Street-Legalize Your Ebike With A Magnet

Getting into e-biking is a great hobby. It can get people on bikes who might otherwise not be physically able to ride, it can speed up commute times, and it can even make hauling lots of stuff possible and easy, not to mention it’s also fun and rewarding. That being said, there are a wide array of conflicting laws around what your e-bike can and can’t do on the road and if you don’t want to run afoul of the rules you may need a programmable device that ensures your e-bike is restricted in the appropriate way.

This build is specifically for Bafang mid drives, which can be up to 1000 W and easily power a bike beyond the speed limit where [Tomblarom] lives. A small microcontroller is housed in a waterproof box on the bike and wired between the motor’s display and controller. A small hall effect sensor and magnet sit by this microcontroller, and if the magnet is removed then the microcontroller reprograms the bike’s controller to limit the speed and also to disable the throttle, another feature that is illegal in some jurisdictions but not others. As an added bonus, the microcontroller also handles brake lights, turn signals, and automatic headlights for the bike as well.

While the project page mentions removing the magnet while getting pulled over to avoid fines and other punishments, that’s on you. We imagine this could still be useful for someone who wants to comply with local laws when riding on the road, but still wants to remove the restrictions when riding on private property or off-road where the wattage and speed restrictions might not apply.

DIY 8-Bit Computer Knows All The Tricks

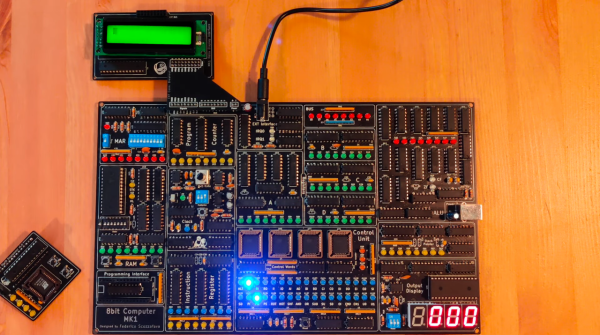
Some projects are a rite of passage within their respected fields. For computer science, building one’s own computer from scratch is certainly among those projects. Of course, we’re not talking about buying components online and snapping together a modern x86 machine. We mean building something closer to a fully-programmable 8-bit computer from the ground up, like this one from [Federico] based on 74LS logic chips.

The computer was designed and built from scratch which is impressive enough, but [Federico] completed this project in about a month as well. It can be programmed manually through DIP switches or via a USB connection to another computer, and also includes an adjustable clock which can perform steps anywhere from 1 Hz to 32 kHz. Complete with a 1024 byte memory, a capable ALU, four seven-segment LEDs and (in the second version of the computer) a 2×16 LCD disply, this 8-bit computer has it all.

Not only is this a capable machine designed by someone who clearly knows his way around a logic chip, but [Federico] has also made the code and schematics available on his GitHub page. It’s worth a read even without building your own, but if you want to go that route without printing an enormous PCB you can always follow the breadboard route.

Thanks to [killergeek] for the tip!

Continue reading “DIY 8-Bit Computer Knows All The Tricks”

Turning A Bad Bench Supply Into A Better Bench Supply

‘Tis the season for dropping hints on what new doodads would make a hacker happy, and we have to admit to doing a little virtual window shopping ourselves. And as a decent bench power supply is on our list, it was no surprise to see videos reviews that the hive mind thinks will help us make a choice pop up in our feed. It’s a magical time to be alive.

What did surprise us was this video on a mashup of two power supplies, both of which we’ve been eyeing, with the result being one nicely hacked programmable bench PSU. It comes to us courtesy of [jeffescortlx], who suffered with one of those no-name, low-end 30V-5A bench supplies that has significant lag when changing the settings, to the point that it’s difficult to use, not to mention dangerous for sensitive components.

So he got a hold of a Riden RD6006 programmable buck converter, which is something like those ubiquitous DPS power supply modules we’ve seen so much of, only on steroids. The Riden takes up to 70V input and turns it into a 0-60V output at up to 6 amps, at constant current or constant voltage. It also just happens to (almost) fit as a replacement for the faceplate of the dodgy old supply. A few SMD resistors simulate the original front panel pots being pegged so that the supply outputs maximum voltage and current, and a little finagling with the case and fan was needed to fit everything up, but the finished product actually looks really good, and fixes all the problems of the original.

We love this hack, and may well cobble this together for our bench.

Continue reading “Turning A Bad Bench Supply Into A Better Bench Supply”

Better Simulators With Homemade Potentiometers

Perhaps you’ve played a flight simulator before, using something like a mouse and keyboard. That’s a fine experience, but like any other activity you can get a lot more out of it if you put a little more effort into the experience. Some will upgrade to a joystick for a modest improvement, and others will build incredible accurate cockpit replicas down to the smallest detail. The builders of these “pits” are always looking for ways of improving their setups, and it’s from this world that we find a method of building specialized, inexpensive hall-effect sensors.

A hall-effect sensor is a circuit that outputs a voltage based on the presence of an external magnetic field. These can be used to make compasses, but with a permanent magnet in close proximity can also be used to create a potentiometer-like device at lower cost and with higher precision than a similarly-priced pot. There was a method of building these in the simulator world using the housing of a Bic pen and some strong glue, but [LocNar] has improved on this method as well. He repurposed some bearings and some stock metal tubing in order to fabricate a professional-level sensor at a fraction of the cost.

This build is essentially a solution for anyone needing a potentiometer that’s easier to build, less expensive, has higher precision, and interacts with a digital input in a much more predictable (and programmable) way. Certainly this has applications in the simulator world, but will work for many other applications. If you’ve never thought about the intricacies (and shortcomings) of potentiometers, some other folks have taken a deep dive into that as well.

Thanks to [Keith O] for the tip!

The Embroidered Computer

By now we’ve all seen ways to manufacture your own PCBs. There are board shops who will do small orders for one-off projects, or you can try something like the toner transfer method if you want to get really adventurous. One thing we haven’t seen is a circuit board that’s stitched together, but that’s exactly what a group of people at a Vienna arts exhibition have done.

The circuit is stitched together on a sheet of fabric using traditional gold embroidery methods for the threads, which function as the circuit’s wires. The relays are made out of magnetic beads, and the entire circuit functions as a fully programmable, although relatively rudimentary, computer. Logic operations are possible, and a functional schematic of the circuit is also provided. Visitors to the expo can program the circuit and see it in operation in real-time.

While this circuit gives new meaning to the term “wearables”, it wasn’t intended to be worn although we can’t see why something like this couldn’t be made into a functional piece of clothing. The main goal was to explore some historic techniques of this type of embroidery, and explore the relationship we have with the technology that’s all around us. To that end, there have been plenty of other pieces of functional technology used as art recently as well, but of course this isn’t the first textile computing element to grace these pages.

Thanks to [Thinkerer] for the tip!


Paper Tape Drive For A Live Performance Music Box

Music is a mystery to some of us. Sure, we know what we like when we hear it, but the idea of actually being able to make it baffles us. And the idea of being able to build new instruments to create it, like this paper-tape programmable music box (YouTube, embedded below), is beyond impressive.

You’ll no doubt remember [Martin Molin] of the group “Wintergatan” and his astounding marble madness music machine. This instrument is on a much more modest scale and is centered around an off-the-shelf paper tape music box. But the cheap plastic drive gears kept failing under performance conditions, so [Martin] headed to what appears to be his cave-based workshop and started grinding. He prototyped a new paper drive from Lego Technics, and while it worked, it needed help to pull the paper. What followed was an iterative design process that culminated in a hybrid of plastic and metal Technic parts that drive the paper reliably, and a musical instrument that’s much more than just a tinny wind-up music box. Hear it in action below with another new instrument, the Modulin, which sounds a little like a Theremin but looks like – ah, just watch the video.

The build video hints at more details to come, and we’re hoping for a complete series like that for the marble machine. We’d also love to see details on the Modulin too – if there ever was a hacked musical instrument, that’s it.

Continue reading “Paper Tape Drive For A Live Performance Music Box”

Simple To Build Programmable Foot Switches

programmable-footswitches

Your hands do a lot of work between the keyboard and the mouse, why the heck are you letting your feet be so lazy? [Dossier van D.] is putting an end to the podiatric sloth. He built this set of three foot pedals which have gone through two versions of functionality.

The buttons themselves are made from a base plate of plywood with a smaller piece on top for each ‘key’. The two parts are separated with some foam carpet pad, with a tactile push button in between to register a click. The only thing we’d change about this is adding a couple of wooden spacers next to the switch so that accidentally sanding on a button doesn’t break that electronic component.

Originally each button was soldered to a gaming controller. This worked just fine using button mapping, but recently [Dossier] made the switch to using an Arduino Leonardo. This is a perfect choice. Unlike input devices made with older Arduino versions the Leonardo board can natively register as a keyboard, making it a snap to programmatically map any key to the switches.

If you like this project you should check out [Dossier’s] foot mouse as well.