Pocket Woodwind MIDI Controller Helps You Carry A Tune

It’s easy to become obsessed with music, especially once you start playing. You want to make music everywhere you go, which is completely impractical. Don’t believe me? See how long you can get away with whistling on the subway or drumming your hands on any number of bus surfaces before your fellow passengers revolt. There’s a better way, and that way is portable USB MIDI controllers.

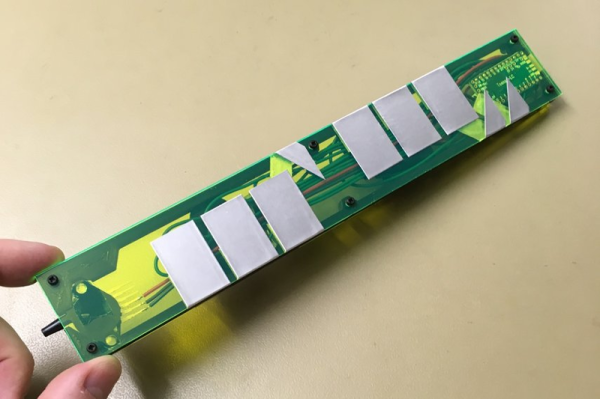
[Johan] wanted a pocket-sized woodwind MIDI controller, but all the existing ones he found were too big and bulky to carry around. With little more than a Teensy and a pressure sensor, he created TeensieWI.  It uses the built-in cap sense library to read input from the copper tape keys, generate MIDI messages, and send them over USB or DIN. Another pair of conductive pads on the back allow for octave changes. [Johan] later added a PSP joystick to do pitch bends, modulation, and glide. This is a simple build that creates a versatile instrument.

You don’t actually blow air into the mouthpiece—just let it escape from the sides of your mouth instead. That might take some getting used to if you’ve developed an embouchure. The values are determined by a pressure sensor that uses piezoresistivity to figure out how hard you’re blowing. There’s a default breath response value that can be configured in the settings.

TeensiWI should be easy to replicate or remix into any suitable chassis, though the UV-reactive acrylic looks pretty awesome. [Johan]’s documentation on IO is top-notch and includes a user guide with a fingering chart. For all you take-my-money types out there, [Johan] sells ’em ready to rock on Tindie. Check out the short demo clips after the break.

We saw a woodwind MIDI controller a few years ago that was eventually outfitted with an on-board synthesizer. Want to build a MIDI controller ? , like this beautiful build that uses hard drive platters as jog wheels.

Continue reading “Pocket Woodwind MIDI Controller Helps You Carry A Tune”

DIY Multi-Touch All The Surfaces

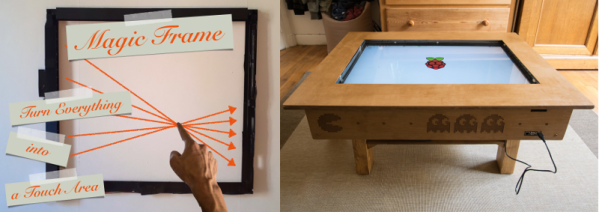
Ever wanted to build a touch table or other touch-input project, but got stuck figuring out the ‘touch’ part? [Jean Perardel] has your back with his multi-touch frame over on IO that makes any surface touch-reactive. In [Jean]’s case, that surface is ultimately a TV inside of a table.

Of course, it’s a bit of a misnomer to say the surface itself becomes touch-reactive. What’s really happening here is that [Jean] is using light triangulation to detect shadows and determine the coordinates of the shadow-casting object. Many barcode scanners and consumer-level document scanners use a contact image sensor (CIS) to detect objects in the path of IR LEDs. These are a low-power, lower-resolution alternative to the CCDs found in high-grade scanners.

As [Jean] explains in the video below, an object placed in the path of a single IR LED facing a sensor array of either type will block the light from reaching the sensors. Keep adding LEDs and their emission angles will begin to overlap, increasing the detection precision. [Jean] reverse engineered a couple of different types of scanners until he found a suitable one. He ended up with CIS that has 2700 light sensors lined up in the space of 20cm (7.87″).

[Jean] designed a 3D-printable frame to hold 96 IR LEDs in stacks of three. A Teensy turns on the LEDs, detects the touch event, calculates the position, and sends those coordinates to a Pi to be displayed on the screen. He eventually went wireless and then built a nice looking touch table to house a 32″ TV.

This is not the only way to build a multi-touch table, nor is it the simplest. Here’s one that uses finger presses to scatter light and an industrial strength projection-based table that was open-sourced a few years ago.

Continue reading “DIY Multi-Touch All The Surfaces”

DIY Nintendo Switch May Be Better Than Real Thing

Nintendo’s latest Zelda-playing device, the Switch, is having no problems essentially printing money for the Japanese gaming juggernaut. Its novel design that bridges the gap between portable and home console by essentially being both at the same time has clearly struck a chord with the modern gamer, and even 8 months after its release, stores are still reporting issues getting enough of the machines to meet demand.

But for our money, we’d rather have the Raspberry Pi powered version that [Tim Lindquist] slaved over for his summer project. Every part of the finished device (which he refers to as the “NinTIMdo RP”) looks professional, from the incredible job he did designing and printing the case down to the small details like the 5 LED display on the top edge that displays volume and battery level. For those of you wondering, his version even allows you to connect it to a TV; mimicking the handheld to console conversion of the real thing.

[Tim] has posted a fascinating time-lapse video of building the NinTIMdo RP on YouTube that covers every step of the process. It starts with a look at the 3D model he created in Autodesk Inventor, and then goes right into the post-printing prep work where he cleans up the printed holes with a Dremel and installs brass threaded inserts for strength. The bulk of the video shows the insane amount of hardware he managed to pack inside the case, a true testament to how much thought was put into the design.

For the software side, the Raspberry Pi is running the ever popular RetroPie along with the very slick EmulationStation front-end. There’s also a Teensy microcontroller on board that handles the low-level functions such as controlling volume, updating the LED display, and mapping the physical buttons to a USB HID device the Raspberry Pi can understand.

The Teensy source code as well as the 3D models of the case have been put up on GitHub, but for a project like this that’s just the tip of the iceberg. [Tim] does mention that he’s currently working on creating a full build tutorial though; so if Santa doesn’t leave a Switch under the tree for you this year, maybe he can at least give you a roll of filament and enough electronics to build your own.

While this isn’t the first time a Raspberry Pi has dressed up as a Nintendo console, it may represent the first time somebody has tried to replicate a current-generation gaming device with one.

Continue reading “DIY Nintendo Switch May Be Better Than Real Thing”

TeensyStep – Fast Stepper Library For Teensy

The Teensy platform is very popular with hackers — and rightly so. Teensys are available in 8-bit and 32-bit versions, the hardware has a bread-board friendly footprint, there are a ton of Teensy libraries available, and they can also run standard Arduino libraries. Want to blink a lot of LED’s? At very fast update rates? How about MIDI? Or USB-HID devices? The Teensy can handle just about anything you throw at it. Driving motors is easy using the standard Arduino libraries such as Stepper, AccelStepper or Arduino Stepper Library.

But if you want to move multiple motors at high micro-stepping speeds, either independently or synchronously and without step loss, these standard libraries become bottlenecks. [Lutz Niggl]’s new TeensyStep fast stepper control library offers a great improvement in performance when driving steppers at high speed. It works with all of the Teensy 3.x boards, and is able to handle accelerated synchronous and independent moves of multiple motors at the high pulse rates required for micro-stepping drivers.

The library can be used to turn motors at up to 300,000 steps/sec which works out to an incredible 5625 rpm at 1/16 th micro-stepping. In the demo video below, you can see him push two motors at 160,000 steps/sec — that’s 3000 rpm — without the two arms colliding. Motors can be moved either independently or synchronously. Synchronous movement uses Bresenham’s line algorithm to plan motor movements based on start and end positions. While doing a synchronous move, it can also run other motors independently. The TeensyStep library uses two class objects. The Stepper class does not require any system resources other than 56 bytes of memory. The StepControl class requires one IntervallTimer and two channels of a FTM  (FlexTimer Module) timer. Since all supported Teensys implement four PIT timers and a FTM0 module with eight timer channels, the usage is limited to four StepControl objects existing at the same time. Check out [Lutz]’s project page for some performance figures.

As a comparison, check out Better Stepping with 8-bit Micros — this approach uses DMA channels as high-speed counters, with each count sending a pulse to the motor.

Thanks to [Paul Stoffregen] for tipping us off about this new library. Continue reading “TeensyStep – Fast Stepper Library For Teensy”

A Vintage Morse Key Turned Into USB Keyboard

Time was when only the cool kids had new-fangled 102-key keyboards with a number pad, arrow keys, and function keys. They were such an improvement over the lame old 86-key layout that nobody would dream of going back. But going all the way back to a one-key keyboard is pretty cool, in the case of this Morse keyer to USB keyboard adapter.

To revive her dad’s old straight key, a sturdy mid-20th century beast from either a military or commercial setup, [Nomblr] started with a proper teardown and cleaning of the brass and Bakelite pounder. A Teensy was chosen for the job of converting Morse to keyboard strokes; careful consideration to the timing of dits and dahs and allowances for contact debouncing were critical to getting the job done. A new wooden base not only provides stability for the key but hides the Teensy and makes for a new presentation. The video below shows it in action; our only complaint is the lack of sidetone to hear the Morse as you pound out that next great novel one click at a time.

Lovingly restored telegraph gear is a bit of a thing around here; we featured this vintage telegraph sounder revived with a Morse code sender not too long ago.

https://www.youtube.com/watch?v=qh_apYcr4xI

[via r/DIY]

Thanks to [Liz] for the tip

MIDI To CV/Gate The Easy Way

Let’s say you’ve got a modular synthesizer. You’re probably a pretty cool person. But all your cool laptop DJ friends keep showing off their MIDI-controlled hardware, and you’re getting jealous. Well, [little-scale] has the build for you.

The Teensy 3.6 is the current top-of-the-line Teensy from PJRC, and it’s [little-scale]’s weapon of choice here. With USB-MIDI and two 12-bit DACs on board, it’s made creating an interface between the worlds of analog and digital music into a remarkably simple job. Control voltages for pitch and velocity are pushed out over the analog pins, while pin 29 is used for gate signals.

It’s a testament to the amount of development that has gone into the Teensy platform that such projects can be built with virtually no off-board components. The build is a further step forward in simplicity from [little-scale]’s previous work, using a Teensy 2 with an offboard DAC to generate the output voltages.

Here at Hackaday, we’ve always been big fans of adding computer control to analog hardware. This CNC mod to a guitar pickup winding machine is a great example.

Print A Flexible Keypad

[Micah Elizabeth Scott] needed a custom USB keyboard that wrapped around a post. She couldn’t find exactly what she wanted so she designed and printed it using flexible Nijaflex filament. You can see the design process and the result in the video below.

The electronics rely on a Teensy, which can emulate a USB keyboard easily. The keys themselves use the old resistor divider trick to allow one analog input on the Teensy to read multiple buttons. This was handy, but also minimized the wiring on the flexible PCB.

The board itself used Pyralux that was milled instead of etched. Most of the PCB artwork was done in KiCAD, other than the outline which was done in a more conventional CAD program.

Continue reading “Print A Flexible Keypad”