Harpsi-Gourd Gets You Into Thanksgiving Spirit

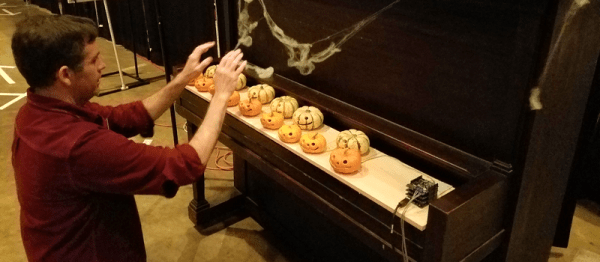
Halloween might be over, but for some of us there’s still another pumpkin-centric holiday right around the corner to give us an excuse to build projects out of various gourds. During a challenge at a local event, [Michael] came up with a virtual cornucopia of uses for all of the squashes he had on hand and built a touch-sensitive piano with all of them.

The musical instrument was dubbed the Harpsi-Gourd and makes extensive use of the Arduino touch-sensitive libraries. Beyond that, the project was constructed to be able to fit into a standard sized upright piano. While only 15 pumpkins are currently employed, the instrument can be scaled up to 48 pumpkins. Presumably they would need to be very small for the lid of the piano to still close.

The Harpsi-Gourd is a whimsical re-imagining of the original Makey Makey which can be used to do all kinds of things, including play Mario Bros. There are all kinds of other food-based musical instruments at your disposal as well, though.

Building Transistors With Transistors

Since the 1940s when the first transistor was created, transistors have evolved from ornery blocks of germanium wrangled into basic amplifiers into thousands and thousands of different devices made of all kinds of material that make any number of electrical applications possible, cheap, and reliable. MOSFETs can come in at least four types: P- or N-channel, and enhancement or depletion mode. They also bear different power ratings. And some varieties are more loved than others; for instance, depletion-mode, N-channel power MOSFETs are comparatively scarce. [DeepSOIC] was trying to find one before he decided to make his own by hacking a more readily available enhancement-mode transistor.

For those not intimately familiar with semiconductor physics, the difference between these two modes is essentially the difference between a relay that is normally closed and one that’s normally open. Enhancement-mode transistors are “normally off” and are easy to obtain and (for most of us) useful for almost all applications. On the other hand, if you need a “normally on” transistor, you will need to source a depletion mode transistor. [DeepSOIC] was able to create a depletion mode transistor by “torturing” the transistor to effectively retrain the semiconductor junctions in the device.

If you’re interested in semiconductors and how transistors work on an atomic level, [DeepSOIC]’s project will keep you on the edge of your seat. On the other hand, if you’re new to the field and looking to get a more basic understanding, look no further than these DIY diodes.

Etching Your Own Metal

It’s been said that with enough soap, one could blow up just about anything. A more modern interpretation of this thought is that with enough knowledge of chemistry, anything is possible. To that end, [Peter] has certainly been doing a good job of putting his knowledge to good use. He recently worked out a relatively inexpensive and easy way to etch metals using some chemistry skill and a little bit of electricity.

After preparing a set of stencils and cleaning the metal work surface, [Peter] sets his work piece in a salt solution. A metal bar is inserted in the other end of the bath, and both it and the work piece are connected to electrodes. The flow of electricity removes some metal from the exposed work surfaces, producing whatever patterns [Peter] wants.

One interesting thing that [Peter] found is that the voltage must stay under 6 volts. This is probably part of the reason it’s relatively easy to etch with even a wall wort. Above that, the iron work piece produces a different ion which can clog the work surface and create undesirable effects. Additionally, since his first experiments with this process he has upgraded the salt bath with magnetic stirrers. He also gets the best results in a very cold environment.

There are many other uses for etching metals, too. Creating your own printed circuit boards comes to mind, but there are plenty of other uses as well. What will you do with this technique?

SNES EPROM Programmer With Arduino

Most video game manufacturers aren’t too keen on homebrew games, or people trying to get more utility out of a video game system than it was designed to have. While some effort is made to keep people from slapping a modchip on an Xbox or from running an emulator for a Playstation, it’s almost completely impossible to stop some of the hardware hacking that is common on older cartridge-based games. The only limit is usually the cost of an EPROM programmer, but [Robson] has that covered now with his Arduino-based SNES EPROM programmer.

Normally this type of hack involves finding any cartridge for the SNES at the lowest possible value, burning an EPROM with the game that you really want, and then swapping the new programmed memory with the one in the worthless cartridge. Even though most programmers are pricey, it’s actually not that difficult to write bits to this type of memory. [Robson] runs us through all of the steps to get an Arduino set up to program these types of memory, and then puts it all together into a Super Nintendo where it looks exactly like the real thing.

If you don’t have an SNES lying around, it’s possible to perform a similar end-around on a Sega Genesis as well. And, if you’re more youthful than those of us that grew up in the 16-bit era, there’s a pretty decent homebrew community that has sprung up around the Nintendo DS and 3DS, too.

Thanks to [Rafael] for the tip!

Electromagnetic Pulse: Pure Hollywood?

Imagine you’re in charge of a major heist. Right as your crew is about to rob the main vault, you need all of the electronics in the building to fail at exactly the right moment with no other collateral damage (except, maybe, to your raggedy panel van). Obviously you will turn to one of the entertainment industry’s tired tropes, the electromagnetic pulse! The only problem is that if you were to use a real one rather than a Hollywood prop either there would be practically no effect, a large crater where the vault used to be, or most of humanity would be in deep trouble. After all, the real world isn’t quite as convenient as the movies make it seem.

emp-electromagnetic-pulse-jra-1cg_wq4mp4-shot0001Our curiosity into this phenomenon was piqued when we featured an “EMP generator” from [FPS Weapons]. The device doesn’t create an enrapturing movie-esque EMP pulse suitable for taking down a casino or two, but it does spew a healthy amount of broadband electromagnetic interference (EMI) in every direction. It probably also doesn’t send the EMI very far; as we’ve seen in many other projects, it’s hard to transfer energy through the air. It got us wondering, though: what is the difference between being annoying and creating a weapon? And, is there any practical use for a device like this?

Continue reading “Electromagnetic Pulse: Pure Hollywood?”

Amazon Dash Reboots Your Pi

We all know feature creep can be a problem in almost any project. A simple idea can often become unusable if a project’s scope isn’t clearly defined in the beginning. However, the opposite problem sometimes presents itself: forgetting to include a key feature. [Zach] had this problem when he built a Raspberry Pi magic mirror and forgot to build a physical reset/shutoff switch. Luckily he had a spare Amazon Dash button and re-purposed it for use with his Pi.

The Raspberry Pi doesn’t include its own on/off switch. Without installing one yourself, the only way to turn off the device (without access to the terminal) is to unplug it, which can easily corrupt data on the SD card. Since [Zach]’s mirror was already complete, he didn’t want to take the entire thing apart just to install a button. There’s already a whole host of applications for the Dash button, so with a little Node.js work on the Raspberry Pi he was able to configure a remote-reset button for his mirror.

This is a similar problem for most Raspberry Pi owners, so if you want to follow [Zach]’s work he has done a great job detailing his process on his project site. If you’re looking for other uses for these convenient network-enabled buttons, he also links to a Github site with lots of other projects. This pizza button is probably our favorite, though.

Tiny Pipe Organ Needs Tiny Church

There are a lot of unusual listings on eBay. If you’re wondering why someone would have a need for shredded cash, or a switchblade comb, or some “unicorn meat” (whatever that is), we’re honestly wondering the same thing. Sometimes, though, a listing that most people would consider bizarre finds its way to the workbench of someone with a little imagination. That was the case when [tinkartank] found three pipe organ pipes on eBay, bought them, and then built his own drivers.

The pipes have pitches of C, D, and F# (which make, as far we can tell, a C add9 flat5 no3 chord). [tinkartank] started by firing up the CNC machine and creating an enclosure to mount the pipes to. He added a church-like embellishment to the front window, and then started working on the controls for the pipes. Each pipe has its own fan, each salvaged from a hot air gun. The three are controlled with an Arduino. [tinkartank] notes that the fan noise is audible over the pipes, but there does seem to be an adequate amount of air going to each pipe.

This project is a good start towards a fully functional organ, provided [tinkartank] gets lucky enough to find the rest of the pipes from the organ. He’s already dreaming about building a full-sized organ of sorts, but in the meantime it might be interesting to use his existing pipes to build something from Myst.