RasPi Doorbell

Raspberry Pi Doorbell Is Fully Featured

When you think of a doorbell, you typically don’t think of anything very complicated. It’s a button that rings a bell inside your home. That’s about it. [Ahmad] decided he wanted to turn his doorbell up to eleven (Google Doc) with this build. Using a Raspberry Pi, he was able to cram in loads of features.

When the doorbell button is pressed, many different events can be triggered. In the demo video, [Ahmad] shows how his phone receives a text message, and email, and a tweet. The system can even be configured to place a voice call via Google Hangouts using a USB microphone. [Ahmad] demonstrates this and shows how the voice call is placed almost instantly when the button is pressed. This may be a bit overkill, but it does demonstrate many different options depending on your own needs.

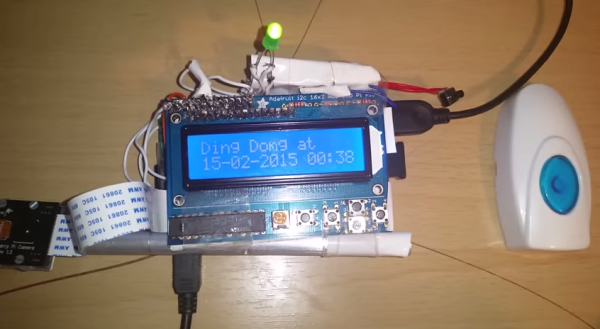
For the hardware side of things, [Ahmad] purchased a wireless doorbell. He opened up the ringer unit and hooked up the speaker wires to a couple of pins on the Raspberry Pi through a resistor. The doorbell unit itself is powered off of the 3.3V supply from the Pi. The Pi also has a small LCD screen which shows helpful information such as if the Internet connection is working. The screen will also display the last time and date the doorbell was pressed, in case you weren’t home to answer the door.

On top of all of that, the system also includes a Raspberry Pi camera module. This allows [Ahmad] to take a photo of the person ringing the doorbell as a security measure. He can even view a live video feed from the front door by streaming directly to YouTube live. [Ahmad] has provided a link to his Pi image in the Google Doc so others can use it and modify it as they see fit. Continue reading “Raspberry Pi Doorbell Is Fully Featured”

Pain Box Project

Making The Dune “Pain Box” A Reality

If you are unfamiliar with Dune, then you may not know what the pain box is. The pain box is a fictional device that produces an excruciating burning sensation without causing any actual damage. [Bryan] has been working on a project to duplicate this effect in the real world. It sounds like he may be on the right path by using the “thermal grill illusion”.

The thermal grill illusion is a sensory trick originally demonstrated back in 1896. The trick is made up of two interlaced grills. One is cool to the touch, and the other is warm. If the user touches a single grill, they won’t experience any pain because neither temperature is very extreme. However if the user places their hand over the interlaced grills simultaneously they will immediately experience a burning heat. This usually causes the person to pull their hand away immediately. It’s a fun trick and you can sometimes see examples of it at science museums.

The thermal grill illusion sounded like the perfect way to make the pain box a reality. [Bryan] has set specific constraints on this build to make it more true to the Dune series. He wants to ensure the entire package fits into a small box, just big enough to place an adult hand inside. He also wants to keep safety in mind, since it has the potential to actually cause harm if it were to overheat.

[Bryan] has so far tried two methods with varying success. The first attempt involved using several thermoelectric coolers (TECs). [Bryan] had seen PCBs etched a certain way allowing them to radiate heat. We’ve seen this before in 3D printer surfaces. He figured if they could become hot, then why couldn’t they become cold too? His idea was very simple. He etched a PCB that had just two large copper pours. Each one branched out into “fingers” making up the grill.

Each side of the grill ultimately lead to a flat surface to which a TEC was mounted. One side was cold and the other was hot. Heat sinks we attached to the open side of the TECs to help with performance. Unfortunately this design didn’t work. The temperature was not conducted down to the fingers at all. The back side of the PCB did get hot and cold directly under the TECs, but that wouldn’t work for this illusion.

The latest version of the project scraps the PCB idea and uses small diameter copper tubing for the grill. [Bryan] is working with two closed loop water systems. One is for warm water and the other is for cold. He’s using an aquarium pump to circulate the water and the TECs to actually heat or cool the water. The idea is that the water will change the temperature of the copper tubing as it flows through.

While the results so far are better than the previous revision, unfortunately this version is having problems of its own. The hot water eventually gets too hot, and it takes over an hour for it to heat up in the first place. On top of that, the cold water never quite gets cold enough. Despite these problems, [Bryan] is hopefully he can get this concept working. He has several ideas for improvements listed on his blog. Maybe some Hackaday readers can come up with some clever solutions to help this project come to fruition.

Plastic Mallet

Turning Plastic Milk Jugs Into A Useful Tool

[Peter] obviously enjoys getting to work in his wood shop. He also likes turning things into other things. With his latest project, he combines his two hobbies by turning plastic milk jugs into a plastic joiner’s mallet.

[Peter] started out by collecting and “processing” the milk jugs. Milk jugs are commonly made with HDPE. HDPE is a petroleum-based plastic with a high strength-to-density ratio. It’s easy to recycle, which makes it perfect for this type of project. We’ve even seen this stuff recycled into 3D printer filament in the past. The “processing” routine actually just consists of cutting apart the jugs with a razor blade. [Peter] mentions in the past that he’s used a blender to do this with much success, but he’s unfortunately been banned from using the blender.

Next, all of the plastic pieces are piled up on a metal try to placed into a small toaster oven. They are melted into one relatively flat, solid chunk. This process is performed three times. The final step was to pile all three chunks on top of each other and melt them into one massive chunk of plastic.

While waiting for the plastic to melt together, [Peter] got to work on the handle. He put his woodworking skills to good use by carving out a nice wooden handle from a piece of cherry wood.  The handle was carefully shaped and sanded with a variety of tools. It is finished with some linseed oil for a nice professional look.

When the plastic was mostly melted together, [Peter] had to get to work quickly while the plastic was still soft. He pried the plastic off of the metal tray and stuffed it into a rectangular mold he made from some fiber board. He used a heat gun to soften the plastic as needed while he crammed it all into the mold. With the mold suitably stuffed, he closed it up and clamped it all shut.

Once the plastic cooled, [Peter] had to cut it into the correct shape and size. He took the solid chunk of plastic to his band saw to cut all the appropriate angles. He then used both a drill press and a chisel to cut the rectangular mounting hole for the handle. The plastic piece was then shaped into its final form using a belt sander. All that [Peter] had left to do was slide it up and only the handle. The shape of the handle and mounting hole prevent the plastic piece from flying off of the top of the handle. Check out the video below to see the whole process. Continue reading “Turning Plastic Milk Jugs Into A Useful Tool”

Plant Watering System

Automated Plant Watering System Uses Car Parts

[Shane] recently built an automated plant watering system for his home. We’ve seen several similar projects before, but none of them worked quite like this one. Shane’s system is not hooked into the house plumbing and it doesn’t use any off-the-shelf electronic valves.

Instead, [Shane’s] build revolves around a device that looks like it was intended to spray weed killer. The unit works sort of like a Super Soaker. The user fills the jug with water and then pumps a handle multiple times to build up some pressure inside the jug. Then a button can be pressed and the air pressure forces water out of the nozzle. [Shane] came up with a way to automate all of these mechanical motions.

First [Shane] had to find a way to pump up the bottle. He purchased a car door electronic lock actuator from eBay. It’s a pretty simple device. It’s just a DC motor with a gear box that turns the rotational motion of the motor into linear motion. This is mounted to a wooden jig and attached to the pump. A dsPIC microcontroller rotates the motor back and forth, which in turn pumps up the bottle.

The dsPic is also hooked up to a small servo. The servo is mounted to the same wooden jig as the car door actuator. A small arm is mounted to the servo so that when it rotates, the arm presses the pressure release button. This sends the water out of the bottles nozzle. [Pat] hooked up a small length of hose to the nozzle so he can direct the water into his plants. The video below demonstrates how the unit works. Continue reading “Automated Plant Watering System Uses Car Parts”

Wireless SNES Controller

SNES Controller Modified To Be Completely Wireless

[Pat] was looking for a way to wirelessly control his Fire TV unit. He could have just went with one of many possible consumer products, but he decided to take it a step further. He modified a unit to fit inside of an original SNES controller. All of the buttons are functional, and the controller even features a wireless charger.

[Pat] started out with a Bluetooth video game controller marketed more playing video games on tablets. The original controller looked sort of like an XBox controller in shape. [Pat] tore this controller open and managed to stuff the guts into an original SNES controller. He didn’t even have to remove the original SNES PCB. [Pat] mentions that it was rather tedious to rewire all of the buttons from the original controller, but in the end it wasn’t too difficult. The only externally visible modification to the original controller is a small hole that was made for a power button.

In order to make this unit completely wireless, [Pat] also installed a Qi wireless charging module. Now, placing the controller on a charging pad will charge up the small LiPo battery in just about 45 minutes. This controller would be the perfect addition to a RetroPi or other similar project. If you’re not into Bluetooth, you can try using a Logitech receiver instead. Continue reading “SNES Controller Modified To Be Completely Wireless”

Fake Certificate

Lenovo Shipped PC’s With Spyware That Breaks HTTPS

If you’ve ever purchased a new computer then you are probably familiar with the barrage of bloatware that comes pre-installed. Usually there are system tools, antivirus software trials, and a whole bunch of other things that most of us never wanted in the first place. Well now we can add Superfish spyware to the list.

You may wonder what makes this case so special. A lot of PC’s come with software pre-installed that collect usage statistics for the manufacturer. Superfish is a somewhat extreme case of this. The software actually installs a self-signed root HTTPS certificate. Then, the software uses its own certificates for every single HTTPS session the user opens. If you visit your online banking portal for example, you won’t actually get the certificate from your bank. Instead, you’ll receive a certificate signed by Superfish. Your PC will trust it, because it already has the root certificate installed. This is essentially a man in the middle attack performed by software installed by Lenovo. Superfish uses this ability to do things to your encrypted connection including collecting data, and injecting ads.

As if that wasn’t bad enough, their certificate is actually using a deprecated SHA-1 certificate that uses 1024-bit RSA encryption. This level of encryption is weak and susceptible to attack. In fact, it was reported that [Rob Graham], CEO of Errata Security has already cracked the certificate and revealed the private key. With the private key known to the public, an attacker can easily spoof any HTTPS certificate and systems that are infected with Superfish will just trust it. The user will have no idea that they are visiting a fake phishing website.

Since this discovery was made, Lenovo has released a statement saying that Superfish was installed on some systems that shipped between September and December of 2014. They claim that server-side interactions have been disabled since January, which disables Superfish. They have no plans to pre-load Superfish on any new systems.

Nexus 7 Dashboard

Custom Double-Din Mount For Nexus 7 Carputer

Many new vehicles come with computers built into the dashboard. They can be very handy with features like GPS navigation, Bluetooth connectivity, and more. Installing a computer into an older car can sometimes be an expensive process, but [Florian] found a way to do it somewhat inexpensively using a Nexus 7 tablet.

The size of the Nexus 7 is roughly the same as a standard vehicle double-din stereo slot. It’s not perfect, but pretty close. [Florian] began by building a proof of concept mounting bracket. This model was built from sections of MDF hot glued and taped together. Plastic double-din mounting brackets were attached the sides of this new rig, allowing it to be installed into the dashboard.

Once [Florian] knew that the mounting bracket was feasible, it was time to think about power. Most in-vehicle devices are powered from the cigarette lighter adapter. [Florian] went a different direction with this build. He started with a cigarette lighter to USB power adapter, but he cut off the actual cigarette lighter plug. He ended up wiring this directly into the 12V line from the stereo’s wiring harness. This meant that the power cord could stay neatly tucked away inside of the dashboard and also leave the cigarette lighter unused.

[Florian] then wanted to replace the MDF frame with something stronger and nicer. He modeled up his idea in Solidworks to make sure the measurements would be perfect. Then the pieces were all laser cut at his local Techshop. Once assembled, the plastic mounting brackets were placed on the sides and the whole unit fit perfectly inside of the double-din slot.

When it comes to features, this van now has it all. The USB hub allows for multiple USB devices to be plugged in, meaning that Nexus only has a single wire for both power and all of the peripherals. Among these peripherals are a USB audio interface, an SD card reader, and a backup camera. There is also a Bluetooth enabled OBD2 reader that can monitor and track the car’s vitals. If this project seems familiar to you, it’s probably because we’ve seen a remarkably similar project in the past.