Dreamcast Controller

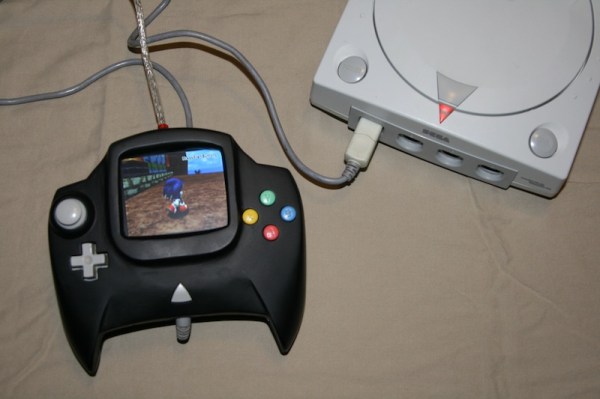
A SEGA Dreamcast Controller With A Built-in Screen

[Fibbef] was hard at work on a project for a build-off competition when he accidentally fried the circuit board. Not one to give up easily, he opted to start a new project with only two days left in the competition. He managed to modify a SEGA Dreamcast controller to hold a color screen in that short amount of time.

The Dreamcast controller’s shape is somewhat conducive to this type of mod. It already has a small window to ensure the view of the visual memory card is not obstructed. Unfortunately [Fibbef’s] screen was a bit too large for this window. That meant he would have to expand the controller and the circuit board.

After taking the controller apart, he desoldered the memory card connectors. He then cut the circuit board cleanly in half vertically. He had to re-wire all of the traces back together by hand. It turned out initially that he had messed something up and accidentally fried the right half of the controller. To fix it, he cut a second controller in half and soldered the two boards together.

With some more horizontal space to work with on the PCB side of things, [Fibbef] now needed to expand the controller’s housing. He cut the controller into several pieces, making sure to keep the start button centered for aesthetics. He then used duct tape to hold popsicle sticks in place to make up for the missing pieces of the case. All of the sticks were then covered with a thick layer of ABS cement to make for a more rigid enclosure. All of this ended up being covered in Bondo, a common trick in video game console mods. It was then sanded smooth and painted with black primer to make for a surprisingly nice finish.

The screen itself still needed a way to get power and a video signal. [Fibbef] built an adapter box to take both of these signals and pass them to the controller via a single cable. The box as a USB-A connector for power input, and a composite connector for video. There’s also a USB-B connector for the output signals. [Fibbef] uses a standard printer USB cable to send power and video signals to the controller. The end result looks great and serves to make the Dreamcast slightly more portable. Check out the demo video below to see it in action. Continue reading “A SEGA Dreamcast Controller With A Built-in Screen”

HotWheels

DIY Hot Wheels Drag Race Timer

[Apachexmd] wanted to do something fun for his three-year-old son’s birthday party. Knowing how cool race cars are, he opted to build his own Hot Wheels drag race timer. He didn’t take the easy way out either. He put both his electronics and 3D printing skills to the test with this project.

The system has two main components. First, there’s the starting gate. The cars all have to leave the gate at the same time for a fair race, so [Apachexmd] needed a way to make this electronically controlled. His solution was to use a servo connected to a hinge. The hinge has four machine screws, one for each car. When the servo is rotated in one direction, the hinge pushes the screws out through holes in the track. This keeps the cars from moving on the downward slope. When the start button is pressed, the screws are pulled back and the cars are free to let gravity take over.

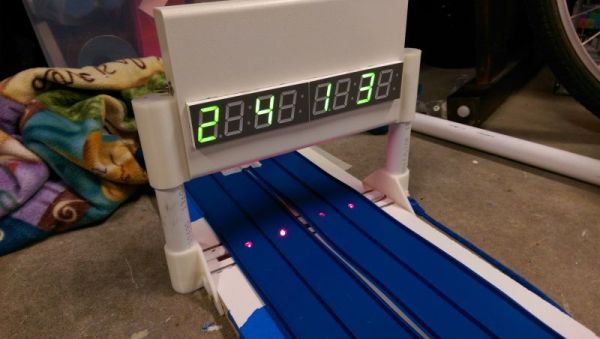
The second component is the finish line. Underneath the track are four laser diodes. These shine upwards through holes drilled into the track. Four phototransistors are mounted up above. These act as sensors to detect when the laser beam is broken by a car. It works similarly to a laser trip wire alarm system. The sensors are aimed downwards and covered in black tape to block out extra light noise.

Also above the track are eight 7-segment displays; two for each car. The system is able to keep track of the order in which the cars cross the finish line. When the race ends, it displays which place each car came in above the corresponding track. The system also keeps track of the winning car’s time in seconds and displays this on the display as well.

The system runs on an Arduino and is built almost exclusively out of custom designed 3D printed components. Since all of the components are designed to fit perfectly, the end result is a very slick race timer. Maybe next [Apachexmd] can add in a radar gun to clock top speed. Check out the video below to see it in action. Continue reading “DIY Hot Wheels Drag Race Timer”

Wifi Antenna

Simple Directional WiFi Antenna

Back in 2007, [Stathack] rented an apartment in Thailand. This particular apartment didn’t include any Internet access. It turned out that getting a good connection would cost upwards of $100 per month, and also required a Thai identification card. Not wanting to be locked into a 12-month contract, [Stathack] decided to build himself a directional WiFi antenna to get free WiFi from a shop down the street.

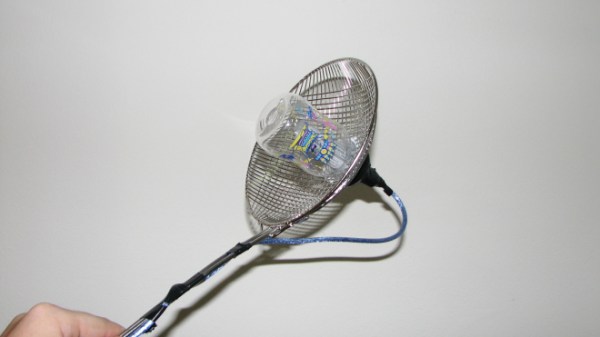
The three main components of this build are a USB WiFi dongle, a baby bottle, and a parabolic Asian mesh wire spoon. The spoon is used as a reflector. The parabolic shape means that it will reflect radio signals to a specific focal point. The goal is to get the USB dongle as close to the focal point as possible. [Stathack] did a little bit of math and used a Cartesian equation to figure out the optimal location.

Once the location was determined, [Stathack] cut a hole in the mesh just big enough for the nipple of the small baby bottle. The USB dongle is housed inside of the bottle for weatherproofing. A hole is cut in the nipple for a USB cable. Everything is held together with electrical tape as needed.

[Stathack] leaves this antenna on his balcony aiming down the street. He was glad to find that he is easily able to pick up the WiFi signal from the shop down the street. He was also surprised to see that he can pick up signals from a high-rise building over 1km away. Not bad for an antenna made from a spoon and a baby bottle; plus it looks less threatening than some of the cantenna builds we’ve seen.

PasswordManagerCode

Tearing Apart An Android Password Manager

With all of the various web applications we use nowadays, it can be daunting to remember all of those passwords. Many people turn to password management software to help with this. Rather than remembering 20 passwords, you can store them all in a (presumably) secure database that’s protected by a single strong password. It’s a good idea in theory, but only if the software is actually secure. [Matteo] was recently poking around an Android password management software and made some disturbing discoveries.

The app claimed to be using DES encryption, but [Matteo] wanted to put this claim to the test. He first decompiled the app to get a look at the code. The developer used some kind of code obfuscation software but it really didn’t help very much. [Matteo] first located the password decryption routine.

He first noticed that the software was using DES in ECB mode, which has known issues and really shouldn’t be used for this type of thing. Second, the software simply uses an eight digit PIN as the encryption key. This only gives up to 100 million possible combinations. It may sound like a lot, but to a computer that’s nothing. The third problem was that if the PIN is less than eight characters, the same digits are always padded to the end to fill in the blanks. Since most people tend to use four digit pins, this can possibly lower the total number of combinations to just ten thousand.

As if that wasn’t bad enough, it actually gets worse. [Matteo] found a function that actually stores the PIN in a plain text file upon generation. When it comes time to decrypt a password, the application will check the PIN you enter with the one stored in the plain-text file. So really, you don’t have to crack the encryption at all. You can simply open the file and reveal the PIN.

[Matteo] doesn’t name the specific app he was testing, but he did say in the Reddit thread that the developer was supposedly pushing out a patch to fix these issues. Regardless, it goes to show that before choosing a password manager you should really do some research and make sure the developer can be trusted, lest your secrets fall into the wrongs hands.

[via Reddit]

iram

PCI I-RAM Working Without A PCI Slot

[Gnif] had a recent hard drive failure in his home server. When rebuilding his RAID array, he decided to update to the ZFS file system. While researching ZFS, [Gnif] learned that the file system allows for a small USB cache disk to greatly improve his disk performance. Since USB is rather slow, [Gnif] had an idea to try to use an old i-RAM PCI card instead.

The problem was that he didn’t have any free PCI slots left in his home server. It didn’t take long for [Gnif] to realize that the PCI card was only using the PCI slot for power. All of the data transfer is actually done via a SATA cable. [Gnif] decided that he could likely get by without an actual PCI slot with just a bit of hacking.

[Gnif] desoldered a PCI socket from an old faulty motherboard, losing half of the pins in the process. Luckily, the pins he needed still remained. [Gnif] knew that DDR memory can be very power-hungry. This meant that he couldn’t only solder one wire for each of the 3v, 5v, 12v, and ground pins. He had to connect all of them in order to share the current load. All in all, this ended up being about 20 pins. He later tested the current draw and found it reached as high as 1.2 amps, confirming his earlier decision. Finally, the reset pin needed to be pulled to 3.3V in order to make the disk accessible.

All of the wires from his adapter were run to Molex connectors. This allows [Gnif] to power the device from a computer power supply. All of the connections were covered in hot glue to prevent them from wriggling lose.

Vacuum Tube

Vacuum Tube Repair After A Spectacular Failure

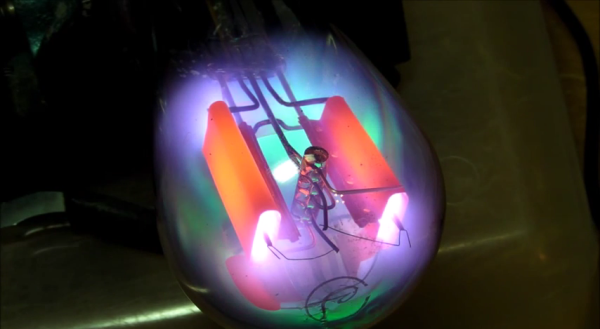
[Eric] has an Atwater Kent 55C AM radio from the early 1900’s. He’s been trying to restore the radio to proper working condition. His most recent pain has been with the rectifier tube. The tube is supposed to have a complete vacuum inside, but that’s not the case here. When the tube is powered up, it glows a beautiful violet color. It may look pretty, but that’s indicative that gas has leaked into the tube. It needed to be replaced.

[Eric] had a tube that would serve as a good replacement, but it’s plug didn’t fit the socket properly. He was going to have to use this old broken tube to make an adapter. Rather than just tearing the old tube apart, he decided to have some fun with it first. He hooked it up to a variac, an ammeter, and a volt meter. Then he slowly increased the voltage to see what would happen. The result was visually stunning.

The tube starts out with the same violet/blue glowing [Eric] experienced previously. As the voltage increases, it gets more and more intense. Eventually we start to see some green colors mixing in with the violets. [Eric’s] reaction to this unexpected result is priceless. As the tube gets increasingly hot, the anode starts glowing an orange-red color. Finally, the filament starts to crackle like a sparkler before the tube just gives up and completely fails.

After the light show, [Eric] moves on to replacing the tube. He begins by tapping on the old tube’s socket with the end of a screwdriver. After much tapping, the glass starts to come lose from the socket. After a bit of wiggling and twisting the tube finally came free from the socket. [Eric] luckily had an unused octal socket that fit perfectly inside of the old socket. All he needed to do to build his adapter was to connect the four pins from the old adapter to the proper pins on the octal socket. Piece of cake.

…Or so [Eric] thought. After testing some new tubes with a tube tester, he realized he had soldered all four pins incorrectly. On top of that, he had super glued the adapter together. He eventually got the two pieces apart. This time he removed all of the unused pins from the octal socket so he wouldn’t get it wrong. Another run on the tube tester confirmed that everything looked good. After plugging the tube into the radio, it worked just as expected

If you need fabrication rather than repair, we’ve got you covered there as well. Check out [Charles Alexanian’s] process for making new vacuum tubes in his garage. Now if you just have too darn many of them around, you can always decorate your pad with ’em.

Continue reading “Vacuum Tube Repair After A Spectacular Failure”

Dial

Dial Is A Simple And Effective Wireless Media Controller

[Patrick] was looking for an easier way to control music and movies on his computer from across the room. There is a huge amount of remote control products that could be purchased to do this, but as a hacker [Patrick] wanted to make something himself. He calls his creation, “Dial” and it’s a simple but elegant solution to the problem.

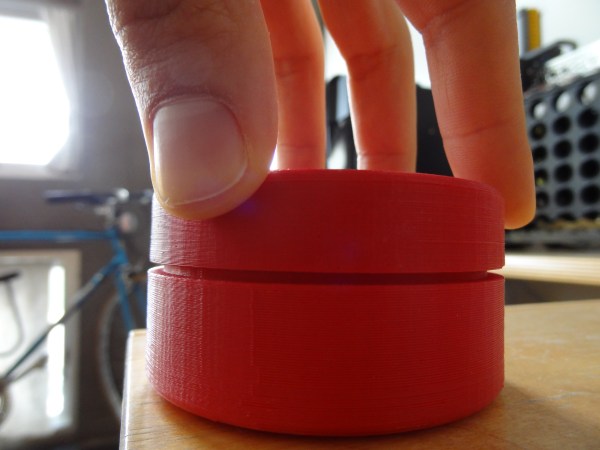
Dial looks like a small cylindrical container that sits on a flat surface. It’s actually split into a top and bottom cylinder. The bottom acts as a base and stays stationary while the top acts as a dial and a push button. The case was designed in SOLIDWORKS and printed on a 3D printer.

The Dial runs on an Arduino Pro mini with a Bluetooth module. The original prototype used Bluetooth 2.0 and required a recharge after about a day. The latest version uses the Bluetooth low energy spec and can reportedly last several weeks on a single charge. Once the LiPo battery dies, it can be recharged easily once plugged into a USB port.

The mechanical component of the dial is actually an off-the-shelf rotary encoder. The encoder included a built-in push button to make things easier. The firmware is able to detect rotation in either direction, a button press, a double press, and a press-and-hold. This gives five different possible functions.

[Patrick] wrote two pieces of software to handle interaction with the Dial. The first is a C program to deal with the Bluetooth communication. The second is actually a set of Apple scripts to actually handle interaction between the Dial and the various media programs on his computer. This allows the user to more easily write their own scripts for whatever software they want. While this may have read like a product review, the Dial is actually open source! Continue reading “Dial Is A Simple And Effective Wireless Media Controller”