Teardown: 168-in-1 Retro Handheld Game

The holidays are upon us, and that can mean many furrowed brows trying to figure out what token gift they can give out this year as stocking-stuffers. Something that’s a bit more interesting than a coupon book or a lotto scratcher, but also affordable enough that you can buy a few of them without having to take part in that other great holiday tradition: unnecessary credit debit.

Includes the NES classic Super Militarized Police Bros 3

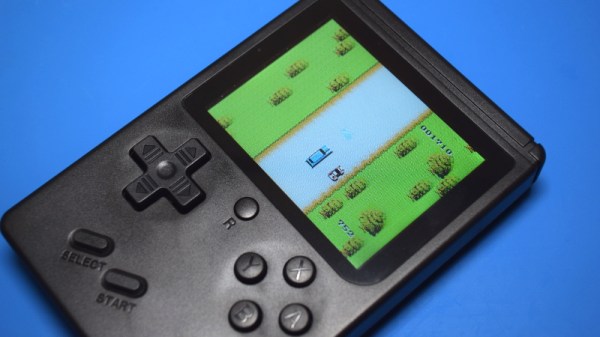
Which is how I came to possess, at least temporarily, one of these cheap handheld multi-games that are all over Amazon and eBay. The one I ordered carries the brand name Weikin, but there are dozens of identical systems available, all being sold at around the same $20 USD price point. With the outward appearance of a squat Game Boy, these systems promise to provide precisely 168 games for your mobile enjoyment, and many even include a composite video out cable and external controller for the less ambulatory classic game aficionado.

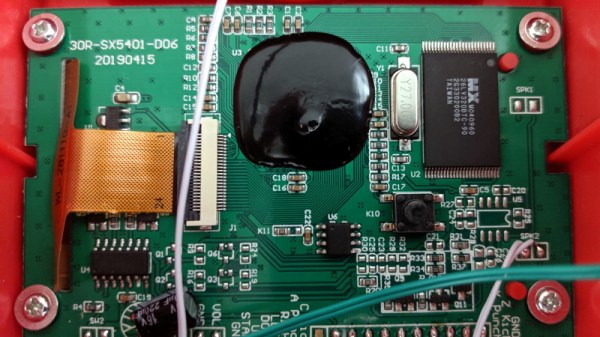
At a glance, the average Hackaday reader will probably see right through this ploy. Invariably, these devices will be using some “NES on a Chip” solution to emulate a handful of legitimate classics mixed in with enough lazy ROM hacked versions of games you almost remember to hit that oddly specific number of 168 titles. It’s nearly a foregone conclusion that at the heart of this little bundle of faux-retro gaming lies a black epoxy blob, the bane of hardware tinkerers everywhere.

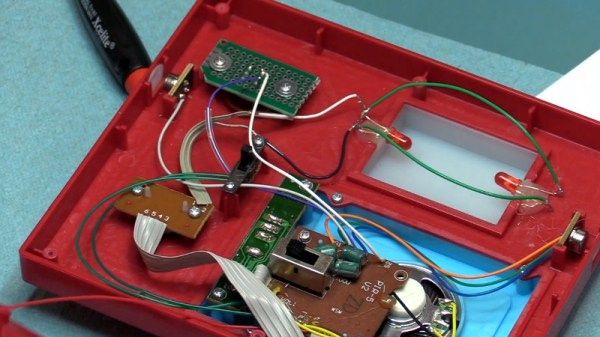
Of course, there’s only one way to find out. Let’s crack open one of these budget handhelds to see what cost reduction secrets are inside. Have the designers secured their place on the Nice List? Or have we been sold the proverbial lump of coal?

Continue reading “Teardown: 168-in-1 Retro Handheld Game”

Guitar Effect Built From An Old Record Player

With little more than a gutted record player, a light bulb, and the legendary 555 timer IC, [Jacob Ellzey] has constructed this very slick optical tremolo effect for his guitar. By modulating the volume of the input signal, the device creates the wavering effect demonstrated in the video after the break.

The key is a vinyl record with large tabs cut out of it. As the record spins, these voids alternately block and unblock a small incandescent bulb. A common GL5537 photoresistor, mounted on the arm that originally held the player’s needle, picks up the varying light levels and passes that on to the electronics underneath the deck. An important note here is that different spacing and sizing of the cutouts will change the sound produced by the effect. [Jacob] has already produced a few different designs and plans on experimenting with more now that the electronics are completed.

Under the hood there’s a voltage divider and low gain amplifier connected to the photoresistor, and also a 555 timer circuit that’s driving the incandescent bulb. Once he was done fiddling with them, the circuit was moved to a neat little protoboard. A pair of potentiometers mounted through the side of the record player allow for adjusting the depth of the effect itself, as well as the output volume. Naturally, there’s also an external foot pedal that allows keying the effect on and off without taking your hands from the guitar.

As is usually the case, everything was going well on this project until the final moments, when [Jacob] found that the circuit and bulb were both browning out when powered from the same transformer. As a quick fix, he gutted a Keurig and used its transformer to drive the light bulb by itself. With independent power supplies, he was ready to rock.

Of course this isn’t the first time we’ve seen a piece of consumer electronics modified into a guitar effect, but if you’re looking for something a bit more built for purpose, there’s plenty of high-tech options to keep you busy.

Continue reading “Guitar Effect Built From An Old Record Player”

RC Strandbeest Is A Head Above The Rest

Prolific maker [Jeremy Cook] recently put the finishing touches (at least, for now) on his impressive ClearCrawler remote controlled Strandbeest, which includes among other things a surprisingly expressive “head” complete with LED matrix eyes. For anyone in the audience who was only mildly terrified of these multi-legged robotic beasties before, you may want to avert your eyes from the video after the break.

The clever locomotive design of [Theo Jansen] known as Strandbeest is a legged walker. What makes it special is that the legs themselves are not independent, but work together for a gliding action more akin to wheeled bots. [Jeremy’s] work with ClearCrawler has taken this to another level of precision and mechanization.

Before installation of the electronics, the ClearCrawler had to be tethered to a bench power supply, and could only move forward and backward. Once the locomotion was working as expected, [Jeremy] was ready to install some brains into the beast.

The robot is controlled by a dual motor driver and an Arduino Nano socketed in an I/O expansion board. Communication between the Nano onboard the walker and the hand-held remote control is provided by of a pair of nRF24L01 modules. The controller itself is a simple affair, comprised of a joystick shield plugged into an Arduino Uno.

The robot’s head is made up of a chunk of clear polycarbonate tube with a 3D printed internal frame to hold the dual 8×8 LED matrices that serve as its animated eyes. This arrangement is mounted on a servo pan and tilt mount, which is controlled by an analog stick on the controller. While the head doesn’t currently serve any practical function, it does give [Jeremy] a chance to emote a bit with his creation; a popular trick when he shows the ClearCrawler off.

A few years ago we covered this robot’s predecessor, the considerably larger ClearWalker. While that machine was surely a beauty to behold, this smaller and more agile iteration of the concept is quite a bit more practical.

Continue reading “RC Strandbeest Is A Head Above The Rest”

From Fail To Wail: Guitar Picks Made From 3D Printed Waste

Between failed prints and iterative designs that need a few attempts before you nail them down, a certain amount of wasted material is essentially unavoidable when 3D printing. The good news is that PLA is a bioplastic and can be broken down via industrial composting, but even still, any method that allows you to reuse this material at home is worth taking a look at.

In a recent video, [Noah Zeck] details one potential use for your scrap plastic by turning his failed 3D prints into guitar picks. The idea here could really be applied to anything you can make out of thin plastic sheeting, but the fact that you can easily and cheaply produce picks with a commercially available punch makes this application particularly appealing.

The first step in this process is about as low-tech as it gets: wrap your scrap printed parts in rags, and beat them with a sledge hammer. This breaks them up into smaller and more manageable pieces, which is important for the next step. If the parts are small enough and you’ve got a decently powerful blender you don’t mind devoting to plastic recycling, we imagine that would make short work of this step as well.

Once suitably pulverized, [Noah] puts the plastic on a piece of glass and gets it warmed up with a heat gun. PLA has a fairly low glass transition temperature, so it shouldn’t take much time to soften. Then he puts a second piece of glass on top and squeezes them together to get a thin, flat sheet of plastic. Once cooled, he punches his guitar picks out of the sheet, with bonus points if the colors swirled around into interesting patterns. If you’re not musically inclined, we’ve seen a very similar method used to produce colorful floor tiles.

Continue reading “From Fail To Wail: Guitar Picks Made From 3D Printed Waste”

Simple Pogo Programmer For ESP8266 Modules

ESP8266 development boards like the Wemos D1 Mini and NodeMCU are an excellent way to get a one-off project up and rolling quickly, but their size and relative complexity mean they aren’t necessarily a good choice for even short-run production hardware. On the other hand, programming the bare ESP modules can be something of a pain. But thanks to [Greg Frost], flashing those tiny little boards just got a lot easier.

His 3D printed design uses pogo pins to securely connect to the board’s castellated edges, which also holds it in place during the programming process. On the back side there’s just a few jumper wires and a couple of resistors, which ultimately lead to the FT232R FTDI board that actually connects the chip to the computer so you can program it.

We’d like to see a back panel that encloses the wiring, and perhaps an alternate version that deletes the space for the FTDI board in favor of a row of header pins. Both easy enough modifications to the basic design should [Greg] or anyone else feel so inclined. But even as it is, this is a great little programmer that can be sourced and assembled easily and cheaply.

This isn’t the first 3D printed ESP8266 programmer we’ve seen, and there are some improvised versions which are even cheaper to put together, but this design has a certain professional look that we think will be right at home on your bench.

Swapping The ROMs In Mini Arcade Cabinets

You’ve probably seen a few of these miniature arcade games online or in big box retailers: for $20 USD or so you get scaled-down version of a classic arcade cabinet, perfect for a desk toy or to throw up on a shelf as part of your gaming collection. Like any good Hackaday reader, you were probably curious about what makes them tick. Thanks to [wrongbaud], we don’t have to wonder anymore.

Over the course of several blog posts, [wrongbaud] walks readers through the hardware and software used in a few of these miniature games. For example, the Rampage cabinet is using a so-called “NES on a Chip” along with a SPI flash chip to hold the ROM, while Mortal Kombat is using a Genesis emulation solution and parallel flash. It wouldn’t be interesting if they didn’t throw you a few curves now and again, right?

But these are more than simple teardowns. Once [wrongbaud] gives an overview of the hardware, the next step is reading the respective flash storage and trying to make sense of the dumped data. These sort of games generally reuse the hardware among a number of titles, so by isolating where the game ROM is and replacing it, they can be made to play other games without hardware modification. Here, this capability is demonstrated by replacing the ROM data for Rampage with Yoshi’s Cookie. Naturally it’s one of those things that’s easier said than done, but it’s an interesting proof of concept.

The Mortal Kombat cabinet is a newer addition to the collection, so [wrongbaud] hasn’t progressed quite as far with that one. The parallel flash chip has been dumped with the help of an ESP32 and a MCP23017 I/O expander, and some Genesis ROM headers are identifiable in the data, but there’s still some sifting to be done before the firmware structure can be fully understood.

Even if you’re not in the market for a diminutive arcade experience, the information that [wrongbaud] has collected here is really phenomenal. From understanding protocols such as I2C and SPI to navigating firmware dumps with a hex editor, these posts are an invaluable resource for anyone looking to get started with reverse engineering.

Tuning Up The ThinkGeek Star Trek Intercom Panel

On Star Trek, all Kirk and friends had to do was snap the button on the always conveniently located intercom panel, start talking, and the intended recipient would immediately respond no matter where they were in the ship. How did it work? Who knows. In spite of, or perhaps even because of, the lightly-explained nature of the technology, the cherry-red wall intercoms still hold a certain charm for fans of the groundbreaking show.

A viewer sent [Fran Blanche] a scaled down replica of the intercom from ThinkGeek, and while it certainly looks fairly close to the original prop, it has a couple of annoying design elements. When triggered by the side-mounted motion sensors, the panel will play either the iconic swoosh of the automatic doors or the “Red Alert” sound effect. It’s a cute idea for a kid’s bedroom maybe, but not exactly ideal for somebody who regularly records YouTube videos.

Peak 23rd century technology

So the first order of business was to cut the motion sensors out of the circuit and replace them with a push button. [Fran] draws up a quick diagram to explain how these sensors work, and shows that they can easily be bypassed with a momentary switch since they normally bring the line high when triggered. She then converted the indicator light on the right side of the panel into a button to enable the alert sound effect, which is more accurate to how it worked in the show anyway.

The other issue, and perhaps the most egregious to Star Trek fans, is that the “Red Alert” indicator on the top of the panel didn’t actually flash like it did in the show. To design and build this panel and not put a few LEDs behind that piece of frosted plastic seems a bit like producing a Matchbox car and forgetting to make the wheels spin. With a couple of red LEDs and a bit of new wiring, the oversight was quickly rectified.

While it might not be perfect, at least ThinkGeek actually produced a functional product this time. It could have ended up like one of their April Fool’s “products” that never get put into production, forcing a desperate Trekkie to begrudgingly build his own version.

Continue reading “Tuning Up The ThinkGeek Star Trek Intercom Panel”