Twitter RNG Is Powered By Memes

Twitter is kind of a crazy place. World leaders doing verbal battle, hashtags that rise and fall along with the social climate, and a never ending barrage of cat pictures all make for a tumultuous stream of consciousness that runs 24/7. What exactly we’re supposed to do with this information is still up to debate, as Twitter has yet to turn it into a profitable service after over a decade of operation. Still, it’s a grand experiment that offers a rare glimpse into the human hive-mind for anyone brave enough to dive in.

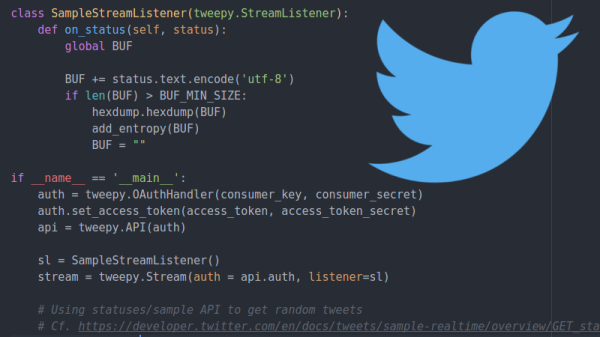
One such explorer is a security researcher who goes by the handle [x0rz]. He’s recently unveiled an experimental new piece of software that grabs Tweets and uses them as a “noise” to mix in with the Linux urandom entropy pool. The end result is a relatively unpredictable and difficult to influence source of random data. While he cautions his software is merely a proof of concept and not meant for high security applications, it’s certainly an interesting approach to introducing humanity-derived chaos into the normally orderly world of your computer’s operating system.

Noise sampling before and after being merged with urandom

This hack is made possible by the fact that Twitter offers a “sample” function in their API, which effectively throws a randomized collection of Tweets at anyone who requests it. There are some caveats here, such as the fact that if multiple clients request a sample at the same time they will both receive the same Tweets. It’s also worth mentioning that some characters are unusually likely to make an appearance due to the nature of Twitter (emoticons, octothorps pound signs, etc), but generally speaking it’s not a terrible way to get some chaotic data on demand.

On its own, [x0rz] found this data to be a good but not great source of entropy. After pulling a 500KB sample, he found it had an entropy of 6.5519 bits per byte (random would be 8). While the Tweets weren’t great on their own, combining the data with the kernel’s entropy pool at /dev/urandom provided something that looked a lot less predictable.

The greatest weakness of using Twitter as a source of entropy is, of course, the nature of Twitter itself. A sufficiently popular hashtag on the rise might be just enough to sink your entropy. It’s even possible (though admittedly unlikely) that enough Twitter spam bots could ruin the sample. But if you’re at the point where you think hinging your entropy pool on a digital fire hose of memes and cat pictures is sufficient, you’re probably not securing any national secrets anyway.

(Editor’s note: The way the Linux entropy pool mixes it together, additional sources can only help, assuming they can’t see the current state of your entropy pool, which Twitter cats most certainly can’t. See article below. Also, this is hilarious.)

We’ve covered some fantastic examples of true random number generators here at Hackaday, and if you’re looking for a good primer for the Kingdom of the Chaotic, check out the piece by our own [Elliot Williams].

Asgard: The Open Source Air Data Computer

We get a lot of awesome projects sent our way via the tip line. Well, mainly it seems like we get spam, but the emails that aren’t trying to sell us something are invariably awesome. Even so, it’s not often we get a tip that contains the magic phrase “determine Mach number” in its list of features. So to say we were interested in the Asgard Air Data Computer (ADC) is something of an understatement.

Now we’ll admit right up front: we aren’t 100% sure who the target audience for the Asgard is, but it certainly looks impressive. Team member [Erik] wrote into tip line with information about this very impressive project, which is able to perform a number of measurements on incoming air, such as true speed, viscosity, and temperature. The team says it has applications ranging from HVAC to measuring the performance of bicycles. We don’t know who’s going so fast on their bike that they need to measure air speed, but of course the hacker community never ceases to amaze us.

Even if you don’t have a jet fighter that could benefit from a high performance ADC such as Asgard, you have to be impressed by the incredible work the team has done not only designing and building it, but documenting it. From the impeccably designed 3D printed case to the stacked PCB internals, every aspect of Asgard screams professional hardware.

Data collected from Asgard can be stored on the internal micro SD if the device is to be used in stand-alone mode, or you can connect to it over USB or Bluetooth thanks to the HC-05 module. The team has even put together some scripts to merge the Asgard’s generated air data with GPS position information.

We’re all for putting high quality sensors in the hand’s of the community and seeing what they can come up with. The spirit and build quality of this project reminds us of the impressive work [Radu Motisan] has been doing with his distributed air quality sensors.

Continue reading “Asgard: The Open Source Air Data Computer”

Printed It: Rubber Band PCB Vise

If you’ve ever worked on a small PCB, you know how much of a hassle it can be to hold on to the thing. It’s almost as if they weren’t designed to be held in the grubby mitts of a human. As designs have become miniaturized over time, PCBs are often so fragile and festooned with components that tossing them into the alligator clips of the classic soldering “third hand” can damage them. The proper tool for this job is a dedicated PCB vise, which is like a normal bench vise except it doesn’t crank down very hard and usually has plastic pads on the jaws to protect the board.

Only problem with a PCB vise is, like many cool tools and gadgets out there, not everybody owns one. Unless you’re doing regular PCB fabrication, you might not take the plunge and buy one either. So what’s a hacker on a budget to do when they’ve got fiddly little PCBs that need attention?

Luckily for us, we live in a world where you can press a button and have a magical robot on your desktop build things for you. Online model repositories like Thingiverse and YouMagine are full of designs for printable PCB vises, all you have to do is pick one. After looking through a number of them I eventually decided on a model designed by [Delph27] on Thingiverse, which I think has a couple of compelling features and more than deserves the few meters of filament it will take to add to your bench.

Of course the best part of all of this is that you can customize and improve the designs you download, which is what I’m about to do with this PCB vise!

Continue reading “Printed It: Rubber Band PCB Vise”

An ADS-B Antenna Built From Actual Garbage

With the advent of low-cost software defined radio (SDR), anyone who’s interested can surf the airwaves from the FM band all the way up to the gigahertz frequencies used by geosynchronous satellites for about $20 USD. It’s difficult to overstate the impact this has had on the world of radio hacking. It used to be only the Wizened Ham Graybeards could command the airwaves from the front panels of their $1K+ radios, but now even those who identify as software hackers can get their foot in the door for a little more than the cost of a pizza.

But as many new SDR explorers find out, having a receiver is only half the battle: you need an antenna as well. A length of wire stuck in the antenna jack of your SDR will let you pick up some low hanging fruit, but if you’re looking to extend your range or get into the higher frequencies, your antenna needs to be carefully designed and constructed. But as [Akos Czermann] shows on his blog, that doesn’t mean it has to be expensive. He shows how you can construct a very capable ADS-B antenna out of little more than an empty soda can and a bit of wire.

He makes it clear that the idea of using an old soda can as an antenna is not new, another radio hacker who goes by the handle [abcd567] popularized their own version of the “cantenna” some time ago. But [Akos] has made some tweaks to the design to drive the bar even lower, which he has dubbed the “coketenna”.

The primary advantages of his design is that you no longer need to solder anything or even use any special connectors. In fact, you can assemble this antenna with nothing more than a pocket knife.

You start by cutting the can down to around 68 mm in length, and cutting an “X” into the bottom. Then strip a piece of coax, and push it through the X. The plastic-coated center conductor of the coax should emerge through the bottom of the can, while the braided copper insulation will bunch up on the other side. If you want to make it really fancy, [Akos] suggests cutting a plastic drink bottle in half and using that as a cover to keep water out of the “coketenna”.

How well does it work? He reports performance being very similar to his commercial ADS-B antenna which set him back $45 USD. Not bad for some parts of out the trash.

We’ve covered the math of creating an ADS-B antenna in the past if you’d like to know more about the science of how it all works. But if you just want an easy way of picking up some signals, this “coketenna” and an RTL-SDR dongle will get you started in no time.

Building A Better Kerbal Space Program Controller

If you have even the most passing interest in space and what it takes to get there, you’ve probably already played Kerbal Space Program (KSP). If you haven’t, then you should set aside about ten hours today to go check that out real quick. Don’t worry, Hackaday will still be here when you get back. Right now you need to focus on getting those rockets built and establishing a network of communication satellites so you can get out of low orbit.

For those of you who’ve played the game (or are joining us again after playing KSP for the prescribed 10, 12, 16 hours), you’ll know that the humble computer keyboard is not very well suited to jaunts through space. You really want a joystick and throttle at the absolute minimum for accurate maneuvers, but even you’ll be spending plenty of time back on the keyboard to operate the craft’s various systems. If you want the ultimate KSP control setup, you’ll need to follow in the footsteps of [Hugo Peeters] and build your own. Luckily for us, he’s written up an exceptionally well detailed guide on building KSP controllers that should prove useful even if you don’t want to clone his.

Wiring switches and buttons to the Arduino.

At the most basic level, building a KSP controller consists of hooking a bunch of switches and buttons to a microcontroller such as the Arduino or Teensy, and converting those to USB HID key presses that the game understands. This works fine up to a point, but is limited because it’s only a one-way method of communication. For his controller, [Hugo] forked KSPSerialIO, a plugin for KSP that allows bidirectional communication between the game and your controller, enabling things like digital readouts of speed and fuel levels on the controller’s panel.

Once the logistics of how you’ll talk to the game are settled, the rest is really up to the individual. The first step in building your own KSP controller is deciding what you want it to do. Are you looking to fly planes? Control a rover? Maybe you just want a master control panel for your space station. There’s a whole lot of things you can build in KSP, and the layout, inputs, and displays on your controller should ideally reflect your play style.

[Hugo] went with a fairly general purpose panel, but did spend quite a bit of extra time to get some slick LED bar graphs hooked up to display resource levels of different systems on his craft. That’s an extra step that isn’t strictly required for a build like this, but once you see it, you’re going to have a hard time not wanting to include it on your own panel. He also went through the expense of having the panel and case professionally laser cut and etched, which definitely gives it a polished feel.

We’ve covered quite a number of custom KSP controllers here at Hackaday. The overlap between KSP players and hackers seems unusually high, but of course a game that lets you build and fly contraptions of your own design does sound like something that would be right up our alley.

Easier End-User Setup For ESP32 Projects

As hackers, we occasionally forget that not everyone is enamored with the same nerdy minutia that we are. Configuring hardware by changing some lines in the code and compiling a new firmware doesn’t sound like that big of a deal to those of us who’ve been around the block a few times, but might as well be ancient Sanskrit to the average person. As long as your projects are for personal use this isn’t really a concern, but what if you plan on distributing the code for a project or perhaps even selling finished products? Shipping it out with hard-coded variables simply isn’t an option.

Code for loading configuration file from SPIFFS

In a recent video, [Proto G] shows a clever way to use WiFiManager to make configuring your ESP32 project easier for end-users. Not only can you use the captive portal system to configure the ESP32’s WiFi against a nearby access point, but it can allow users to enter in configuration data which can be picked up in your code by using SPI Flash File System (SPIFSS).

With the setup demonstrated in the video below by [Proto G], you don’t need anything more exotic than a web browser to configure the device. The end user simply searches for the device’s WiFi network, connects to it, and is presented with an easy to understand dialog which has them select a WiFi network to configure against along with some fields to enter in custom variables. All this information is then stored to a file on the SPI flash. When the ESP32 reboots, it reads the configuration from the saved file and applies the requested settings.

This is very similar to how many consumer devices are now configured, and even the less technically-inclined recipients of such a device should be able to work through the setup with a bit of hand-holding. If you plan on handing one of your ESP32 projects to John Q. Public, this is the kind of configuration you should be aiming for.

We’ve covered using WiFiManager to make ESP32 projects easier to manage, but the addition of arbitrary variables to the captive portal opens up a lot of possibilities. Just the kind of thing you need when you start considering the leap to commercial product.

Continue reading “Easier End-User Setup For ESP32 Projects”

Teardown: What’s Inside A Christmas Laser Projector?

In the world of big-box retail, December 26th is a very special day. The Christmas music playing on the overhead speakers switches back to the family friendly Top 40, the store’s decorations get tossed in the compactor, and everything that’s even remotely related to the holiday is put on steep clearance. No more money to be made on the most commercialized of all holidays, so back to business as usual.

It’s in this narrow corridor of time, between the Great Holiday Unloading and the new spring products coming in, that you can find some fantastic deals on Christmas decorations. Not that long ago, this would hardly be exciting news for the readers of Hackaday. But Christmas lights and decorations have really started pushing the envelope in terms of technology: addressable RGB LED strands, Bluetooth controlled effects, and as of the last couple years, friggin’ lasers.

That’s right, you’ve seen them all over the neighborhood, probably took a few stray beams to the eye, you might even own your own. Laser projectors have been one of the most popular Christmas decorations for the last couple of years, and it’s not hard to see why. Just set the projector up in front of your house, and you’re done. No need to get on a ladder and string lights on the roof when you can just blast some directed energy up there instead.

Given how popular they are, I was surprised to see a lone Home Accents Holiday Multi-Color Light Projector on the clearance rack at Home Depot for around $14 a few days after Christmas. This was a 75% price reduction from normal MSRP, and right in that sweet impulse-buy price range. Let’s see what’s hiding inside!

Continue reading “Teardown: What’s Inside A Christmas Laser Projector?”