Add Nest Functionality To Your Thermostat For $5

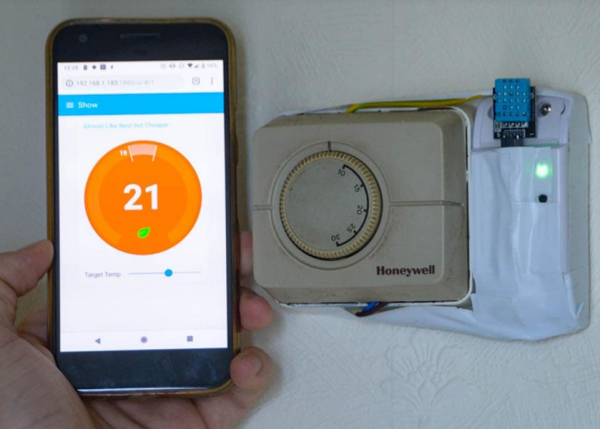
The Nest Thermostat revolutionized the way that people control the climate in their homes. It has features more features than even the best programmable thermostats. But, all of the premium features also come at a premium price. On the other hand, for only $5, a little coding, and the realization that thermostats are glorified switches, you can easily have your own thermostat that can do everything a Nest can do.

[Mat’s] solution uses a Sonoff WiFi switch that he ties directly into the thermostat’s control wiring. That’s really the easy part, since most thermostats have a ground or common wire, a signal wire, and a power wire. The real interesting work for this build is in setting up the WiFi interface and doing the backend programming. [Mat’s] thermostat is controlled by software written in Node-RED. It can even interface with Alexa. Thanks to the open source software, it’s easy to add any features you might want.

[Mat] goes through a lot of detail on the project site on how his implementation works, as far as interfacing all of the devices and the timing and some of the coding problems he solved. If you’ve been thinking about a Nest but are turned off by the price, this is a great way to get something similar — provided you’re willing to put in a little extra work. This might also be the perfect point to fall down the home automation rabbit hole, so be careful!

Continue reading “Add Nest Functionality To Your Thermostat For $5”
Weather Station Is A Tutorial In Low Power Design

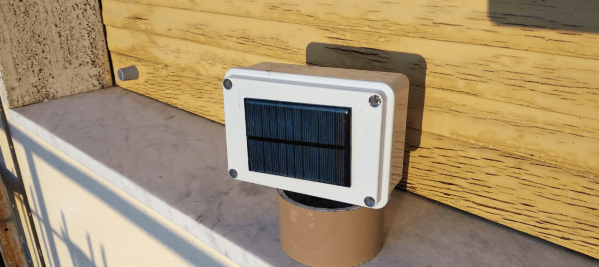
Building your own weather station is a fun project in itself, but building it to be self-sufficient and off-grid adds another set of challenges to the mix. You’ll need a battery and a solar panel to power the station, which means adding at least a regulator and charge controller to your build. If the panel and battery are small, you’ll also need to make some power-saving tweaks to the code as well. (Google Translate from Italian) The tricks that [Danilo Larizza] uses in his build are useful for more than just weather stations though, they’ll be perfect for anyone trying to optimize their off-grid projects for battery and solar panel size.

When it comes to power conservation, the low-hanging fruit is plucked first. [Danilo] set the measurement intervals to as long as possible and put the microcontroller (a NodeMCU) to sleep in between. Removing the power from the sensors when the microcontroller was asleep was another easy step, but the device was still crashing overnight. Then he turned to a hardware solution and added a more efficient battery charger to the setup, which saved even more power. This is all the more impressive because the station communicates via WiFi which is notoriously difficult to run in low-power applications.

Besides the low power optimizations, the weather station itself is interesting for its relative simplicity. It could be built with things most of us have knocking around. Best of all, [Danilo] published the source code on his site, so most of the hard work has been done already. If you’re thinking he seems a little familiar, it’s because we’ve featured some of his projects before, like his cheap WiFi extender antenna and his homemade hybrid tube amplifier.

Cut Through The Noise, See Tiny Signals

An oscilloscope is a handy tool for measuring signals of all kinds, but it’s especially useful if you want to measure something with a periodic component. Modern oscilloscopes have all kinds of features built-in that allow you sample a wide range of signals in the hundreds of megahertz, and make finding and measuring your signal pretty easy, provided you know which buttons to push. There are some advanced oscilloscope methods that go beyond the built-in features of even the best oscilloscopes, and [AM] has a tutorial on one of them.

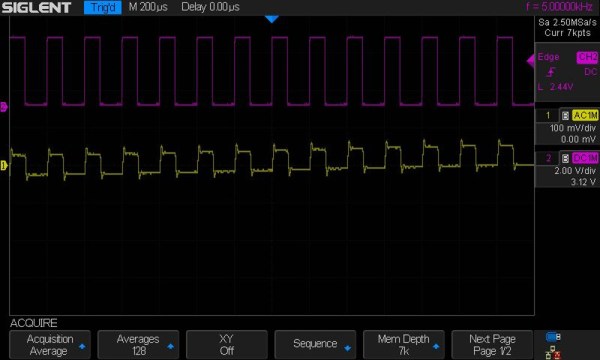
The method used here is called phase-senstitive detection, and allows tiny signals to be found within noise, even if the magnitude of the noise is hundreds of times greater than the signal itself. Normally this wouldn’t be possible, but by shifting the signal out of the DC range and giving it some frequency content, and then using a second channel on the oscilloscope to measure the frequency content of the source and triggering the oscilloscope on the second channel, the phase of the measured signal can be sifted out of the noise and shown clearly on the screen.

In [AM]’s example, he is measuring the intensity of a laser using a photodiode with a crude amplifier, but even with the amplifier it’s hard to see the signal in the noise. By adding a PWM-like signal to the power source of the laser and then syncing it up with the incoming signal from the photodiode, he can tease out the information he needs. It’s eally a fascinating concept, and if you fancy yourself a whiz with an oscilloscope this is really a tool you should have in your back pocket.  If you’re new to this equipment, we do have a primer on some oscilloscope basics, too.

Continue reading “Cut Through The Noise, See Tiny Signals”

Learn To Optimize Code In Assembly… For Android

When programming a microcontroller, there are some physical limitations that you’ll come across much earlier than programming a modern computer, whether that’s program size or even processor speed. To make the most use of a small chip, we can easily dig into the assembly language to optimize our code. On the other hand, modern processors in everyday computers and smartphones are so fast and have so much memory compared to microcontrollers that this is rarely necessary, but on the off-chance that you really want to dig into the assembly language for ARM, [Uri Shaked] has a tutorial to get you started.

The tutorial starts with a “hello, world” program for Android written entirely in assembly. [Uri] goes into detail on every line of the program, since it looks a little confusing if you’ve never dealt with assembly before. The second half of the program is a walkthrough on how to actually execute this program on your device by using the Android Native Deveolpment Kit (NDK) and using ADB to communicate with the phone. This might be second nature for some of us already, but for those who have never programmed on a handheld device before, it’s worthwhile to notice that there are a lot more steps to go through than you might have on a regular computer.

If you want to skip the assembly language part of all of this and just get started writing programs for Android, you can download an IDE and get started pretty easily, but there’s a huge advantage to knowing assembly once you get deep in the weeds especially if you want to start reverse engineering software or bitbanging communications protocols. And if you don’t have an Android device handy to learn on, you can still learn assembly just by playing a game.

Unicycle Given A Hand Crafted Gear Box

Being able to coast on a bicycle is a feature that is often taken for granted. The use of a freewheel was an improvement made early in the bicycle’s history, for obvious reasons. This also unlocked the ability to build bikes with multiple gears, allowing higher speeds to be easily reached. On a unicycle, however, there’s no chain and the pedals are permanently fixed to the wheel’s axle, meaning that there is (usually) no freewheel and no gearing. [johnybondo] wanted to get some more speed out of his unicycle, though, and realized he could do this with his own homemade internal geared hub for his unicycle.

The internal hub gear was machined and welded by hand as a one-off prototype. There are commercial offerings, but at $1700 it’s almost best to fund your own machine shop. It uses a planet gearset which is more compact than a standard gear, allowing it to fit in the axle. Once all the machining was done, it was time to assemble all of the gears into the hub, lace it to the wheel with spokes, and start pedaling away. Since it was so successful, he plans to build another and lace it to a larger wheel which will allow him to reach even higher speeds. If this isn’t fast enough for you, personally, there are other options available for ludicrous speed.

Now, this gear is still “fixed” in the sense that it’s a permanent gear ratio for his unicycle and it doesn’t allow him to shift gears or coast. There’s no freewheel mechanism so the unicycle can still be pedaled forward and backwards like a traditional unicycle. The advantage of this setup is that the wheel spins 1.5 times for every one revolution of the pedals, allowing him to more easily reach higher speeds.

Hurdy-Gurdy Gets Modernized With MIDI Upgrades

If you’ve never heard a hurdy-gurdy before, you’re in for a treat. Not many people have, since they’re instruments which are uncommon outside of some eastern European communities. Think of a violin that replaces the bow with a hand-cranked wheel, and adds some extra strings that function similar to drones on a bagpipe. The instrument has been around for hundreds of years, but now it’s been given an upgrade via the magic of MIDI.

All of these new features come from [Barnaby Walters] who builds hurdy-gurdys by hand but has recently been focusing on his MIDI interface. The interface can do pitch-shifting polyphony, which allows the instrument to make its own chords and harmonies. It also has a hybrid poly synthesizer, which plays completely different sounds, and can layer them on top of one another. It can also split the keyboard into two instruments, where the top half plays one sound and the bottom half another. It’s an interesting take on an interesting instrument, and the video is definitely worth a look.

The hurdy-gurdy isn’t a commonly used instrument for hacking compared to something like drums or the violin, of course. In fact we had to go back over ten years to find any other articles featuring the hurdy-gurdy, the Furby Gurdy. It was an appropriately named instrument.

Thanks to [baldpower] for the tip!

Continue reading “Hurdy-Gurdy Gets Modernized With MIDI Upgrades”

10,000-Year-Old Camera Lens Takes Striking Pictures

The first photograph was taken sometime in the early 1800s, and through almost two centuries of development we’ve advanced through black-and-white, the video camera, and even high-speed cameras that can take thousands of frames per second. [Mathieu Stern] took a step back from all of the technological progress of the past two hundred years, though, and found a lens for his camera hidden in the glacial ice of Iceland.

Ice in this part of the world has been purified over the course of 10,000 years, and [Mathieu] realized that with this purity the ice could be formed into a workable camera lens. The first step was to get something that could actually form the ice into the proper shape, and for that he used a modified ice ball maker that was shaped to make a lens rather than a sphere. Next, he needed an enclosure to hold the lens and attach it to his camera, which he made using a 3D printer.

For this build, the hardest part probably wasn’t making the actual equipment, but rather getting to the right place in Iceland and actually making the lenses. At room temperature the lenses could be made in around five minutes, but in Iceland it took almost 45 minutes and the first four attempts broke. The fifth one was a charm though, so after over five hours on the beach he was finally able to make some striking images with the 10,000-year-old ice lens which melted after only a minute of use. If that seems like too much work, though, you can always outfit your camera with no lens at all.

Thanks to [baldpower] for the tip!

Continue reading “10,000-Year-Old Camera Lens Takes Striking Pictures”