Spooky Animated Eyes For Your Frightening Needs

Unless you have an incredibly well-stocked parts bin, it’s probably too late to build these spooky animated eyes to scare off the neighborhood kiddies this year. But next year…

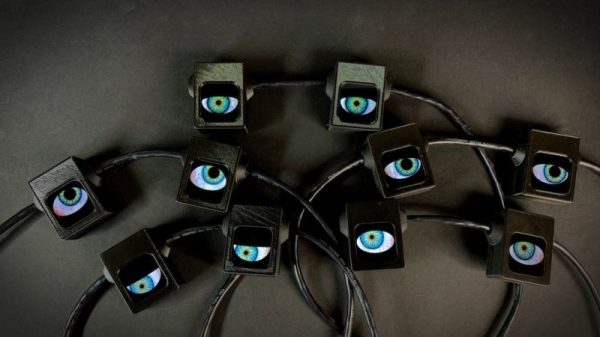
It’s pretty clear that Halloween decorating has gone over the top recently. It may not be as extreme as some Christmas displays, but plenty of folks like to up the scare-factor, and [wermy] seems to number himself among those with the spirit of the season. Like Christmas lights, these eyes are deployed as a string, but rather than just blink lights, they blink creepy eyes from various kinds of creatures. The eyes are displayed on individual backlit TFT-LCD displays housed in 3D-printed enclosures. Two pairs of eyes can be driven by the SPI interface of one ItsyBitsy M0 Express; driving more displays works, but the frame rate drops to an unacceptable level if you stretch it too far. Strung together on scraps of black ethernet cable, the peepers can live in the shrubs next to the front door or lining the walk, and with surprisingly modest power needs, you’ll get a full night of frights from a USB battery bank.

We like the look of these, and maybe we’ll do something about it next year. If you’re still in the mood to scare and don’t have the time for animated eyes this year, try these simple Arduino blinky eyes for a quick hit.

Continue reading “Spooky Animated Eyes For Your Frightening Needs”

Oliver Heaviside: Rags To Recognition, To Madness

Like any complex topic, electromagnetic theory has its own vocabulary. When speaking about dielectrics we may refer to their permittivity, and discussions on magnetic circuits might find terms like reluctance and inductance bandied about. At a more practical level, a ham radio operator might discuss the impedance of the coaxial cable used to send signals to an antenna that will then be bounced off the ionosphere for long-range communications.

It’s everyday stuff to most of us, but none of this vocabulary would exist if it hadn’t been for Oliver Heaviside, the brilliant but challenging self-taught British electrical engineer and researcher. He coined all these terms and many more in his life-long quest to understand the mysteries of the electromagnetic world, and gave us much of the theoretical basis for telecommunications.

Continue reading “Oliver Heaviside: Rags To Recognition, To Madness”

Lessons In Disposable Design From A Cheap Blinky Ball

Planned obsolescence, as annoying as it is when you’re its victim, still has to be admired. You can’t help but stand in awe of the designer who somehow managed to optimize a product to live one day longer than its warranty period. Seriously, why is it always the next day?

The design of products that are never intended to live long enough to go obsolete must be similarly challenging, and [electronupdate] did a teardown of a cheap LED blinky toy to see what’s involved. You’ve no doubt seen these seizure-triggering silicone balls before, mostly at checkout counters and the like where they’re sold at prices many hundreds of times what it took to make them. This particular device, which seems representative of the species, has two bright LEDs, a small controller chip, a trio of button cells for power, and a springy switch to activate it. All this is mounted to a cheap scrap of phenolic resin PCB, with the controller chip and one of the LEDs covered by a blob of clear epoxy.

This teardown one-ups most others, as [electronupdate] disrobes the chip and points a microscope at the die; the video below shows just how few transistors are employed and proposes a likely circuit. Everything about this ball just oozes cheapness, and it’s likely these things cost essentially nothing to build. Which makes sense for something destined for the landfill within a week or so.

Yes, this annoying blinky-thing is low-end garbage, but there are still design lessons to be learned from it. Anything that’s built for a broad market has to be built to a price point, and understanding those constraints is important to understanding how planned obsolescence works.

Continue reading “Lessons In Disposable Design From A Cheap Blinky Ball”

Kinetic Sculpture Achieves Balance Through Machine Learning

We all know how important it is to achieve balance in life, or at least so the self-help industry tells us. How exactly to achieve balance is generally left as an exercise to the individual, however, with varying results. But what about our machines? Will there come a day when artificial intelligences and their robotic bodies become so stressed that they too will search for an elusive and ill-defined sense of balance?

We kid, but only a little; who knows what the future field of machine psychology will discover? Until then, this kinetic sculpture that achieves literal balance might hold lessons for human and machine alike. Dubbed In Medio Stat Virtus, or “In the middle stands virtue,” [Astrid Kraniger]’s kinetic sculpture explores how a simple system can find a stable equilibrium with machine learning. The task seems easy: keep a ball centered on a track suspended by two cables. The length of the cables is varied by stepper motors, while the position of the ball is detected by the difference in weight between the two cables using load cells scavenged from luggage scales. The motors raise and lower each side to even out the forces on each, eventually achieving balance.

The twist here is that rather than a simple PID loop or another control algorithm, [Astrid] chose to apply machine learning to the problem using the Q-Behave library. The system detects when the difference between the two weights is decreasing and “rewards” the algorithm so that it learns what is required of it. The result is a system that gently settles into equilibrium. Check out the video below; it’s strangely soothing.

We’ve seen self-balancing systems before, from ball-balancing Stewart platforms to Segway-like two-wheel balancers. One wonders if machine learning could be applied to these systems as well.

Continue reading “Kinetic Sculpture Achieves Balance Through Machine Learning”

DIY Tuning Capacitors From Washers And 3D-Printed Parts

The inside of classic radios holds wonders that the sterile chips and SMD components of today’s circuits can’t hold a candle to. Chunky resistors and capacitors, vacuum tubes with cathodes aglow, and seemingly free-form loops of wire forming inductors will all likely make an appearance. But the most fascinating bit of any old radio was connected to the tuning knob: the big variable capacitor with its interdigitating metal plates. Watching one at work, with its plates evenly and finely spaced, is still a joy to behold.

In an attempt to recapture a little of that magic, [Jeremy S. Cook] came up with this home-brew variable tuning capacitor. The frame is built mainly from 3D-printed parts, which supports a shaft made from a common bolt. Plates are fashioned from stainless steel fender washers cut in half; the fixed plates are press-fit into the frame while the rotary plates ride on the shaft. The spacing between the rotary plates is maintained by printed spacers, which also serve to lock the rotor into one solid unit. [Jeremy]’s prototype, for which he provides STL files, can be tuned between about 7 and 15 pF. Check out the build in the video below.

We love the look of this, and we can imagine custom tuning caps would come in handy for certain retro radio builds. The tuning range is a little narrow, but that could be fixed with more plates or closer spacing. That might be a tall order with thick steel washers, but we’ve seen really thin aluminum machined and closely spaced before, so this might be one approach to higher capacitance. Continue reading “DIY Tuning Capacitors From Washers And 3D-Printed Parts”

Faux Walkie-Talkie For Comedy Walking Tour Is A Rapid Prototyping Win

Chances are good that a fair number of us have been roped into “one of those” projects before. You know the type: vague specs, limited budget, and of course they need it yesterday. But you know 3D-printers and Raspberduinos and whatnot; surely you can wizard something together quickly. Pretty please?

He might not have been quite that constrained, but when [Sean Hodgins] got tapped to help a friend out with an unusual project, rapid prototyping skills helped him create this GPS-enabled faux-walkie talkie audio player. It’s an unusual device with an unusual purpose: a comedic walking tour of Vancouver “haunted houses” where his friend’s funny ghost stories are prompted by location. The hardware to support this is based around [Sean]’s useful HCC module, an Arduino-compatible development board. With a GPS module for localization and a VS1053 codec, SD card reader, and a small power amp for the audio end, the device can recognize when the user is within 50 meters of a location and play the right audio clip. The housing is a 3D-printed replica of an old toy walkie-talkie, complete with non-functional rubber ducky antenna.

[Sean]’s build looks great and does the job, although we don’t get to hear any of the funny stuff in the video below; guess we’ll have to head up to BC for that. That it only took two weeks start to finish is impressive, but watch out – once they know you’re a wizard, they’ll keep coming back. Continue reading “Faux Walkie-Talkie For Comedy Walking Tour Is A Rapid Prototyping Win”

Building An Electric Scooter That’s Street Legal, Even In Germany

Sometimes a successful project isn’t only about making sure all the electrons are in the right place at the right time, or building something that won’t collapse under its own weight. A lot of projects involve a fair amount of social engineering to be counted as a success, especially those that might result in arrest and incarceration if built as originally planned. Such projects are often referred to as “the fun ones.”

For the past few months, we’ve been following [Bitluni]’s DIY electric scooter build, which had been following the usual trajectory for these things – take a stock unpowered scooter, replace the rear wheel with a 250 W hub motor, add an ESC, battery, and throttle, and away you go. Things took a very interesting turn, however, when his street testing ran afoul of German law, which limits small electric vehicles to a yawn-inducing 6 kph. Unwilling to bore himself to death thus, [Bitluni] found a workaround: vehicles that are only assisted by an electric motor have a much more reasonable speed limit of 25 kph. So he added an Arduino with a gyro and accelerometer module and wrote a program to only power the wheel after the rider has kicked the scooter along a few times – no throttle needed. The motor stops after a bit, needing another push or two to kick it back on. A brake lever kills the motor, as does laying the scooter on its side. It’s quite a clever design, and while it might not keep the Polizei at bay, you can’t say he didn’t try.

[Bitluni] has quite a range of builds, from software-defined television to bad 3D-scanners to precision wine glass whacking. You should check out his stuff. Continue reading “Building An Electric Scooter That’s Street Legal, Even In Germany”