Unleash Your Inner Starship Captain With This Immersive Simulator Console

We like a good video game as much as the next person. Heck, a few hours wasted with “Team Fortress 2” on a couple of big monitors is a guilty pleasure we’ll never be ashamed of. But this starship bridge simulation console brings immersive gameplay to a new level, and we wholeheartedly endorse it even if we don’t quite get it.

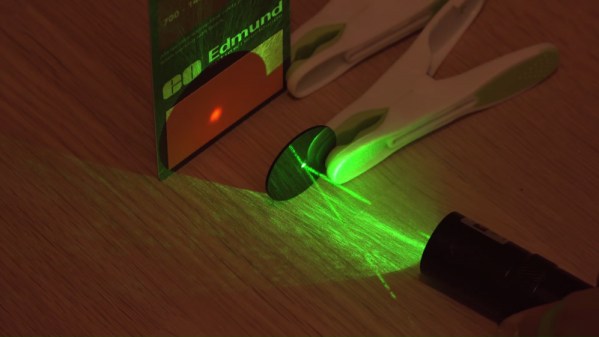
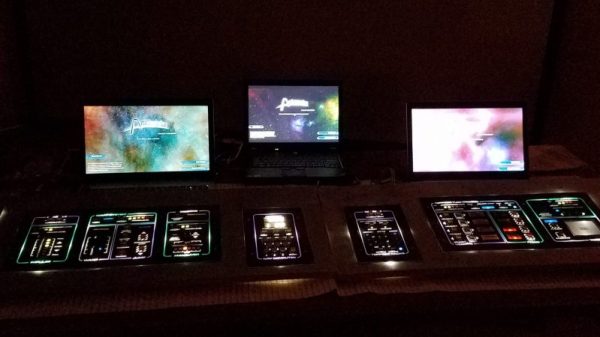
The game in question is “Artemis Spaceship Bridge Simulator”, a game played by anywhere from 2 to 11 players, each of whom mans a different station on the bridge of a generic starship, from Engineering to Communications to the vaunted Captain’s chair. The game is generally played on laptops linked together in a LAN with everyone in the same room, and as cool as that sounds, it wasn’t enough for [Angel of Rust]. The whole mousing back and forth to control the ship seemed so 21st-century, so he built detailed control panels for each of the bridge stations. The level of detail is impressive, as is the thought put into panel layouts and graphics. The panels are mostly acrylic in MDF frames, which allows for backlighting to achieve the proper mood. With the help of a bunch of Arduinos, everything talks to the game software over DMX, the protocol used mainly for stage lighting control. There’s a cool demo video below.

This is uber-nerd stuff, and we love it. Pyrotechnics and atmospherics would be a great addition for “realistic” battles, and dare we hope that someday this ends up on a giant Stewart platform flight simulator for the ultimate experience?

Continue reading “Unleash Your Inner Starship Captain With This Immersive Simulator Console”

Scratch-Built 3D-Printer Goes Back To The Roots Of The Hobby

It’s so easy and so cheap to order things like CNC routers and 3D-printers off the shelf that we can be forgiven for forgetting what was once involved in owning machines such as these. It used to be that you had no choice but to build your machine from the ground up. While that’s less true today, it’s still the case if you want to push the limits of what’s commercially available, and this huge scratch-built 3D-printer is a good example of that.

It’s not exactly a fresh build – [Thomas Workshop] posted this last year – but it escaped our notice at the time, and we think the three-part video series below that details the build deserves a look over. When we say scratch built, we mean it. This machine started off as a bundle of aluminum and steel stock. No 80/20 extrusions, no off-the-shelf linear rails – just metal and a plan. The build was helped considerably by a small CNC router, which also had that DIY look, but most of the parts were cut and finished with simple hand tools. The resulting gantry allows an enormous work volume 40 cm in each dimension, with a heated bed that uses four heat mats. We were impressed that [Thomas] got the build just far enough to print parts that were used to finish the build – that’s the hacker spirit.

It’s perhaps not the biggest 3D-printer we’ve seen – that distinction might go to this enormous 8-cubic foot machine – and it certainly can’t print a house. But it’s an impressive build that probably cost a whole lot less than a commercial machine of similar capacity, and it’s got that scratch-built cred.

Continue reading “Scratch-Built 3D-Printer Goes Back To The Roots Of The Hobby”

Custom Coaxial Dust Collector Makes CNC Router A Clean Machine

Everyone loves firing up that CNC router for the first time. But if the first thing you cut is wood, chances are good that the second thing you cut will be parts for some kind of dust shroud. Babysitting the machine and chasing the spindle around with a shop vac hose probably isn’t why you got it in the first place, right?

Trouble is, most dust-management designs just don’t get the job done, or if they do, they obstruct your view of the tool with a brush or other flexible shroud. [Jeremy Cook] figured he could do better with this coaxial dust collector, and from the practically dust-free cuts at the end of the video below, we think he’s right. The design is a two-piece, 3D-printed affair, with a collar that attaches to the spindle and a separate piece containing the duct. The two pieces stick together with magnets, which also lets the shroud swivel around for optimal placement. The duct surrounds the collet and tool and has a shop vac hose connection. In use, the vacuum pulls a ton of air through small opening, resulting in zero dust. It also results in the occasional part sucked up from the bed, so watch out for that. [Jeremy] has published the STL files if you want to make your own.

We’re pretty impressed, but if you still feel the need for a physical shroud, check out this shaggy-dog design that seems to work well too. Or you could just throw the whole thing in an enclosure.

Continue reading “Custom Coaxial Dust Collector Makes CNC Router A Clean Machine”

Retrotechtacular: The Iron Giants That Built The Jet Age

In the closing months of World War II, the Axis and the Allies were throwing everything they had at each other. The tide was turning to the Allies’ favor, but the Germans were showing a surprising resilience, at least in terms of replacing downed fighter and bomber aircraft. When the Allies examined the wreckage of these planes, they discovered the disturbing truth: the planes contained large pieces forged from single billets of metal, which suggested a manufacturing capability none of the Allies possessed and which allowed the Germans to quickly and cheaply make better and faster planes.

When the war was over, the Allies went looking for the tools the Germans had used to make their planes, and found massive closed-die forging presses that could squeeze parts out of aluminum and magnesium alloys in a single step. The Soviets carted off a 30,000 ton machine, while the Americans went home with a shipload of smaller presses and the knowledge that the Russians had an edge over them. Thus began the Heavy Press Program, an ultimately successful attempt by the US military to close a huge gap in strategic manufacturing capabilities that [Machine Thinking] details in the excellent video below.

One doesn’t instantly equate monstrous machines such as the Mesta 50,000-ton press, over nine stories tall with half of it buried underground and attached directly to bedrock, with airplane manufacture. But without it and similar machines that came from the program, planes from the B-52 to the Boeing 747 would have been impossible to build. And this isn’t dead technology by any means; sold to Alcoa in 1982 after having been operated by them for decades, the “Fifty” recently got a $100 makeover after cracks appeared in some castings, and the press and its retro-brethren are still squeezing out parts for fighters as recent as the F-35.

Continue reading “Retrotechtacular: The Iron Giants That Built The Jet Age”

Single-Rotor Drone: A Thrust-Vectoring Monocopter

We’re not entirely sure what to call this one. It’s got the usual trappings of a drone, but with only a single rotor it clearly can’t be called by any of the standard multicopter names. Helicopter? Close, but not quite, since the rotor blades are fixed-pitch. We’ll just go with “monocopter” for now and sort out the details later for this ducted-fan, thrust-vectored UAV.

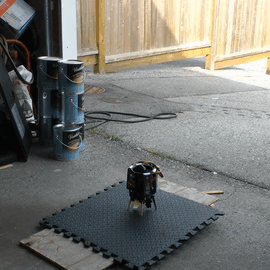
Whatever we choose to call it — builder [tesla500] dubbed it the simultaneously optimistic and fatalistic “Ikarus” — it’s really unique. The monocopter is built around a 90-mm electric ducted fan mounted vertically on a 3D-printed shroud. The shroud serves as a mounting point for the landing legs and for four servos that swivel vanes within the rotor wash. The vanes deflect the airstream and provide the thrust vectoring that gives this little machine its control.

Coming to the correct control method was not easy, though. Thanks mainly to the strong gyroscopic force exerted by the rotor, [tesla500] had a hard time getting the flight controller to cooperate. He built a gimballed test stand to work the problem through, and eventually rewrote LibrePilot to deal with the unique forces on the craft and tuned the PID loops accordingly. Check out the results in the video below.

Some attempts to reduce the number of rotors work better than others, of course, but this worked out great, and we’re looking forward to the promised improvements to come.

Continue reading “Single-Rotor Drone: A Thrust-Vectoring Monocopter”

Science Shows Green Lasers Might Be More Than You Bargained For

This may come as a shock, but some of those hot screaming deals on China-sourced gadgets and goodies are not all they appear. After you plunk down your pittance and wait a few weeks for the package to arrive, you just might find that you didn’t get exactly what you thought you ordered. Or worse, you may get a product with unwanted bugs features, like some green lasers that also emit strongly in the infrared wavelengths.

Sure, getting a free death ray in addition to your green laser sounds like a bargain, but as [Brainiac75] points out, it actually represents a dangerous situation. He knows whereof he speaks, having done a thorough exploration of a wide range of cheap (and not so cheap) lasers in the video below. He explains that the paradox of an ostensibly monochromatic source emitting two distinct wavelengths comes from the IR laser at the heart of the diode-pumped solid state (DPSS) laser inside the pointer. The process is only about 48% efficient, meaning that IR leaks out along with the green light. The better quality DPSS laser pointers include a quality IR filter to remove it; cheaper ones often fail to include this essential safety feature. What wavelengths you’re working with are critical to protecting your eyes; indeed, the first viewer comment in the video is from someone who seared his retina with a cheap green laser while wearing goggles only meant to block the higher frequency light.

It’s a sobering lesson, but an apt one given the ubiquity of green lasers these days. Be safe out there; educate yourself on how lasers work and take a look at our guide to laser safety. Continue reading “Science Shows Green Lasers Might Be More Than You Bargained For”

Faded Beauty DMM Gets An OLED Makeover

When a fine piece of lab instrumentation crosses your bench, you’ve got to do your best to put it to work. But even in the highest quality devices no component lasts forever, especially vacuum tubes. For some vintage instruments with vacuum fluorescent displays, that means putting up with less-than-perfect digits in order to get that sweet, sweet precision. Or not – you can always reverse engineer the thing and add a spanking new OLED display.

The Hewlett-Packard 34401A digital multimeter that fell into [qu1ck]’s lap was a beauty, but it had clearly seen better days. The display was full of spuriously illuminated dots and segments, making it hard to use the 6.5 digit DMM. After a futile bit of probing to see if a relatively easy driver fix would help, and with a replacement display being made of solid unobtanium, [qu1ck] settled in for the long process of reverse engineering the front panel protocol. As luck would have it, H-P used the SPI protocol to talk to the display, and it wasn’t long before [qu1ck] had a decent prototype working. The final version is much more polished, with a display sized to fit inside the original space occupied by the VFD. The original digits and annunciator icons are recreated, and he added a USB port and the bargraph display show in the clip below.

We think it looks fabulous, and both the firmware and hardware are on Github if you’d like to rescue a similar meter. You may want to check our guide to buying old test gear first, though, to get the most bang for your buck.

Continue reading “Faded Beauty DMM Gets An OLED Makeover”