“Have you tried turning it off and on again?” is a common tech support maneuver that everyone already seems to know and apply to just about all the wonky tech in their life. But would you tell someone to apply it to a reservoir? Someone did, and with disastrous results, at least according to a report on the lead-up to the collapse of a reservoir in the city of Lewiston, Idaho — just across the Snake River from Clarkston, Washington; get it? According to the report, operators at the reservoir had an issue crop up that required a contractor to log into the SCADA (supervisory control and data acquisition) system running the reservoir. The contractor’s quick log-in resulted in him issuing instructions to local staff to unplug the network cable on the SCADA controller and plug it back in. Somehow, that caused a variable in the SCADA system — the one storing the level of water in the reservoir — to get stuck at the current value. This made it appear that the water level was too low, which lead the SCADA system to keep adding water to the reservoir, which eventually collapsed.
Author: Dan Maloney3373 Articles
Voyager 2: Communication Reestablished With One Big Shout
You could practically hear the collective “PHEW!” as NASA announced that they had reestablished full two-way communications with Voyager 2 on Friday afternoon! Details are few at this point — hopefully we’ll get more information on how this was pulled off, since we suspect there was some interesting wizardry involved. If you haven’t been following along, here’s a quick recap of the situation.
As we previously reported, a wayward command that was sent to Voyager 2, currently almost 19 light-hours distant from Earth, reoriented the spacecraft by a mere two degrees. It doesn’t sound like much, but the very narrow beamwidth on Voyager‘s high-gain antenna and the vast distance put it out of touch with the Canberra Deep Space Network station, currently the only ground station with line-of-sight to the spacecraft. While this was certainly a problem, NASA controllers seemed to take it in stride thanks to a contingency program which would automatically force the spacecraft to realign itself to point at Earth using its Canopus star tracker. The only catch was, that system wasn’t set to engage until October.
With this latest development, it appears that mission controllers weren’t willing to wait that long. Instead, based on what was universally referred to in the non-tech media as a “heartbeat” from Voyager on August 1– it appears that what they were really talking about was the use of multiple antennas at the Canberra site to pick up a weak carrier signal from the probe — they decided to send an “interstellar shout” and attempt to reorient the antenna. The 70-m DSS-43 dish blasted out the message early in the morning of August 2, and 37 hours later, science and engineering data started streaming into the antenna again, indicating that Voyager 2 was pointing back at Earth and operating fine.
Hats off to everyone involved in making this fix and getting humanity’s most remote outpost back online. If you want to follow the heroics in nearly real-time, or just like watching what goes on at the intersection of Big Engineering and Big Science, make sure you check out the Canberra DSN Twitter feed.
Hackaday Prize 2023: One-Handed Soldering With The Solder Sustainer
For a lot of us, soldering has become so ingrained that it’s muscle memory. We know exactly when the iron is hot enough, how long to leave the tip in contact with the joint to heat it up, and exactly where to dab in the solder to get it to flow. When you’re well-practiced it can be a beautiful thing, but for those who don’t do it frequently, soldering can be frustrating indeed.
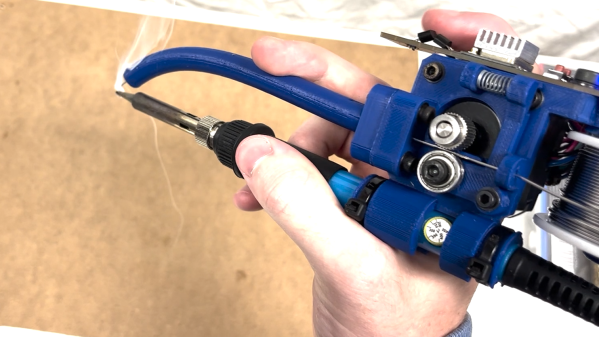
The “Solder Sustainer” looks like it just might be aimed at solving that problem, as well as a few others. It comes to us from [RoboticWorx], and while it looks a little like the love child of a MIG welder and a tattoo machine, it’s got a lot going for it. The idea is to make soldering a one-handed task by combining the soldering iron and a solder wire feeder into one compact package. The solder feeder is very reminiscent of a filament extruder on a 3D printer, using a stepper to drive spring-loaded pinch wheels, which forces the solder down a curved 3D-printed tube that directs it toward the tip. The pancake stepper is driven by an ESP32, which also supports the touch sensor that lets you advance the solder. The whole thing can be powered off a USB-C power supply, or using the onboard USB charger that can be connected in line with the soldering iron supply.
The video below shows Solder Sustainer in use. Yes, we know — some of those joints look a little iffy. But that seems to have more to do with technique than with the automatic solder feed. And really, in situations where you’ve previously wished for a third hand while soldering, this would probably be just the thing.
The Solder Sustainer is an entry in the “Gearing Up” round of the 2023 Hackaday Prize. If you’ve got an idea for a tool, jig, fixture, or instrument that makes hacking easier, we want to know about it. But you’d better hurry — the round ends on August 8.
Continue reading “Hackaday Prize 2023: One-Handed Soldering With The Solder Sustainer”
Better 3D Prints, Courtesy Of A Simple Mass-Produced Bracket
On the “hack/not-a-hack” scale, a 3D printed bracket for aluminum extrusions is — well, a little boring. Such connectors are nothing you couldn’t buy, and even if you insisted on printing them instead, Printables and Thingiverse are full of ready-to-use designs. So why would you waste your precious time and effort rolling your own?
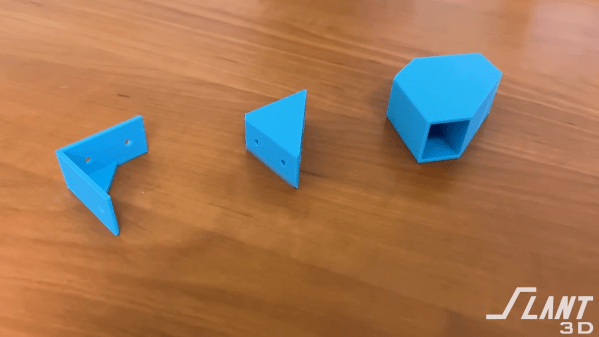
According to production 3D printing company [Slant 3D], a lot of times, we forget to take advantage of the special capabilities of 3D printing. The design progression of the L-bracket shown is a perfect example; it starts as a simple L, moves on to a more elaborate gusseted design, and eventually into a sturdy sold block design that would be difficult to make with injection molding thanks to shrinkage but is no problem for a 3D printer. Taking that a step further, the bracket morphs into a socketed design, taking advantage of what 3D printers can do by coming up with a part that reduces assembly time and fastener count while making a more finished, professional look.
Again, this isn’t really about the bracket. Rather, it’s about a different way of thinking about your designs and leveraging the unique capabilities of 3D printers relative to other mass-production methods, like injection molding. We’ve covered some of [Slant 3D]’s high-volume design insights before, such as including living hinges and alternatives of pins and holes for assembling printed parts. Continue reading “Better 3D Prints, Courtesy Of A Simple Mass-Produced Bracket”
The Simplest Curve Tracer Ever
To a lot of us, curve tracing seems to be one of those black magic things that only the true wizards understand. But as [DiodeGoneWild] explains, curve tracing really isn’t all that complicated, and it doesn’t even require specialized test instruments — just a transformer, a couple of resistors, and pretty much whatever oscilloscope you can lay your hands on.
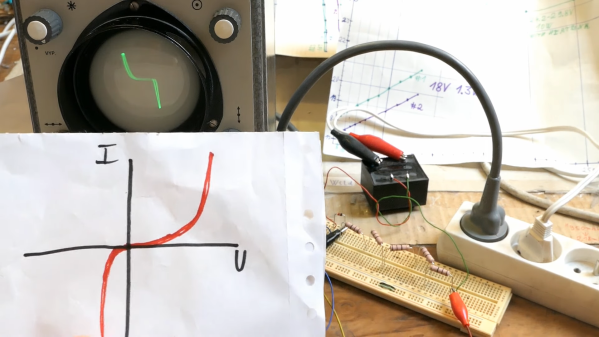
True to his handle, [DiodeGoneWild] concentrates on the current-voltage curves of Zener diodes in the video below, mainly as a follow-up to his recent simple linear power supply project, where he took a careful look at thermal drift to select the best Zener for the job. His curve tracer is super simple — just the device under test in series with a bunch of 10-ohm resistors and the secondary winding of a 12-volt transformer. The probes of his oscilloscope — a no-frills analog model — go across the DUT and the resistor, and with the scope in X-Y mode, the familiar current-voltage curve appears. Sure, the trace is reversed, but it still provides a good visualization of what’s going on. The technique also works on digital scopes; just be ready for a lot of twiddling to get into X-Y mode and to get the trace aligned.
Of course it’s not just diodes that can be tested with a curve tracer, and [DiodeGoneWild] showed a bunch of other two-lead components on his setup. But for our money, the neatest trick here was using a shorted bridge rectifier to generate a bright spot on the curve to mark the zero crossing point. Clever indeed, and pretty useful on a scope with no graticule.
Hackaday Links: July 30, 2023
A couple of weeks ago, we noted with interest that the space shuttle Endeavour (OV85) would be set up as a full-stack launch configuration display, complete with external fuel tank and solid rocket boosters. We predicted that this would result in some interesting engineering, not least of which will be making the entire 20-story stack safe from seismic activity. Looks like we were right on all counts, with this story about the foundation upon which the display will stand, which has been under construction for quite a while now. The base has six seismic isolators that support the 2.4-m thick slab of reinforced concrete that will serve as a perch for the full stack. The 1,800-ton slab will be able to move a meter or so from its resting position during earthquakes. Or perhaps more accurately, the foundation will allow Los Angeles to move as much as it wants while Endeavour rides it out.
If like us you’re worried that seismic loads are vastly different than the loads the spacecraft was actually designed for, relax — it turns out that the flight loads are far in excess of predicted loads from seismic stress. The plan is to build the booster stacks first — the aft skirts, which will support the entire stack, were just bolted in place — then lift the external tank in place between the boosters, and finally hoist the actual orbiter into place. After the stack is complete, the rest of the building will be built around it. We’re really looking forward to seeing some video on this project.
Automate Your Pin Header Chopping Chores Away
In most cases, cutting pin headers is a pretty simple job to tackle with a pair of cutters or even your bare fingers. But if you’re doing a lot of it, like for kitting up lots of projects for customers, then you might want to look at something like this automatic pin header cutter.
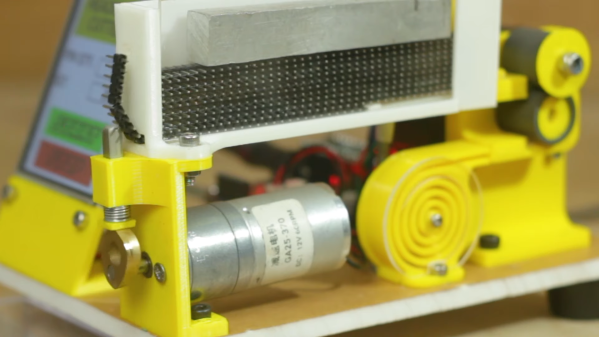
Even if you don’t need to follow [Mr. Innovative]’s lead on this, it’s worth taking a look at the video below, which has a couple of cool ideas that are probably applicable to other automation projects, especially those where lots of small parts are handled. Processing begins with a hopper that holds a stack of header strips over what we’d call a “reverse guillotine,” consisting of a spring-loaded plunger riding on a cam. A header strip is pushed out of the hopper to expose the specified number of terminals, the cam rotates and raises the plunger, and the correct length header is snapped off.
For our money, the neatest part of this build is the feed mechanism for the hopper. Rather than anything complicated like a rack-and-pinion, [Mr. Innovative] opted for a pusher made from a stiff yet flexible strip of plastic, which is forced along the bottom of the hopper by a pair of stepper-driven drive rollers. The plastic pusher is stored rolled up in a spiral fixture so it doesn’t take up much room.
Overall, it’s a simple and largely effective design. [Mr. Innovative] does express a little dissatisfaction with some aspects of the build, though; it looks like the stack of header strips needs a little weight on top of it to keep them feeding properly, and we notice a couple of iterations of the cutting mechanism in the video. The cut headers do seem to either fly off into the stratosphere or stay attached to each other, which could lead to jamming problems.
But still, it’s a solid design and reminds us of some other projects by [Mr. Innovative], like this SMD tape slicer or a CNC gear cutter.
Continue reading “Automate Your Pin Header Chopping Chores Away”


