Mac SE

Viewing A Macintosh SE’s Video On A Modern Computer

[Bbraun] has an old Macintosh SE computer. He was looking for a way to view the video output from the SE on a newer, modern computer. He ended up working out a pretty clever solution using a stm32f4discovery board.

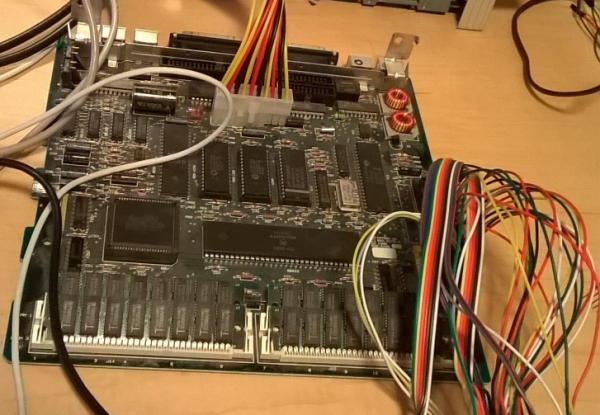
First, the SE’s logic board was removed from its case and placed onto a desk for easier access. The discovery board was then hooked up to the SE’s processor direct slot (PDS) using normal jumper wires. The discovery board acts as a USB COM port on a newer Mac OSX computer. The discovery board watches the SE for writes to video memory. When it sees that the R/W pin goes low, it knows that a write is occurring. It then waits for /AS to go low, which indicates that an address is on the bus. The discovery board reads the address and verifies that it falls within the range of the video frame buffer. If it does, then the discovery board writes a copy of the data to a local buffer.

The OSX computer runs a simple app that can make a request to the discovery board via USB. When the board receives the request, it sends its local frame buffer data over the USB connection and back to the host. The OSX computer then displays that data in a window using CGImage. The demo video below was captured using this technique. Continue reading “Viewing A Macintosh SE’s Video On A Modern Computer”

CD launcher

Fully-Automatic CD Launcher Looks Dangerously Fun

When [JZSlenker] was challenged to find a creative way to destroy a bunch of compact discs that were burned incorrectly, he did not disappoint. He came up with a rather simple but fun contraption that launches the CD’s at high speeds and with a fast rate of fire. He doesn’t share many details about how this machine was built, but the 18 second video makes it pretty obvious how it works.

The CD gun is built mainly from a piece of plywood. This provides a flat base with which to mount the other components. A stack of compact discs is held in place by what appears to be a metal cage that was welded together. An inexpensive angle grinder is used as the propulsion mechanism. The grinding wheel is mounted just in front of the stack of CD’s in a vertical orientation. The wheel must be placed just high enough above the plywood base for a CD to fit in between the wheel and the base. This design is remarkably similar to the Sticker Gun which our own [Brian Benchoff] is building.

Some type of linear actuator is used as the firing mechanism. The actuator is hooked up to a thin piece of metal, cut into an L shape. It almost looks like a reaper tool. When a button is pressed, the actuator fires instantly. This pushes the metal hammer into the CD on the bottom of the stack. The CD is pressed forward into the grinder wheel which then shoots the CD into the air. Based on the below video, it looks like [JZSlenker] is able to fire at a rate of about three CD’s per second with this rig.

This has got to be a super-villain weapon for an upcoming movie, right? Maybe AOL-man?

Continue reading “Fully-Automatic CD Launcher Looks Dangerously Fun”

Bread Online

Bread Online Is A Bread Maker For The Internet Of Things

An engineering student at the University of Western Macedonia has just added another appliance to the ever-growing list of Internet enabled things. [Panagiotis] decided to modify an off-the-shelf bread maker to enable remote control via the Internet.

[Panagiotis] had to remove pretty much all of the original control circuitry for this device. The original controller was replaced with an Arduino Uno R3 and an Ethernet shield. The temperature sensor also needed to be replaced, since [Panagiotis] could not find any official documentation describing the specifications of the original. Luckily, the heating element and mixer motor were able to be re-used.

A few holes were drilled into the case to make room for the Ethernet connector as well as a USB connector. Two relays were used to allow the Arduino to switch the heating element and mixer motor on and off. The front panel of the bread maker came with a simple LCD screen and a few control buttons. Rather than let those go to waste, they were also wired into the Arduino.

The Arduino bread maker can be controlled via a web site that runs on a separate server. The website is coded with PHP and runs on Apache. It has a simple interface that allows the user to specify several settings including how much bread is being cooked as well as the desired darkness of the bread. The user can then schedule the bread maker to start. Bread Online also comes with an “offline” mode so that it can be used locally without the need for a computer or web browser. Be sure to check out the video demonstration below. Continue reading “Bread Online Is A Bread Maker For The Internet Of Things”

Vibrating Distance Torch Illuminates The Dark Without Light

If you’ve ever had to move around in a dark room before, you know how frustrating it can be. This is especially true if you are in an unfamiliar place. [Brian] has attempted to help solve this problem by building a vibrating distance sensor that is intuitive to use.

The main circuit is rather simple. An Arduino is hooked up to both an ultrasonic distance sensor and a vibrating motor. The distance sensor uses sound to determine the distance of an object by calculating how long it takes for an emitted sound to return to the sensor. The sensor uses sounds that are above the range of human hearing, so no one in the vicinity will hear it. The Arduino then vibrates a motor quickly if the object is very close, or slowly if it is far away. The whole circuit is powered by a 9V battery.

The real trick to this project is that the entire thing is housed inside of an old flashlight. [Brian] used OpenSCAD to design a custom plastic mount. This mount replaces the flashlight lens and allows the ultrasonic sensor to be secured to the front of the flashlight. The flashlight housing makes the device very intuitive to use. You simply point the flashlight in front of you and press the button. Instead of shining a bright light, the flashlight vibrates to let you know if the way ahead is clear. This way the user can more easily navigate around in the dark without the risk of being seen or waking up people in the area.

This reminds us of project Tacit, which used two of these ultrasonic sensors mounted on a fingerless glove.

Water Gun

Motion Sensing Water Gun Tweets Photos To Embarrass Enemies

[Ashish] is bringing office warfare to the next level with a motion sensing water gun. Not only does this water gun automatically fire when it detects motion, but it also takes a photo of the victim and publishes it on Twitter.

This hack began with the watergun. [Ashish] used a Super Soaker Thunderstorm motorized water gun. He pulled the case apart and cut one of the battery wires. he then lengthened the exposed ends and ran them out of the gun to his control circuit. He also placed a protection diode to help prevent any reverse EMF from damaging his more sensitive electronics. The new control wires run to a MOSFET on a bread board.

[Ashish] is using a Lightblue Bean board as a microcontroller. The Bean is Arduino compatible and can be programmed via low energy Bluetooth. The Bean uses an external PIR sensor to detect motion in the room. When it senses the motion, it activates the MOSFET which then turns on the water gun.

[Ashish] decided to use Node-RED and Python to link the Bean to a Twitter account. The system runs on a computer and monitor’s the Bean’s serial output. If it detects the proper command, it launches a Python script which takes a photo using a webcam. A second script will upload that photo to a Twitter account. The Node-RED server can also monitor the Twitter account for incoming direct messages. If it detects a message with the correct password, it can use the rest of the message as a command to enable or disable the gun.

Temperature Logger

Logging Engine Temperature For RC Models

[Rui] enjoys his remote-controlled helicopter hobby and he was looking for a way to better track the temperature of the helicopter’s engine. According to [Rui], engine temperature can affect the performance of the craft, as well as the longevity and durability of the engine. He ended up building his own temperature logger from scratch.

The data logger runs from a PIC 16F88 microcontroller mounted to a circuit board. The PIC reads temperature data from a LM35 temperature sensor. This device can detect temperatures up to 140 degrees Celsius. The temperature sensor is mounted to the engine using Arctic Alumina Silver paste. The paste acts as a glue, holding the sensor in place. The circuit also contains a Microchip 24LC512 EEPROM separated into four blocks. This allows [Rui] to easily make four separate data recordings. His data logger can record up to 15 minutes of data per memory block at two samples per second.

Three buttons on the circuit allow for control over the memory. One button selects which of the four memory banks are being accessed. A second button changes modes between reading, writing, and erasing. The third button actually starts or stops the reading or writing action. The board contains an RS232 port to read the data onto a computer. The circuit is powered via two AA batteries. Combined, these batteries don’t put out the full 5V required for the circuit. [Rui] included a DC-DC converter in order to boost the voltage up high enough.

USB Switch

Reverse Engineering How A USB Switch Switches

[Daniel] found himself with a need to connect a single USB device to two Linux servers. After searching around, he managed to find an inexpensive USB switch designed to do just that. He noticed that the product description mentioned nothing about Linux support, but he figured it couldn’t be that hard to make it work.

[Daniel] started by plugging the device into a Windows PC for testing. Windows detected the device and installed an HID driver automatically.  The next step was to install the control software on the Windows system. This provided [Daniel] with a tray icon and a “switch” function. Clicking this button disconnected the HID device from the Windows PC and connected the actual USB device on the other side of the USB switch. The second computer would now have access to the HID device instead.

[Daniel] fired up a program called SnoopyPro. This software is used to inspect USB traffic. [Daniel] noticed that a single message repeated itself until he pressed the “switch” button. At that time, a final message was sent and the HID device disconnected.

Now it was time to get cracking on Linux. [Daniel] hooked up the switch to a Linux system and configured a udev rule to ensure that it always showed up as /dev/usbswitch. He then wrote a python script to write the captured data to the usbswitch device. It was that simple. The device switched over as expected. So much for having no Linux support!