Guitar Effect Built From An Old Record Player

With little more than a gutted record player, a light bulb, and the legendary 555 timer IC, [Jacob Ellzey] has constructed this very slick optical tremolo effect for his guitar. By modulating the volume of the input signal, the device creates the wavering effect demonstrated in the video after the break.

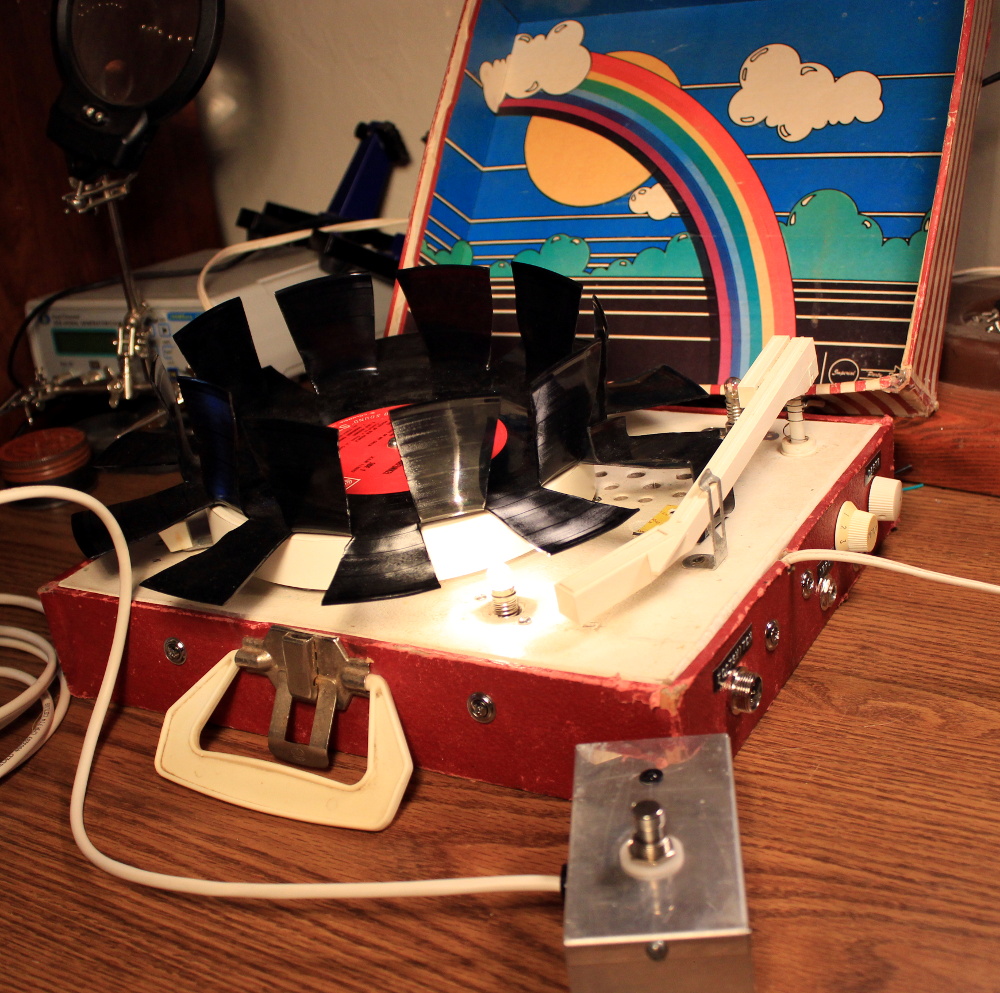
The key is a vinyl record with large tabs cut out of it. As the record spins, these voids alternately block and unblock a small incandescent bulb. A common GL5537 photoresistor, mounted on the arm that originally held the player’s needle, picks up the varying light levels and passes that on to the electronics underneath the deck. An important note here is that different spacing and sizing of the cutouts will change the sound produced by the effect. [Jacob] has already produced a few different designs and plans on experimenting with more now that the electronics are completed.

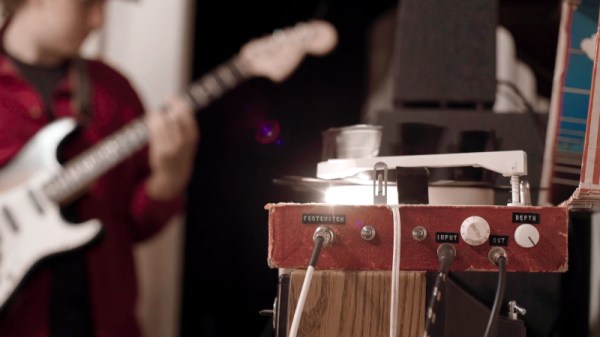
Under the hood there’s a voltage divider and low gain amplifier connected to the photoresistor, and also a 555 timer circuit that’s driving the incandescent bulb. Once he was done fiddling with them, the circuit was moved to a neat little protoboard. A pair of potentiometers mounted through the side of the record player allow for adjusting the depth of the effect itself, as well as the output volume. Naturally, there’s also an external foot pedal that allows keying the effect on and off without taking your hands from the guitar.

As is usually the case, everything was going well on this project until the final moments, when [Jacob] found that the circuit and bulb were both browning out when powered from the same transformer. As a quick fix, he gutted a Keurig and used its transformer to drive the light bulb by itself. With independent power supplies, he was ready to rock.

Of course this isn’t the first time we’ve seen a piece of consumer electronics modified into a guitar effect, but if you’re looking for something a bit more built for purpose, there’s plenty of high-tech options to keep you busy.

Continue reading “Guitar Effect Built From An Old Record Player”

Conductive Tape Current Capacity Comparison

The world of DIY circuits for STEM and wearables has a few options for conductors. Wire with Dupont connectors is a standard, as is adhesive copper tape. There’s also conductive nylon/steel thread or ribbon. Which you choose depends on your application, of course, but as a general rule wire is cheap and ubiquitous while making connections is more challenging; copper tape is cheap and simple to use, but delicate and rips easily, so is best used for flat surfaces that won’t see a lot of stress or temporary applications; and conductive nylon thread or tape is better for weaving into fabrics.

The Brown Dog Gadgets team wanted to respond to a frequent question they are asked, what are the current limits for their Maker Tape (nylon/steel ribbon), so they ran some experiments to find out. In the name of Science you’ll see some flames in the video below, but only under extreme conditions.
Continue reading “Conductive Tape Current Capacity Comparison”

Antique Pocket Watch Project Updates Antique Pocket Watch

Here at Hackaday we have a bit of a preoccupation with timepieces. Maybe it’s the deeply personal connection to an object you wear on your body, or the need for ultimate reliability. Perhaps it’s just a fascination with the notion of time itself. Whatever the case, we don’t seem to be alone as there is a constant stream of time-related projects coming through our virtual doors. For this article we’ve unearthed the LED Pocketwatch 1.0 by [Dr. Pauline Pounds] from way back in 2009 (ironically via a post about a wristwatch from last year!). Fortunately for us the Internet Archive has saved this heirloom nouveau from the internet dustbin so we can appreciate the craftsmanship involved in [Dr. Pounds]’ work.

Check out the wonderful, spiral routing!

My how far we’ve come; a decade after this project was posted a hacker might choose to 3d print a case for a new wearable, but in 2009 that would have been an entire project by itself! [Dr. Pounds] chose to use the casing from an antique Elgin pocket watch. Even through the mists of a grainy demo video we can imagine how soft the well-worn casing must be from heavy use. This particular unit was chosen because it was a hefty 50mm in diameter, leaving plenty of room inside for a 44mm double sided PCBA with 133 0603 LEDs (60 seconds, 60 minutes, 12 hours), a PIC 16F946, an ERM, and a 110mAh LiPo. But what really sets the LED Pocketwatch 1.0 apart is the user interface.

The ERM is attached directly to the rear of the case in order to best conduct vibration to the outside world. For maximum authenticity it blips on the second, to give a sense that the digital watch is mechanically ticking like the original. The original pocket watch was designed with a closing lid which is released when the stem is pressed. [Dr. Pounds] integrated a button and encoder with the end of the stem (on the PCBA) so the device can be aware of this interaction; on lid open it wakes the device to display the time on the LEDs. The real pièce de résistance is that he also integrated a minuscule rotary encoder, so when the stem is pressed you can rotate it to set the time. It’s all quite elegantly integrated and imminently usable.

At this point we’d love to link to sources, detailed drawings, or CAD files, but unfortunately we haven’t found any. If this has you inspired check out some of the other pocket watches we’ve posted about in the past. If you’re interested in a live demo of the LED Pocketwatch 1.0, check out the original video after the break.

Continue reading “Antique Pocket Watch Project Updates Antique Pocket Watch”

RC Strandbeest Is A Head Above The Rest

Prolific maker [Jeremy Cook] recently put the finishing touches (at least, for now) on his impressive ClearCrawler remote controlled Strandbeest, which includes among other things a surprisingly expressive “head” complete with LED matrix eyes. For anyone in the audience who was only mildly terrified of these multi-legged robotic beasties before, you may want to avert your eyes from the video after the break.

The clever locomotive design of [Theo Jansen] known as Strandbeest is a legged walker. What makes it special is that the legs themselves are not independent, but work together for a gliding action more akin to wheeled bots. [Jeremy’s] work with ClearCrawler has taken this to another level of precision and mechanization.

Before installation of the electronics, the ClearCrawler had to be tethered to a bench power supply, and could only move forward and backward. Once the locomotion was working as expected, [Jeremy] was ready to install some brains into the beast.

The robot is controlled by a dual motor driver and an Arduino Nano socketed in an I/O expansion board. Communication between the Nano onboard the walker and the hand-held remote control is provided by of a pair of nRF24L01 modules. The controller itself is a simple affair, comprised of a joystick shield plugged into an Arduino Uno.

The robot’s head is made up of a chunk of clear polycarbonate tube with a 3D printed internal frame to hold the dual 8×8 LED matrices that serve as its animated eyes. This arrangement is mounted on a servo pan and tilt mount, which is controlled by an analog stick on the controller. While the head doesn’t currently serve any practical function, it does give [Jeremy] a chance to emote a bit with his creation; a popular trick when he shows the ClearCrawler off.

A few years ago we covered this robot’s predecessor, the considerably larger ClearWalker. While that machine was surely a beauty to behold, this smaller and more agile iteration of the concept is quite a bit more practical.

Continue reading “RC Strandbeest Is A Head Above The Rest”

Hackaday Links Column Banner

Hackaday Links: December 8, 2019

Now that November of 2019 has passed, it’s a shame that some of the predictions made in Blade Runner for this future haven’t yet come true. Oh sure, 109 million people living in Los Angeles would be fun and all, but until we get our flying cars, we’ll just have to console ourselves with the ability to “Enhance!” photographs. While the new service, AI Image Enlarger, can’t tease out three-dimensional information, the app is intended to sharpen enlargements of low-resolution images, improving the focus and bringing up details in the darker parts of the image. The marketing material claims that the app uses machine learning, and is looking for volunteers to upload high-resolution images to improve its training set.

We’ve been on a bit of a nano-satellite bender around here lately, with last week’s Hack Chat discussing simulators for CubeSats, and next week’s focusing on open-source thrusters for PocketQube satellites. So we appreciated the timing of a video announcing the launch of the first public LoRa relay satellite. The PocketCube-format satellite, dubbed FossaSat-1, went for a ride to space along with six other small payloads on a Rocket Lab Electron rocket launched from New Zealand. Andreas Spiess has a short video preview of the FossaSat-1 mission, which was designed to test the capabilities of a space-based IoT link that almost anyone can access with cheap and readily available parts; a ground station should only cost a couple of bucks, but you will need an amateur radio license to uplink.

We know GitHub has become the de facto standard for source control and has morphed into a collaboration and project management platform used by everybody who’s anybody in the hacking community. But have you ever wished for a collaboration platform that was a little more in tune with the needs of hardware designers? Then InventHub might be of interest to you. Currently in a limited beta – we tried to sign up for the early access program but seem to have been put on a waiting list – it seems like this will be a platform that brings versioning directly to the ECAD package of your choice. Through plugins to KiCad, Eagle, and all the major ECAD players you’ll be able to collaborate with other designers and see their changes marked up on the schematic — sort of a visual diff. It seems interesting, and we’ll be keeping an eye on developments.

Amazon is now offering a stripped-down version of their Echo smart speaker called Input, which teams up with speakers that you already own to satisfy all your privacy invasion needs on the super cheap — only $10. At that price, it’s hard to resist buying one just to pop it open, which is what Brian Dorey did with his. The teardown is pretty standard, and the innards are pretty much what you’d expect from a modern piece of surveillance apparatus, but the neat trick here involved the flash memory chip on the main board. Brian accidentally overheated it while trying to free up the metal shield over it, and the BGA chip came loose. So naturally, he looked up the pinout and soldered it to a micro-SD card adapter with fine magnet wire. He was able to slip it into a USB SD card reader and see the whole file system for the Input. It was a nice hack, and a good teardown.

This FPV Tank Explores The Lawn

Radio control is good and all, and it’s always fun to watch a little vehicle scoot about the backyard. But there’s always something to be said for feeling as though you’re really in control. First person view, or FPV, is the way to do it, and [Brian] has gone down that route with this tidy tank build.

The tank is 3D printed, from the chassis right down to the wheels. There’s even a moving “eye” up front containing the FPV camera, controlled by a servo, allowing the driver to look up and down. A 5.8 GHz transmitter is used to send the signal back to the driver’s goggles. The tracks are a snap-together design that are fully 3D printed, requiring no additional metal links or hardware. Forward propulsion is courtesy of a pair of 12 volt gear motors, driven from an L298N motor driver. An Arduino Nano is used in conjunction with Spektrum RC gear to receive signals and tell the tank where to go.

It’s a tidy build that would be great fun to drive through the bushes or through the house. We’ve seen even tinier builds used to inspect crawlspaces. If you build one of your own, be sure to let us know.

From Fail To Wail: Guitar Picks Made From 3D Printed Waste

Between failed prints and iterative designs that need a few attempts before you nail them down, a certain amount of wasted material is essentially unavoidable when 3D printing. The good news is that PLA is a bioplastic and can be broken down via industrial composting, but even still, any method that allows you to reuse this material at home is worth taking a look at.

In a recent video, [Noah Zeck] details one potential use for your scrap plastic by turning his failed 3D prints into guitar picks. The idea here could really be applied to anything you can make out of thin plastic sheeting, but the fact that you can easily and cheaply produce picks with a commercially available punch makes this application particularly appealing.

The first step in this process is about as low-tech as it gets: wrap your scrap printed parts in rags, and beat them with a sledge hammer. This breaks them up into smaller and more manageable pieces, which is important for the next step. If the parts are small enough and you’ve got a decently powerful blender you don’t mind devoting to plastic recycling, we imagine that would make short work of this step as well.

Once suitably pulverized, [Noah] puts the plastic on a piece of glass and gets it warmed up with a heat gun. PLA has a fairly low glass transition temperature, so it shouldn’t take much time to soften. Then he puts a second piece of glass on top and squeezes them together to get a thin, flat sheet of plastic. Once cooled, he punches his guitar picks out of the sheet, with bonus points if the colors swirled around into interesting patterns. If you’re not musically inclined, we’ve seen a very similar method used to produce colorful floor tiles.

Continue reading “From Fail To Wail: Guitar Picks Made From 3D Printed Waste”