It’s not surprising that Analog to Digital Converters (ADC’s) now employ several techniques to accomplish higher speeds and resolutions than their simpler counterparts. Enter the Delta-Sigma (Δ∑) ADC which combines a couple of techniques including oversampling, noise shaping and digital filtering. That’s not to say that you need several chips to accomplish this, these days single chip Delta-Sigma ADCs and very small and available for a few dollars. Sometimes they are called Sigma-Delta (∑Δ) just to confuse things, a measure I applaud as there aren’t enough sources of confusion in the engineering world already.
I’m making this a two-parter. I will be talking about some theory and show the builds that demonstrate Delta-Sigma properties and when you might want to use them.
3D printers have become incredibly cheap, you can get a fully workable unit for $200 – even without throwing your money down a crowdfunded abyss. Looking at the folks who still buy kits or even build their own 3D printer from scratch, investing far more than those $200 and so many hours of work into a machine you can buy for cheap, the question “Why the heck would you do that?” may justifiably arise.
The answer is simple: DIY 3D printers done right are rugged workhorses. They work every single time, they never break, and even if: they are an inexhaustible source of spare parts for themselves. They have exactly the quality and functionality you build them to have. No clutter and nothing’s missing. However, the term DIY 3D printer, in its current commonly accepted use, actually means: the first and the last 3D printer someone ever built, which often ends in the amazing disappointment machine.
This post is dedicated to unlocking the full potential in all of these builds, and to turning almost any combination of threaded rods and plywood into a workshop-grade piece of equipment.
“Did I forget something?” It’s that nagging feeling every engineer has when their project is about to be deployed – it may be a product about to be ramped into production, a low volume product, or even a one off like a microsatellite. If you have the time and a few prototypes to spare though, there are ways to alleviate these worries. The key is a test method which has been used in aerospace, military, and other industries for years – Highly Accelerated Life Testing (HALT).
How to HALT
The idea behind HALT testing can be summed up in a couple of sentences:
Beat your product to death.
Figure out what broke.
Fix it, and fix the design.
Repeat.
Sounds barbaric, and in many cases it is. HALT testing is often associated with giant test chambers which are literally designed to torture anything inside them. Liquid nitrogen shock cools the chamber as low as -100°C. The Device Under Test (DUT) can soak at that temperature for hours. Powerful heaters then blast the chamber, causing temperature rises of up to 90°C per minute, topping off at up to 200°C. Pneumatic hammers beat on the chamber table causing vibrations at up to 90 Grms and 10 KHz. Corrosive sprays simulate years of rain and humidity. These chambers are literally hell on earth for any device unlucky enough to be placed inside them. It’s easy to see why this sort of testing is often referred to as “Shake and Bake”.
BB-8 is the much loved new droid introduced in the 2016 movie Star Wars: The Force Awakens, though in my case from the very first trailer released in 2014 I liked it for the interesting engineering problems it posed. How would you make a robot that’s a ball that rolls along, but with a head that stays on top while the ball rolls under it?
BB-8 in 1st Star Wars: The Force Awakens trailer
Hamster in hamster wheel
To make the ball roll, the answer most people found obvious at first was to use the analogy of a hamster wheel. The hamster running inside makes the wheel turn. In the BB-8 building world, which is quite large, the drive mechanism has come to be called a hamster drive, or just a hamster.
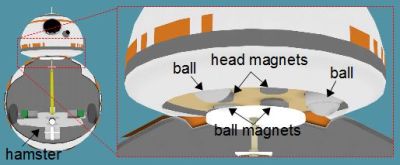
Magnets holding the head on
For the head, it seemed obvious that there would be magnets inside the ball, perhaps held in place near the top of the ball by a post extending up from the hamster. Corresponding magnets in attraction would then be attached to the underside of the head, and balls (also mounted under the head) would keep the head moving smoothly over the ball.
The magnet approach for the head has turned out to be the method used by all BB-8 builders that I’ve seen. However, the hamster has turned out to be only one of multiple solutions. Since the original debut many different methods have been used in builds and we’re going to have a lot of fun looking at each separate approach. It’s almost like revealing a magic trick; but really it’s all just clever engineering.
Note that for the actual movie, a combination of 7 or 8 props and CGI were used. The official working BB-8s that are shown at various promotional events were built after the movie was made and as of this writing, few details of their construction have been released. One notable detail, however, is that they aren’t using hamster drives.
Below are details of all the different BB-8 drive systems I’ve seen so far that have been built along with how they work.
Lasers are optical amplifiers, optical oscillators, and in a way, the most sophisticated light source ever invented. Not only are lasers extremely useful, but they are also champions of magnitude: While different laser types cover the electromagnetic spectrum from radiation (<10 nm) over the visible spectrum to far infrared light (699 μm), their individual output band can be as narrow as a few µHz. Their high temporal and spatial coherence lets them cover hundreds of meters in a tight beam of lowest divergence as a perfectly sinusoidal, electromagnetic wave. Some lasers reach peak power outputs of several exawatts, while their beams can be focused down to the smallest spot sizes in the hundreds and even tens of nanometers. Laser is the acronym for Light Amplification by Stimulated Emission Of Radiation, which suggests that it makes use of a phenomenon called stimulated emission, but well, how exactly do they do that? It’s time to look the laser in the eye (Disclaimer: don’t!).
Working with high voltage is like working with high pressure plumbing. You can spring a leak in your plumbing, and of course you fix it. And now that you’ve fixed that leak, you’re able to increase the pressure still more, and sometimes another leak occurs. I’ve had these same experiences but with high voltage wiring. At a high enough voltage, around 30kV or higher, the leak manifests itself as a hissing sound and a corona that appears as a bluish glow of excited ions spraying from the leak. Try to dial up the voltage and the hiss turns into a shriek.
Why do leaks occur in high voltage? I’ve found that the best way to visualize the reason is by visualizing electric fields. Electric fields exist between positive and negative charges and can be pictured as electric field lines (illustrated below on the left.) The denser the electric field lines, the stronger the electric field.
Weak and strong electric fields
Ionization in electric fields
The stronger electric fields are where ionization of the air occurs. As illustrated in the “collision” example on the right above, ionization can happen by a negatively charged electron leaving the electrically conductive surface, which can be a wire or a part of the device, and colliding with a nearby neutral atom turning it into an ion. The collision can result in the electron attaching to the atom, turning the atom into a negatively charged ion, or the collision can knock another electron from the atom, turning the atom into a positively charged ion. In the “stripping off” example illustrated above, the strong electric field can affect things more directly by stripping an electron from the neutral atom, again turning it into a positive ion. And there are other effects as well such as electron avalanches and the photoelectric effect.
In either case, we wanted to keep those electrons in the electrically conductive wires or other surfaces and their loss constitutes a leak in a very real way.
In high voltage applications involving tens of thousands of volts, too often people think about the high voltage needed but don’t consider the current. This is especially so when part of the circuit that the charge travels through is an air gap, and the charge is in the form of ions. That’s a far cry from electrons flowing in copper wire or moving through resistors.
Consider the lifter. The lifter is a fun, lightweight flying machine. It consists of a thin wire and an aluminum foil skirt separated by an air gap. Apply 25kV volts across that air gap and it lifts into the air.
Lifter flying with high voltage power supply
Lifter parts
So you’d think that the small handheld Van de Graaff generator pictured below, that’s capable of 80kV, could power the lifter. However, like many high voltage applications, the lifter works by ionizing air, in this case ionizing air surrounding the thin wire resulting in a bluish corona. That sets off a chain of events that produces a downward flowing jet of air, commonly called ion wind, lifting the lifter upward.