JITX Spits Out Handy USB Cable Tester

When USB first came on the scene, one of the benefits was that essentially any four conductors could get you to the point where you could send information at 12 Mbps. Of course everything is faster these days, and reaching today’s speeds requires a little bit more fidelity in the cables. This simple tester makes sure that your modern cables are actually up to the task.

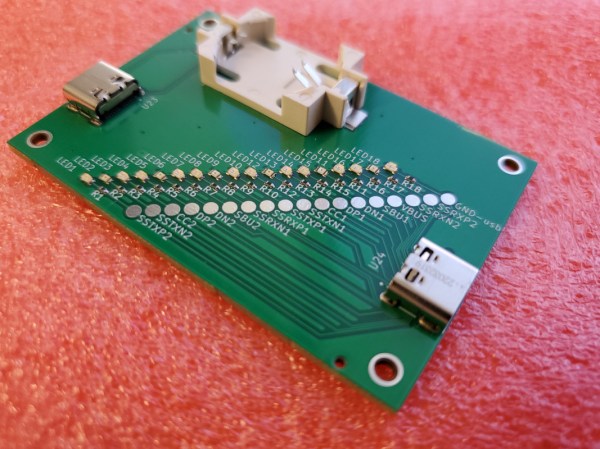
One of the design goals of this project is to automate away the task of testing cables or finding one that works, especially before thinking a problem with a device is somewhere in software, spending hours or days debugging, before realizing that it’s actually being caused by a hardware malfunction. The small PCB has two USB-C fittings to plug in both of the ends of a cable to, and between those connectors there is a number of LEDs. Each LED is paired to one the many conductors within the USB cable, and not only does it show continuity of these conductors but it can also show a high resistance connection via a dimly-lit or off-color display from an LED.

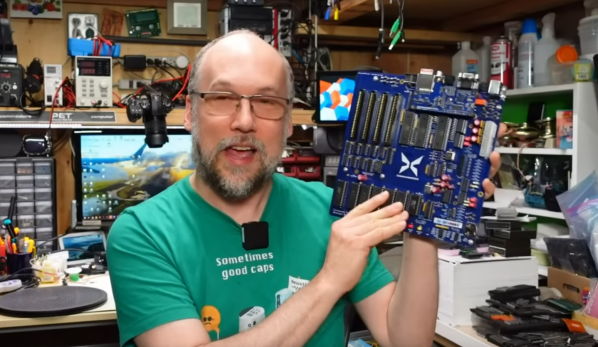
One of the other interesting facets of this build is the use of JITX, which is a software-defined electronics CAD tool which allows PCB design to be automated by writing out the requirements of the PCB into code, rather than drawing it manually. It’s worth a look, and a lot of the schematics of this particular project as well as some discussion on this software can be found on the project’s GitHub page. Incidentally, if this tester looks familiar, it’s probably because your’re thinking of the open source hardware USB tester created by [Álvaro Prieto].

UAV Flight Controller Saves Weight

When building autonomous airborne vehicles like drones or UAVs, saving a little bit of weight goes a long way, literally. Every gram saved means less energy needed to keep the aircraft aloft and ultimately more time in the air, but unmanned vehicles often need to compromise some on weight in order to carry increased computing abilities. Thankfully this one carries a dizzying quantity of computer power for an absolute minimum of weight, and has some clever design considerations to improve its performance as well.

The advantage of this board compared to other similar offerings is that it is built to host a Raspberry Pi Compute Module 4, while the rest of the flight controllers are separated out onto a single circuit board. This means that the Pi is completely sandboxed from the flight control code, freeing up computing power on the Pi and allowing it to run a UAV-specific OS like OpenHD or RubyFPV. These have a number of valuable tools available for unmanned flight, such as setting up a long range telemetry and camera links. The system itself supports dual HD camera input as well as additional support for other USB devices, and also includes an electronic speed controller mezzanine which has support for quadcopters and fixed wing crafts.

Separating non-critical tasks like cameras and telemetry from the more important flight controls has a number of benefits as well, including improved reliability and simpler software and program design. And with a weight of only 30 grams, it won’t take too much cargo space on most UAVs. While the flight computer is fairly capable of controlling various autonomous aircraft, whether it’s a multi-rotor like a quadcopter or a fixed wing device, you might need a little more computing power if you want to build something more complicated.

A Mobile Phone From 1985

It might seem quaint through the lends of history we have the luxury of looking through, but in the mid 1980s it was a major symbol of status to be able to communicate on-the-go. Car phones and pagers were cutting-edge devices of the time, and even though there were some mobile cellular telephones, they were behemoths compared to anything we would recognize as a cell phone today. It wasn’t until 1985 that a cell phone was able to fit in a pocket, and that first device wasn’t just revolutionary because of its size. It made a number of technological advancements that were extremely impressive for its time, and [Janus Cycle] takes us through some of those in this teardown video.

The Technophone came to us from Great Britain by way of a former Ericsson engineer named Nils Mårtensson. It was able to achieve its relatively small stature using a surface-mount PCB, which was a cutting-edge manufacturing process for the time. Not only did it use surface-mount components and boards, but the PCB itself has 12 layers and two sides and hosts two custom Technophone chips. The phone is relatively modular as well, with the screen, battery pack, and other components capable of easily disconnecting from the main board. Continue reading “A Mobile Phone From 1985”

Vehicle-to-Grid Made Easy

As electric cars continue to see increased adoption, one associated technology that was touted long ago that still hasn’t seen widespread adoption is vehicle-to-grid or vehicle-to-home. Since most cars are parked most of the time, this would allow the cars to perform load-levelling for the grid or even act as emergency generators on an individual basis when needed. While this hasn’t panned out for a variety of reasons, it is still possible to use an EV battery for use off-grid or as part of a grid tie solar system, and now you can do it without needing to disassemble the battery packs at all.

Normally when attempting to use a scrapped EV battery for another use, the cells would be removed from the OEM pack and reorganized to a specific voltage. This build, however, eliminates the need to modify the packs at all. A LilyGO ESP32 is used to convert the CAN bus messages from the battery pack to the Modbus communications protocol used by the inverters, in this case a Fronius Gen24, so the inverter and battery can coordinate energy delivery from one to the other automatically. With the hard part out of the way, the only other requirements are to connect a high voltage DC cable from the battery pack to the inverter.

[Dala], the creator of this project, has taken other steps to ensure safety as well that we’d recommend anyone attempting to recreate this build pays close attention to, as these battery packs contain an extremely large amount of energy. The system itself supports battery packs from Nissan Leafs as well as the Tesla Model 3, which can usually be found for comparably low prices. Building battery energy storage systems to make up for the lack of commercially-available vehicle-to-home systems isn’t the only use for an old EV battery, though. For example, it’s possible to use Leaf batteries to triple the range of other EVs like [Muxsan] did with this Nissan van.

Continue reading “Vehicle-to-Grid Made Easy”

The Voltaic Pile: Building The First Battery

In the technologically-underpinned modern world, most of us interact with a battery of some sort every day. Whether that’s the starter battery in a car, the lithium battery in a phone, or even just the coin cell battery in a wrist watch, batteries underpin a lot of what makes society possible now. Not so in the early 1800s when chemists and physicists were first building and experimenting with batteries. And those batteries were enormous, non-rechargable, and fairly fragile to boot. Not something suited for powering much of anything, but if you want to explore what it would have been like to use one of these devices, follow along with [Christopher]’s build of a voltaic pile. Continue reading “The Voltaic Pile: Building The First Battery”

Adding Variometer Functionality To A GPS

Flying a glider, or similarly piloting a paraglider or hang glider, can all be pathways into aviation with a lower barrier of entry than powered flight. Sacrificing one’s engine does generate a few complexities, but can be rewarding as the pilot searches for various means of increasing altitude like ridge soaring or thermaling. You’ll need a special instrument called a variometer to know just how much altitude you’re gaining though, like this one which is built into commercially-available handheld GPS units.

These GPS units are normally intended for use on terra firma only, but [Oganisyan] has figured out a clever way to add this flight instrumentation to these units to help when operating a paraglider. An ATmega328 paired with a pressure sensor is added to the inside of the GPS units and communicates with an available serial interface within the units. To complete the modification, a patched firmware must be installed which adds the variometer function to the display. This upgrade is compatible with a handful of GPS units as well such as the BikePilot2+ or Falk Tiger.

For those who already own one of these GPS units, this could be a cost-effective way of obtaining a variometer, especially since commercially-available variometers tailored for this sort of application can cost around $200 to $500. It is an activity sensitive to cost, though, as it offers a much more affordable option for taking to the skies than any powered craft could, with an exception made for this powered paraglider which offers the ability for powered take off and flight extension using electric-powered props.

Thanks to [MartinO] for the tip!

Commodore 64 Upgrade In Modern Package

While the Commodore 64 was an immensely popular computer for its time, and still remains a strong favorite within the retrocomputing community, there’s a reason we’re not using modern Commodore-branded computers today. Intense competition, company mismanagement, and advancing beyond 8-bit computers too late in the game all led to the company’s eventual downfall. But if you’re still a Commodore enthusiast and always wished you were able to get an upgraded C64, you might want to take a look at the Commander X16, a modern take on this classic computer.

We’ve actually seen the Commander X16 before, but this was back in its early days of prototyping and design. This video from [Adrian’s Digital Basement], also linked below the break, takes a look at how it’s come in the four years since [David Murray] started this project. At its core, it’s an 8-bit 6502-based computer like you’d find in the 1980s but built with new components. There are some more modern updates as well such as the ability to use an SD card as well as built-in SNES controller ports, but the real magic here is the VERA module. Built around an FPGA, this module handles graphics, some of the audio, and the storage capabilities and does all of these things much better than the original Commodore, while still being faithful to what made these computer great.

While the inclusion of the FPGA might offend some of the most staunch 8-bit purists, it turns out to be necessary due to the lack of off-the-shelf video chips and really makes this build shine in the end. It’s also capable of running 6502-based software from other machines too, including the original NES. The VERA module makes it possible to run other software too, including a sample of Sonic the Hedgehog from the Sega Genesis which [Adrian] demonstrates in his video. 6502-based computers are quite versatile as the Commander X16 demonstrates, and it’s even possible to build a rudimentary 6502 on a breadboard with just a few parts.

Continue reading “Commodore 64 Upgrade In Modern Package”