[Stevej52] likes to build things you can’t buy, and this Jetson Nano robot falls well within that category. Reading the project details, you might think [Stevej52] drinks too much coffee. But we think he is just excited to have successfully pulled off the Herculean task of integrating over a dozen hardware and software modules. Very briefly, he is running Ubuntu and ROS on the PC and Nano. It is all tied together with Python code, and is using Modbus over IP to solve a problem getting joystick data to the Nano. We like it when existing, standard protocols can be used because it frees the designer to focus more on the application. Modbus has been around for 40 years, has widespread support in many languages and platforms.
This is an ongoing project, and we look forward to seeing more updates and especially more video of it in action like the one found below. With the recent release of a price-reduced Jetson Nano, which we covered last week, this might be an excellent project to take on.
Every so often, console manufacturers release a crystal edition of their hardware that never really lives up to the hype. The manufacturing realities of producing optically clear plastic mean the expense is rarely justified, even for a special edition. Instead, we get hazy, smoky translucent cases that are comparatively underwhelming. Here to rectify that, [BitHead1000] delivers on a properly transparent PlayStation2.
While the title calls it a Glass PS2, the cutting tools used and the labels on the material make it pretty clear (pun intended) that this build uses acrylic. Regardless, it’s an attractive material all on its own, and much more suited for such a build. To get the best possible visual effect, the internal shielding is removed and tossed in the bin, with plastic standoffs used to hold things in place instead. The case is then assembled around the components, giving an unparalleled view of the hardware inside.
It’s undeniably cool to watch the optical drive doing its thing inside the case when it’s switched on, and a few internal LEDs only add to the spectacle. We’ve seen [BitHead1000] pull off other casemodding feats, too, such as the fire breathing N64. Video after the break.
There’s good news and there’s bad news in what we’re about to tell you. The good news is that a team of physicists has found a blend of hydrogen, carbon, and sulfur that exhibit superconductivity at 59F. Exciting, right? The bad news is that it only works when being crushed between two diamonds at pressures approaching that of the Earth’s core. For perspective, the bottom of the Marianas trench is about 1,000 atmospheres, while the superconductor needs 2.6 million atmospheres of pressure.
Granted, 59F is a bit chilly, but it is easy to imagine cooling something down that much if you could harness superconductivity. We cool off CPUs all the time. However, unless there’s a breakthrough that allows the material to operate under at least reasonable pressures, this isn’t going to change much outside of a laboratory.
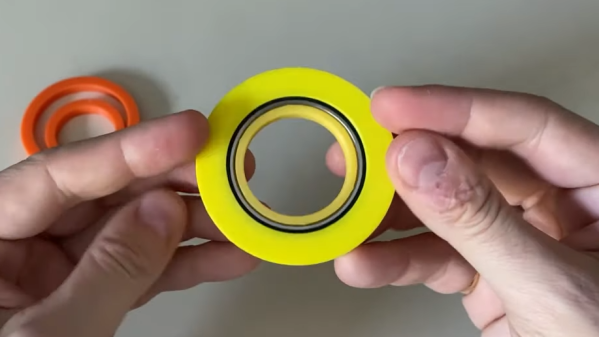
[Dan Royer] shared a tip about how to get a reliably tight fit between 3D printed parts and other hardware (like bearings, for example.) He suggests using crush ribs, a tried-and-true solution borrowed from the world of injection molding and repurposed with 3D printing in mind. Before we explain the solution, let’s first look at the problem a little more closely.
Imagine one wishes to press-fit a bearing into a hole. If that hole isn’t just the right size, the bearing won’t be held snugly. If the hole is a little too big, the bearing is loose. Too small, and the bearing won’t fit at all. Since a 0.1 mm difference can have a noticeable effect on how loose or snug a fit is, it’s important to get it right.
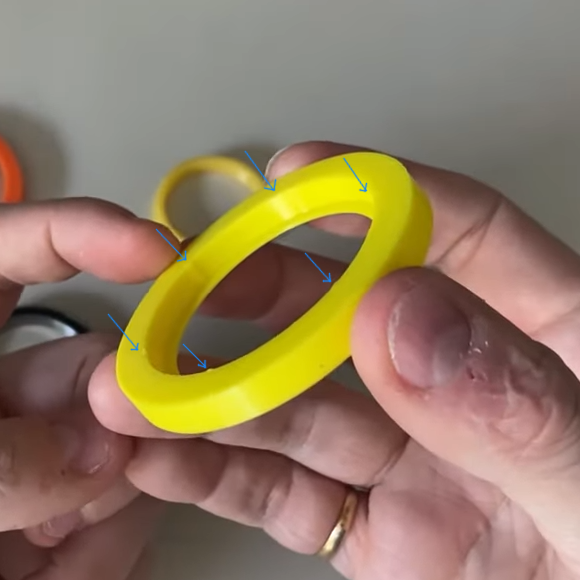
Crush rib locations highlighted with blue arrows.
For a 3D printed object, a hole designed with a diameter of 20 mm (for example) will come out slightly different when printed. The usual way around this is to adjust printer settings or modify the object until the magic combination that yields exactly the right outcome is found, also known as the Goldilocks approach. However, this means the 3D model only comes out right on a specific printer, which is a problem for a design that is meant to be shared. Since [Dan] works on robots with 3D printed elements, finding a solution to this problem was particularly important.
The solution he borrowed from the world of injection molding is to use crush ribs, which can be thought of as a set of very small standoffs that deform as a part is press-fit into them. Instead of a piece of hardware making contact with the entire inside surface of a hole, it makes contact only with the crush ribs. Press fitting a part into crush ribs is far easier (and more forgiving) than trying to get the entire mating surface exactly right.
Using crush ribs in this way is a bit of a hack since their original purpose in injection molding is somewhat different. Walls in injection-molded parts are rarely truly flat, because that makes them harder to eject from a mold. Surfaces therefore have a slight cant to them, which is called a draft. This slight angle means that press fitting parts becomes a problem, because any injection-molded hole will have slanted sides. The solution is crush ribs, which — unlike the walls — are modeled straight. The ribs are small enough that they don’t have an issue with sticking in the mold, and provide the mating surface that a press-fit piece of hardware requires. [Dan] has a short video about applying this technique to 3D printed objects, embedded below.
Terrestrial radio is all well and good, but it limits you to listening to local stations. [Nick Koumaris] lives in a small town in Southern Greece, and his favorite stations sadly don’t transmit in his area. Thus, an internet radio was the natural solution.
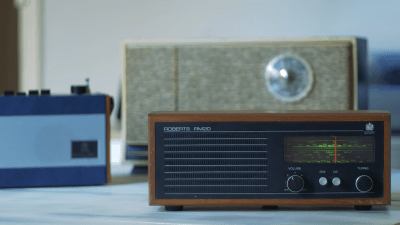
[David Watts] did a similar build, throwing the hardware inside a stunning Roberts RM20 radio from the 1970s.While a Raspberry Pi is a common way to go in these situations, an ESP32 has enough grunt to do the job without the long boot times that come with running a full Linux distribution. Combined with a VS1503 MP3 decoder board and a PAM8403 amplifier, it’s more than capable of tuning in streams online. [Nick] went with a retro-look interface on an LCD, using a Nextion part for its onboard controller and in-built GUI tools. Taking inspiration from the project, [David Watts] executed a similar build, but instead used an Arduino Nano to interface the controls on a vintage Roberts RM20 radio instead.
While we’ve all got smartphones we can use to listen to content online, it can be nice to use a device that allows us to put on some music without constant notifications and chimes every time an email comes in or a government scandal erupts in a nearby country. When building your own radio, you can tailor the interface to suit your tastes – like this build that lets users scan the globe for a station to listen to. Video after the break.
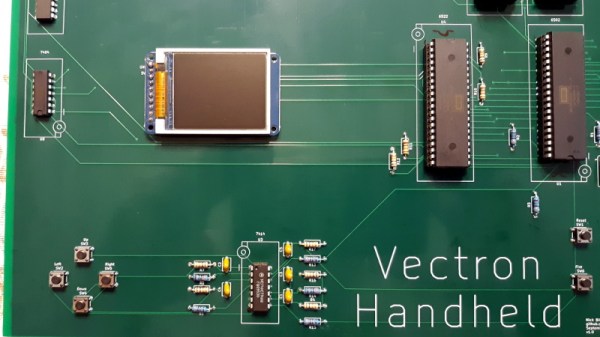
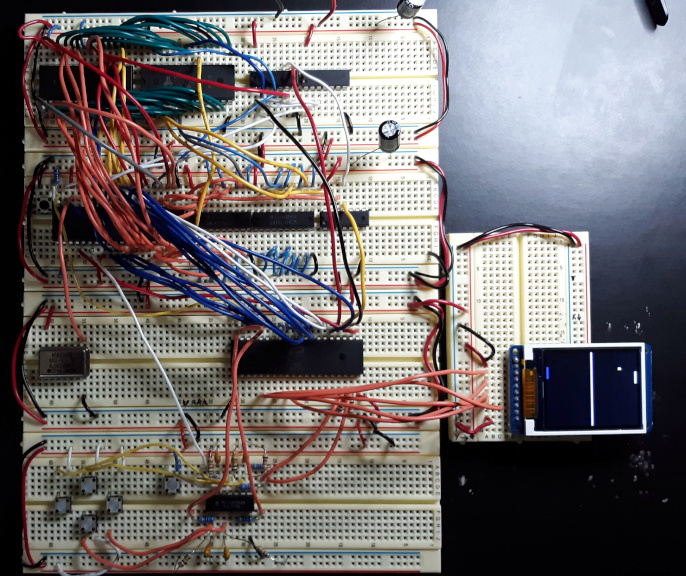
Recreating the arcade smash hit Pong in a device small enough to plug into a home television was a considerable technical challenge back in 1975. Of course, a big part of that was the fact that it needed to be cheap enough that consumers would actually buy it. But had money been no object, the Vectron Handheld by [Nick Bild] shows what a dedicated Pong board based on the 6502 CPU and 7400-series logic could have looked like.
Prototyping the Vectron Handheld
Well, aside from the display anyway. While [Nick] made sure to use components that were contemporaries of the 6502 wherever possible, he did drop in a modern SPI LCD panel. After all, it’s supposed to be a portable game system.
Though as you can see in the video after the break, the massive 273 mm x 221 mm PCB only just meets that description. Incidentally, there’s no technical reason for the board to be this big; [Nick] was just playing it safe as he’s still learning KiCad.
Those with a keen eye towards 6502 projects likely saw the breadboard version of the Vectron that [Nick] put together last year. Compared to the original, the circuit for the handheld has been considerably simplified as it wasn’t designed to be a general purpose 6502 computer. Whether or not you think being able to play Pong on it makes up for those shortcomings is a matter of personal preference.
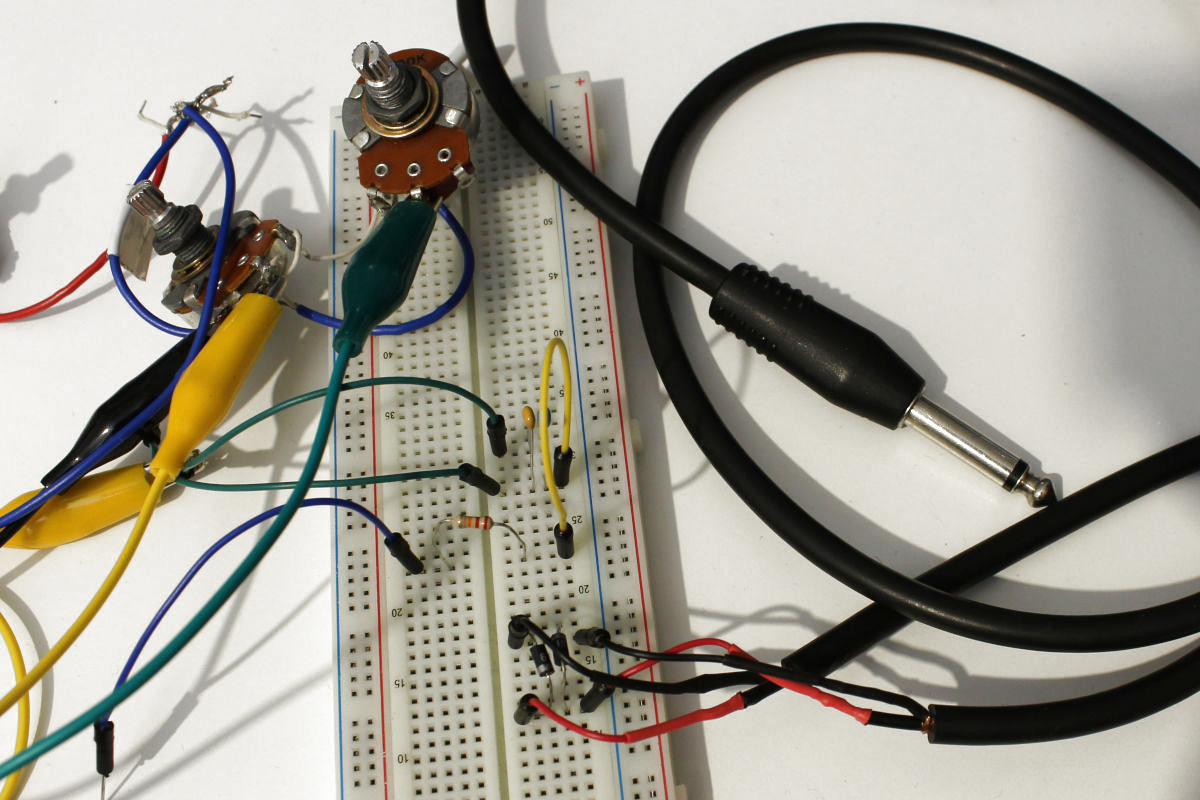
From a guitar hacking point of view, the two major parts that are interesting to us are the pickups and the volume/tone control circuit that lets you adjust the sound while playing. Today, I’ll get into the latter part and take a close look at the components involved — potentiometers, switches, and a few other passive components — and show how they function, what alternative options we have, and how we can re-purpose them altogether.
In that sense, it’s time to heat up the soldering iron, get out the screwdriver, and take off that pick guard / open up that back cover and continue our quest for new electric guitar sounds. And if the thought of that sounds uncomfortable, skip the soldering iron and grab some alligator clips and a breadboard. It may not be the ideal environment, but it’ll work.