A Camera Slider With A Twist

“Scope creep” is often derided as an obstacle between your idea and the delivery of a finished project. That may be, but sometimes the creep is the whole point. It’s how we end up with wonderful builds like this multi-axis differential camera slider.

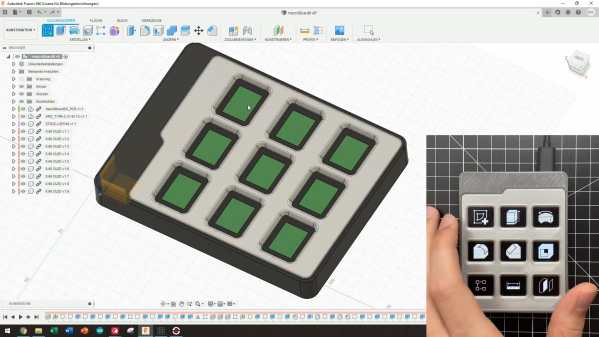
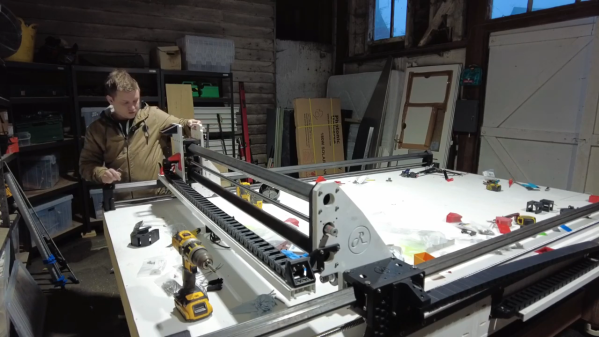
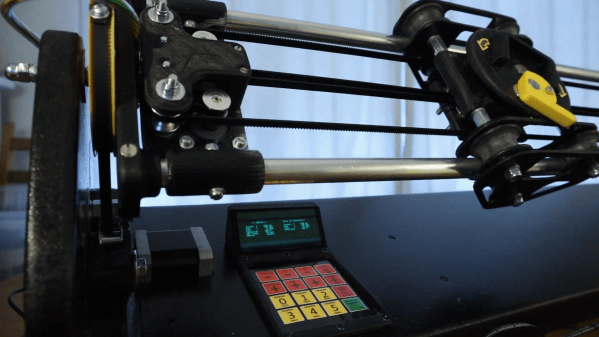
We mention scope creep because that’s what [Jan Derogee] blames for this slider’s protracted development time, as well as its final form. The design is a bit unconventional in that it not only dollies the camera left and right but also works in pan and tilt axes, and it does this without putting any motors on the carriage. Instead, the motors, which are located near the end of the slider rails, transmit power to the carriage via loops of 217timing belt. It’s a little like the CoreXY mechanism; rotating the motors in the same direction and speed slides the carriage, while moving them in opposite directions pans the camera. A Sparkfun Pro Micro in the controller coordinates the motors for smooth multi-axis motion, and the three steppers — there’s a separate motor for the tilt axis — sound really cool all working at the same time. Check out the video below for the full story.

We’ve seen a few fun projects from [Jan] before. Check out his linear clock, the persistence of phosphorescence display, or his touchpad for retrocomputers.

Continue reading “A Camera Slider With A Twist”

Over-Engineered Bottle Opener Takes The Drudgery Out Of Drinking

Some projects take but a single glance for you to know what inspired them in the first place. For this over-engineered robotic bottle opener, the obvious influence was a combination of abundant free time and beer. Plenty of beer.

Of course there are many ways to pop the top on a tall cold one, depending on the occasion. [Matt McCoy] and his cohorts selected the “high-impulse” method, which when not performed by a robot is often accomplished by resting the edge of the cap on a countertop and slapping the bottle down with the palm of one’s hand. This magnificently pointless machine does the same thing, except with style.

The bottle is placed in a cradle which grips it, gently but firmly, and presents it to the opening mechanism in a wholly unnecessary motion-control ballet. Once in place, a lead screw moves a carriage down, simultaneously storing potential energy in a bundle of elastic surgical tubing while tripping a pawl on the edge of the cap. A lever trips at the bottom of the carriage’s travel, sending the pawl flying upward to liberate the libation, giving the robot a well-deserved and sudsy showers. Behold the wonderful interplay of 190 custom parts — and beer — in the video below.

Hats off to [Matt] et al for their tireless efforts on behalf of beleaguered beer-openers everywhere. This seems like the perfect accessory to go along with a game of mind-controlled beer pong.

Continue reading “Over-Engineered Bottle Opener Takes The Drudgery Out Of Drinking”

Edge-Mounted LEDs Make This Spherical POV Look Fantastic

For as many of them as we’ve seen, we still love a good persistence of vision display project. There’s something fascinating about the combination of movement and light creating the illusion of solid surfaces, and there’s always fun to be had in electromechanical aspects of a POV build. This high-resolution spherical POV display pushes all those buttons, and more.

Called “Flicker” for obvious reasons by its creator [Dan Foisy], this POV display started with a pretty clear set of goals in terms of resolution and image quality, plus the need to support animated images, all in a spherical form factor. These goals dictated the final form of the display — a PCB disc spinning vertically. The shaft has the usual slip rings for power distribution and encoders for position feedback. The PCB, though, is where the interesting stuff is.

[Dan] chose to use an FPGA to slice and dice the images, which are fed from a Raspberry Pi’s HDMI port, to the LED drivers. And the LEDs themselves are pretty slick — he found parts with 1.6 mm lead spacing, making them a perfect fit for mounting on the rim of the PCB rather than on either side. A KiCAD script automated the process of laying out the 256 LEDs and their supporting components as evenly as possible, to avoid imbalance issues.

The video below shows Flicker in action — there are a few problem pixels, but on the whole, the display is pretty stunning. We’ve seen a few other spherical POV displays before, but none that look as good as this one does.

Continue reading “Edge-Mounted LEDs Make This Spherical POV Look Fantastic”

Adaptive Macro-Pad Uses Tiny OLED Screens As Keycaps

When we first laid eyes on Keybon, the adaptive macro keyboard, we sort of wondered what the big deal was. It honestly looked like any other USB macro keyboard, with big icons for various common tasks on the chunky keys. But looks can be deceiving, and [Max Kern] worked a couple of surprises into Keybon.

First of all, each one of Keybon’s buttons is actually a tiny OLED display, making the keycaps customizable through software. Each of the nine 0.66″ displays has a resolution of 64 x 48 pixels, which is plenty for all kinds of icons, and each is mounted over an SMD pushbutton switch. He had to deal with the problem of the keycaps just wobbling around atop the switch button without depressing it; this was solved with a 3D-printed cantilever frame that forced the keycaps to pivot only in one axis, resulting in clean, satisfyingly clicky keypresses.

The other trick that Keybon has is interactivity. By itself, it boots up with a standard set of icons and sends the corresponding keystrokes over USB. But when used with its companion Windows application, the entire macro set can be switched out to accommodate whatever application is being used. This gives the users access to custom macros for a web browser, EDA suite, CAD applications, or an IDE. The app supports up to eight macro sets and can be seen in action in the video below.

We love the look and the functionality [Max.K] has built into Keybon, but we wonder if e-ink displays would be a good choice for the keycaps too. They’re available for a song as decommissioned store shelf price tags now, and they might be nice since the icon would persist without power.

Continue reading “Adaptive Macro-Pad Uses Tiny OLED Screens As Keycaps”

Animatronic Saturn V Launch Tower Sends Lego Model To The Moon

When it comes to their more adult-oriented models, Lego really knocked it out of the park with their Saturn V rocket model. Within the constraints of the universe of Lego parts, the one-meter-tall model is incredibly detailed, and thousands of space fans eagerly snapped up the kit when it came out.

But a rocket without a launchpad is just a little sad, which is why [Mark Howe] came up with this animatronic Saturn V launch pad and gantry for his rocket model. The level of detail in the launchpad complements the features of the Saturn V model perfectly, and highlights just what it took to service the crew and the rocket once it was rolled out to the pad. As you can imagine, extensive use of 3D-printed parts was the key to getting the look just right, and to making parts that actually move.

When it’s time for a launch, the sway control arm and hammerhead crane swing out of the way under servo control as the Arduino embedded in the base plays authentic countdown audio. The crew catwalk swings away, the engines light, and the service arms swing back. Then for the pièce de résistance, the Saturn V begins rising slowly from the pad on five columns of flame. [Mark] uses a trio of steppers driving linear actuators to lift the model; the flame effect is cleverly provided by strings of WS2812s inside five clear plastic tubes. We have to say it took some guts to put the precious 1,969-piece model on a lift like that, but the effect was well worth the risk.

This project has a great look and is obviously a labor of love, and a great homage to the Apollo program’s many successes. We’ve got a ton of other Apollo-era hacks on our pages, including a replica DSKY, a rejuvenated AGC, and a look behind the big boards of mission control.

Continue reading “Animatronic Saturn V Launch Tower Sends Lego Model To The Moon”

Enormous CNC Router Uses Clever Tricks To Improve Performance

CNC machines made from wood and 3D-printed parts may be popular, but they aren’t always practical from a precision and repeatability standpoint. This is especially true as the machines are scaled up in size, where the compliance of their components starts to really add up. But can those issues be resolved? [jamie clarke] thinks so, and he’s in the process of building a CNC router that can handle a full sheet of plywood. (Video, embedded below.)

This is very much a work in progress, and the videos below are only the very beginning of the process. But we found [jamie]’s build interesting even at this early point because he has included a few clever tricks to control the normal sources of slop that plague larger CNC machines. To provide stiffness on a budget, [jamie] went with a wooden torsion-box design for the bed of his machine. It’s the approach taken by the Root CNC project, which is the inspiration for this build. The bed is formed from shallow boxes that achieve their stiffness through stressed skins applied to rigid, lightweight frames.

Upon the torsion-box bed are guide rails made from commodity lengths of square steel tubing. Stiff these may be over short lengths, but over the three meters needed to access a full sheet of plywood, even steel will bend. [jamie]’s solution is a support that moves along with the carriage, which halves the unsupported length of the beam at all points of travel. He’s using a similar approach to fight whip in the ball screw, with a clever flip-down cradle at the midpoint of the screw.

So far, we’re impressed by the quality of this build. We’re looking forward to seeing where this goes and how well the machine performs, so we’re paying close attention to the playlist for updates. At an estimated build cost of £1,500, this might be just the CNC build you’ve been looking for.

Continue reading “Enormous CNC Router Uses Clever Tricks To Improve Performance”

Remoticon Video: Intro To Modern Synthesis Using VCV Rack

Modular synthesizers, with their profusion of knobs and switches and their seemingly insatiable appetite for patch cables, are wonderful examples of over-complexity — the best kind of complexity, in our view. Play with a synthesizer long enough and you start thinking that any kind of sound is possible, limited only by your imagination in hooking up the various oscillators, filters, and envelope generators. And the aforementioned patch cables, of course, which are always in short supply.

Luckily, though, patch cables and the modules they connect can be virtualized, and in his 2020 Remoticon workshop, Jonathan Foote showed us all the ways VCV Rack can emulate modular synthesizers right on your computer’s desktop. The workshop focused on VCV Rack, where Eurorack-style synthesizer modules are graphically presented in a configurable rack and patched together just like physical synth modules would be.

Continue reading “Remoticon Video: Intro To Modern Synthesis Using VCV Rack”