Nintendo Switch Doubles As Network Switch

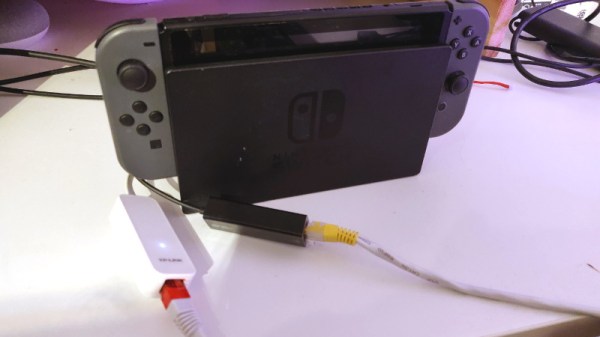
Coming straight to you from the “Department of Redundant Redundancies” comes this clever hack that turns a Switch into a switch. More specifically, a network switch. Not even a half bad one either, judging by the speed tests [Cynthia Revström] performed after setting it all up. We wouldn’t advise you dump your existing network gear in favor of a repurposed game system, but perhaps in a pinch…

Despite what you might be thinking, there’s no hardware modifications at work here. This is a fully functional Nintendo Switch that’s just had two USB to Ethernet adapters plugged into it. The secret ingredient is the addition of some Penguin Power, up and running on Nintendo’s latest and greatest thanks to a project called switchroot.

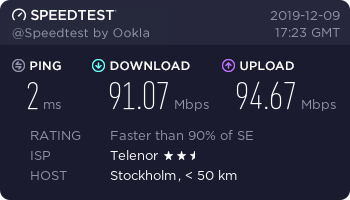
With Linux running on the system, all [Cynthia] had to do was make sure that the USB to Ethernet adapters were supported, and fiddle around with the brctl and ip commands to configure a bridge between the interfaces to get the packets moving. Putting the Switch between the main network and a test computer showed it had a throughput of just over 90 Mbps, which is about all that could be expected from the USB-connected network interfaces.

From here it wouldn’t have taken much more effort to get the system working as a wireless router and providing services like DHCP and NAT to clients. But since Nintendo didn’t see fit to call it the Router, that would’ve offered minimal meme value. There’s always next generation.

Seeing the Nintendo Switch do a surprisingly good job running as an Ethernet switch is even more surprising given the fact that it struggles to function with accessories that are actually intended for it. Though to be fair, the migration to USB-C has been a little rockier than most of us would have hoped.

3D Print Your Way To A Glass Cockpit Simulator

Today’s commercial aircraft are packed to the elevators with sensors, computers, and miles and miles of wiring. Inside the cockpit you’re more than likely to see banks of LCDs and push buttons than analog gauges. So what’s that mean for the intrepid home simulator builder? Modern problems require modern solutions, and this 3D printed simulator is about as modern as it gets.

Published to Thingiverse by the aptly named [FlightSimMaker], this project consists of a dizzying number of 3D-printed components that combine into a full-featured desktop simulator for the Garmin G1000 avionics system. Everything from the parking brake lever to the push buttons in the display bezels was designed and printed: over 200 individual parts in all. Everything in this X-Plane 11 compatible simulator is controlled by an Arduino Mega 2560 with the SimVim firmware.

To help with connecting dozens of buttons, toggle switches, and rotary encoders to the Arduino, [FlightSimMaker] uses five CD74HC4067 16-channel multiplexers. The display is a 12.1 inch 1024 x 768 LCD panel with integrated driver, and comes in at the second most expensive part of the build behind the rotary encoders. All told, the estimated cost per display is around $250 USD.

Even if you aren’t looking to build yourself a high-tech flight simulator, there’s plenty of ideas and tips here that could be useful for building front panels. We particularly like the technique used for doing 3D-printed lettering: the part is printed in white, spray painted a darker color, and then the paint is sanded off the faces of the letters to reveal the plastic. Even with a standard 0.4 mm nozzle, this results in clean high-contrast labels on the panel with minimal fuss.

Of course, while impressive, these panels are just the beginning. There’s still plenty more work to do if you want to build an immersive simulation experience. Including, in the most extreme cases, buying a Boeing 737 cockpit.

A Modular System For Building Heavy Duty 18650 Battery Packs

With 18650 cells as cheap and plentiful as they are, you’d think building your own custom battery packs would be simple. Unfortunately, soldering the cells is tricky, and not everyone is willing to invest in a spot welding setup just to put the tabs on them. Of course that’s only half the battle, you’ll still want some battery protection and management onboard to protect the cells.

The lack of a good open source system for pulling all this together is why [Timothy Economu] created DKblock. Developed over the last three years, his open source system allows users to assemble large 18650 battery packs for electric vehicles or home energy storage, complete with integrated intelligent management and protection systems. Perhaps best of all there’s no welding required, the packs simply get bolted together.

Each block of batteries is assembled using screws and standoffs in conjunction with ABS plastic cell holders. A PCB is placed on each side of the stack, and with tabs not unlike what you’d see in a traditional battery compartment, all the cells get connected without having to solder or weld anything to them. This allows for the rapid assembly of battery packs from 7.2 VDC all the way up to 150 VDC , and means individual cells can easily be checked and replaced in the future should the need arise.

For monitoring the cells, a “Block Manager” board is installed on each block, which communicates wirelessly to a “Pack Supervisor” board that monitors the overall health of the system. Obviously, such a robust system is probably a bit overkill if you’re just looking to build a pack for your quadcopter, but if you’re looking to build a DIY Powerwall or juice up a custom electric vehicle, this could be the battery management system you’ve been looking for.

3D Printed Metro Charger Ready For The Wasteland

In the video game Metro 2033 and its subsequent sequels, players fight their way through a post-apocalyptic version of Russia using improvised weapons and tools cobbled together from the sort of bits and bobs the survivors of a nuclear war might be able to scavenge from the rubble. One of the most useful devices in the game is known as the “Universal Charger”: a hand-operated dynamo that the player must use periodically recharge their electrical devices.

The in-game Universal Charger

Being a fan of the series, [Nikola Petrov] wanted to build his own version of the Metro 2033 charger; but rather than going for an exact screen replica, he decided to explore the mechanism itself and see if he could 3D print a functional device.

As demonstrated in the video after the break, his charger manages to produce enough energy to light an LED on each squeeze of the trigger. Though if we were packing our gear to go fight mutated beasties in alternate-future Moscow, we might look for something with a bit more kick.

Beyond the 3D printed parts, the charger uses a couple short pieces of 8 mm rod, a NEMA 17 stepper motor, and a one-way bearing that’s usually used for pull starting small gasolene engines.

Interestingly, [Nikola Petrov] is no stranger to 3D printed electrical generation. If you’re interested in getting some real power out of a NEMA 17 stepper, his fantastic printed wind turbine is a must-see.

Continue reading “3D Printed Metro Charger Ready For The Wasteland”

Catch The Old School BASIC Bug With This Computer Kit

Does the complexity of modern computing ever get you down? Do you find yourself longing for the old days, where you could actually understand what your desktop machine’s hardware and software was doing at any given moment? You aren’t alone, but unfortunately running a 40+ year old computer as your daily driver isn’t really a viable option.

But that doesn’t mean you don’t have options. [Kostas] writes in to tell us about the “CB2 micro”: a diminutive open source retrocomputer kit that can be built in as little as 30 minutes thanks to its through-hole construction and exceptionally low parts count. When completed the miniature computer is an all-in-one BASIC development platform; just connect up a display and a PS/2 keyboard, and you’ve got everything you need to write you own programs or run games and applications developed by the community. You don’t even need a floppy, as the ATmega644P powered board has enough internal flash to store eight programs for easy access through its graphical menu system.

Main menu of the CB2 micro

For many in the audience, a cheap little board that you can assemble yourself and use as a stand-alone BASIC experimentation platform is appealing enough. But thanks to a collection of hardware add-on boards, the CB2 micro can be augmented with some interesting capabilities.

Some are fairly obvious such as adding additional flash storage or RAM, but you can also run the computer on AA or AAA batteries, or add an S-Video port. [Kostas] even explains how to assemble a special serial cable that allows you to network multiple boards together. If you take the plunge and start building your own hardware modules, the sky’s the limit.

Of course, purists may balk because the CB2 micro isn’t using a “real” computer processor. Fair enough. For those that want a more authentic retro experience, you could always pick up a kit like the RC2014, or go all out and cram a Z80 into an Altoids tin so you can carry it around with you.

Software Defined Radio Gets Physical Control

Software Defined Radio (SDR) is a great technology, but there’s something so satisfying about spinning a physical knob to cruise the airwaves. Wanting to restore that tactile experience, [Tysonpower] purchased a cheap USB volume knob and set out to get it working with his software. Unfortunately, getting it up and running took a lot more work than you’re probably expecting.

Programming the knob’s STM32

After verifying that the knob worked for volume control on his computer, [Tysonpower] decided to try and pull the firmware from the device’s STM32 microcontroller. Unfortunately, this is where things got tricky. It turned out the chip had Code Protection enabled, so when it was wired up to a programmer and put into DFU mode, the firmware got wiped. Oops.

That left [Tysonpower] with no choice but to write a new firmware from scratch, which naturally required reverse engineering the device’s hardware. Step one was reading up on STM32 development and getting the toolchain working, which paved the way to getting the knob’s LED to blink. A couple more hours worth of work and some multimeter poking later, and he was able to read the knob’s movement. He describes getting USB HID working as a nightmare due to lack of documentation, but eventually he got that sorted out as well.

The end result is a firmware allows the volume knob to mimic a mouse scroll wheel, which can be used for tuning in many SDR packages. But we think the real success story is the experience [Tysonpower] gained with reverse engineering and working with the STM32 platform. After all, sometimes the journey is just as important as the end result. Continue reading “Software Defined Radio Gets Physical Control”

Sleeper PlayStation Hides A Raspberry Pi 4

[Andreas Wilcox] wanted to get his brother a birthday gift that reflected their shared love for the early days of 3D gaming, but just handing him a second-hand original PlayStation lacked a certain style. So he decided to gut the classic system and replace its dated internals with a shiny new Raspberry Pi 4. But rather than taking the easy way out, he put in the time and effort to integrate the new hardware so seamlessly that the nearly 25 year old console still looks stock from the outside.

The fact that the front ports are functional and work with the original controllers really helps sell the stock look. [Andreas] found a USB to PlayStation controller adapter, liberated the PCB, and soldered it to the back of the system’s ports. Even the memory card slots got in on the action, thanks to female USB connectors installed where the original connector went. It was a tight fit, but the final result was well worth it.

We also love the GPIO-controlled cooling fan complete with a duct designed to blow across the notoriously toasty Pi, and check out that carefully designed holder for the power and reset buttons. This entire project is really a fantastic example of how 3D printed parts can give your projects a far cleaner and more professional look than the hacker’s old standby of hot glue; though of course it demands a considerable time investment.

This isn’t the first time we’ve seen a Raspberry Pi shoehorned into a classic video game console, but it’s absolutely one of the cleanest examples we’ve ever seen. Though if we lump Raspberry Pi portables into the running, the competition is considerably fiercer.