What if Google Glass didn’t have a battery? That’s not too far fetched. This battery-free HD video streaming camera could be built into a pair of eyeglass frames to stream HD video to a nearby phone or other receiver using no bulky batteries or external power source. Researchers at the University of Washington are using backscatter to pull this off.
The problem is that a camera which streams HD video wirelessly to a receiver consumes over 1 watt due to the need for a digital processor and transmitter. The researchers have separated the processing hardware into the receiving unit. They then send the analog pixels from the camera sensor directly to backscatter hardware. Backscatter involves reflecting received waves back to where they came from. By adding the video signal to those reflected waves, they eliminated the need for the power-hungry transmitter. The full details are in their paper (PDF), but here are the highlights.
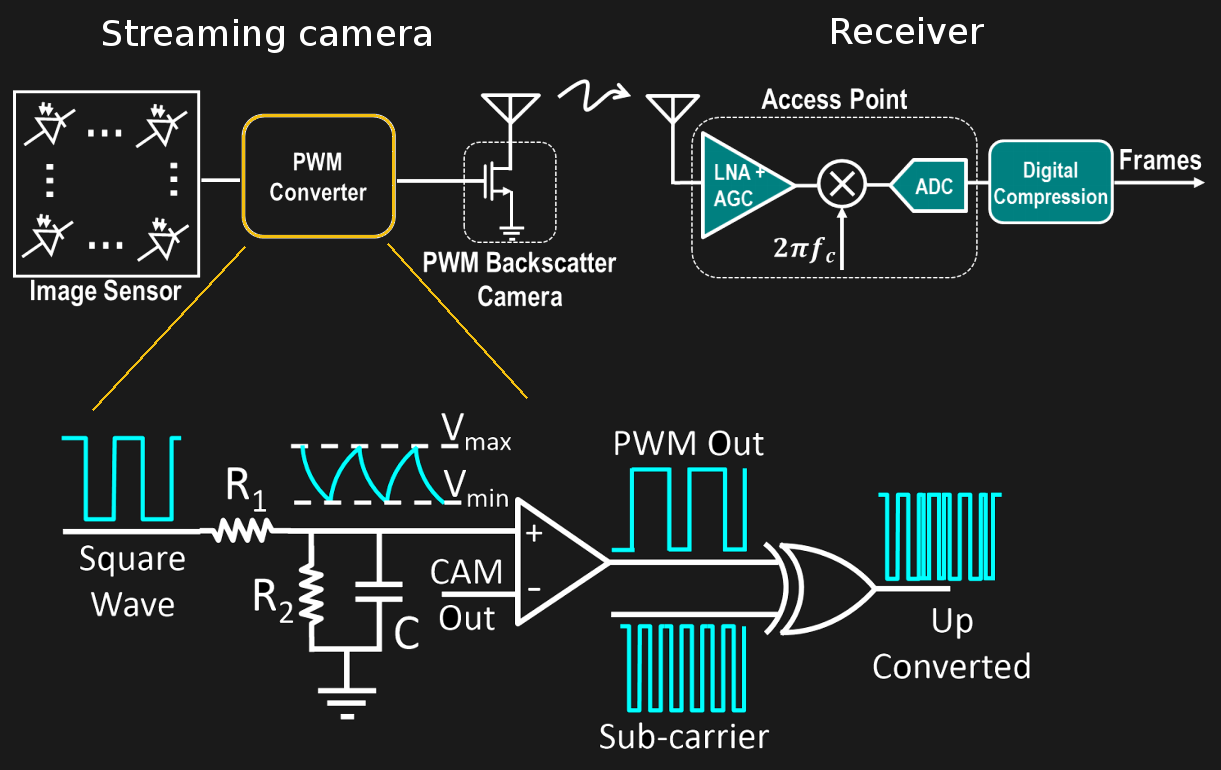
On the camera side, the pixel voltages (CAM Out) are an analog signal which is fed into a comparator along with a triangular waveform. Wherever the triangle wave’s voltage is lower than the pixel voltage, the comparator outputs a 0, otherwise, it outputs a 1. In this way, the pixel voltage is converted to different pulse widths. The triangular waveform’s minimum and maximum voltages are selected such that they cover the full possible range of the camera voltages.
The sub-carrier modulation with the XOR gate in the diagram is there to address the problem of self-interference. This is unwanted interference from the transmitter of the same frequency as the carrier. And so the PWM output is converted to a different frequency using a sub-carrier. The receiver can then filter out the interference. The XOR gate is actually part of an FPGA which also inserts frame and line synchronization patterns.
They tested two different implementations with this circuit design, a 112 x 112 grayscale one at up to 13 frames per second (fps) and an HD one. Unfortunately, no HD camera on the market gives access to the raw analog pixel outputs so they took HD video from a laptop using USB and ran that through a DAC and then into their PWM converter. The USB limited it to 10 fps.
The result is that video streaming at 720p and 10 fps uses as low as 250 μW and can be backscattered up to sixteen feet. They also simulated an ASIC which achieved 720p and 1080p at 60 fps using 321 μW and 806 μW respectively. See the video below for an animated explanation and a demonstration. The resulting video is quite impressive for passive power only.
If the University of Washington seems familiar in the context of backscatter, that’s because we’ve previously covered their battery-free (almost) cell phone. Though they’re not the only ones experimenting with it. Here’s where backscatter is being used for a soil network. All of this involves power harvesting, and now’s a great time to start brushing up on these concepts and building your own prototypes. The Hackaday Prize includes a Power Harvesting Challenge this year.
Continue reading “No-Battery HD Video Streaming Does It With Backscatter”