Improving More Leaf Design Flaws

[Daniel] was recently featured here for his work in improving the default charging mode for the Nissan Leaf electric vehicle when using the emergency/trickle charger included with the car. His work made it possible to reduce the amount of incoming power from the car, if the charging plug looked like it might not be able to handle the full 1.2 kW -3 kW that these cars draw when charging. Thanks to that work, he was able to create another upgrade for these entry-level EVs, this time addressing a major Leaf design flaw that is known as Rapidgate.

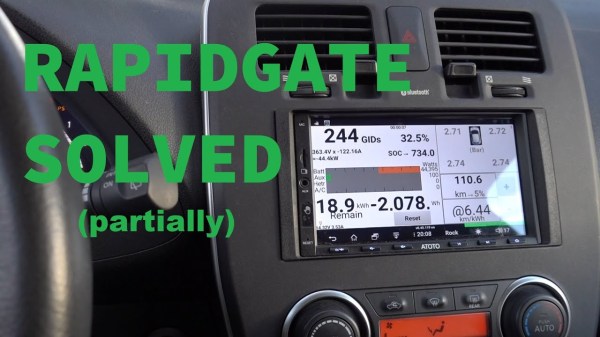
The problem that these cars have is that they still have passive thermal management for their batteries, unlike most of their competitors now. This was fine in the early ’10s when this car was one of the first all-electric cars to market, but now its design age is catching up with it. On long trips at highway speed with many rapid charges in a row the batteries can overheat easily. When this happens, the car’s charging controller will not allow the car to rapid charge any more and severely limits the charge rate even at the rapid charging stations. [Daniel] was able to tweak the charging software in order to limit the rapid charging by default, reducing it from 45 kW to 35 kW and saving a significant amount of heat during charging than is otherwise possible.

While we’d like to see Nissan actually address the design issues with their car designs while making these straighforward software changes (or at least giving Leaf owners the options that improve charging experiences) we are at least happy that there are now other electric vehicles in the market that have at least addressed the battery thermal management issues that are common with all EVs. If you do own a Leaf though, be sure to check out [Daniel]’s original project related to charging these cars.

Continue reading “Improving More Leaf Design Flaws”

Rapid Charging Supercapacitors

Battery technology is the talk of the town right now, as it’s the main bottleneck holding up progress on many facets of renewable energy. There are other technologies available for energy storage, though, and while they might seem like drop-in replacements for batteries they can have some peculiar behaviors. Supercapacitors, for example, have a completely different set of requirements for charging compared to batteries, and behave in peculiar ways compared to batteries.

This project from [sciencedude1990] shows off some of the quirks of supercapacitors by showing one method of rapidly charging one. One of the most critical differences between batteries and supercapacitors is that supercapacitors’ charge state can be easily related to voltage, and they will discharge effectively all the way to zero volts without damage. This behavior has to be accounted for in the charging circuit. The charging circuit here uses an ATtiny13A and a MP18021 half-bridge gate driver to charge the capacitor, and also is programmed in a way that allows for three steps for charging the capacitor. This helps mitigate the its peculiar behavior compared to a battery, and also allows the 450 farad capacitor to charge from 0.7V to 2.8V in about three minutes.

If you haven’t used a supercapacitor like this in place of a lithium battery, it’s definitely worth trying out in some situations. Capacitors tolerate temperature extremes better than batteries, and provided you have good DC regulation can often provide power more reliably than batteries in some situations. You can also combine supercapacitors with batteries to get the benefits of both types of energy storage devices.

LED Art Reveals Itself In Very Slow Motion

Every bit of film or video you’ve ever seen is a mind trick, an optical illusion of continuous movement based on flashing 24 to 30 slightly different images into your eyes every second. The wetware between your ears can’t deal with all that information individually, so it convinces itself that you’re seeing smooth motion.

But what if you slow down time: dial things back to one frame every 100 seconds, or every 1,000? That’s the idea behind this slow-motion LED art display called, appropriately enough, “Continuum.” It’s the work of [Louis Beaudoin] and it was inspired by the original very-slow-motion movie player and the recent update we featured. But while those players featured e-paper displays for photorealistic images, “Continuum” takes a lower-resolution approach. The display is comprised of four nine HUB75 32×32 RGB LED displays, each with a 5-mm pitch. The resulting 96×96 pixel display fits nicely within an Ikea RIBBA picture frame.

The display is driven by a Teensy 4 and [Louis]’ custom-designed SmartLED Shield that plugs directly into the HUB75s. The rear of the frame is rimmed with APA102 LED strips for an Ambilight-style effect, and the front of the display has a frosted acrylic diffuser. It’s configured to show animated GIFs at anything from 1 frame per second its original framerate to 1,000 seconds per frame times slower, the latter resulting in an image that looks static unless you revisit it sometime later. [Louis] takes full advantage of the Teensy’s processing power to smoothly transition between each pair of frames, and the whole effect is quite wonderful. The video below captures it as best it can, but we imagine this is something best seen in person.

Continue reading “LED Art Reveals Itself In Very Slow Motion”

Whimsical Solder Stand Moonlights As Toy 3D Printer

A few Lego pieces provide key functionality, like an articulated dispenser head.

Most of us have bent a length of solder into a more convenient shape and angle when soldering, and just sort of pushed the soldering iron and work piece into the hanging solder instead of breaking out a third hand. Well, [yukseltemiz] seems to have decided that a solder dispenser and a miniature 3D printer model can have a lot in common, and created a 1/5 scale Ender 3 printer model that acts as a solder stand and dispenser. The solder spool hangs where the filament roll would go, and the solder itself is dispensed through the “print head”.

It’s cute, and we do like the way that [yukseltemiz] incorporated a few Lego pieces into the build. A swivel and eyelet guides the solder off the roll and a small Lego ball and socket gives the dispenser its articulation, an important feature for bending solder to a more convenient angle for working. It makes us think that using Lego pieces right alongside more traditional hardware like M3 nuts and bolts might be an under-explored technique. You can see the unit in action in the brief assembly video, embedded below.

Continue reading “Whimsical Solder Stand Moonlights As Toy 3D Printer”

Open-Source Robotic Arm For All Purposes

A set of helping hands is a nice tool to have around the shop, especially if soldering or gluing small components is a common task. What we all really want, though, is a robotic arm. Sure, it could help us set up glue or solder but it can do virtually any other task it is assigned as well. A general-purpose tool like this might be out of reach of most of us, unless we have a 3D printer to make this open-source robotic arm at home.

The KAUDA Robotic Arm from [Giovanni Lerda] is a five-axis arm with a gripping tool and has a completely open-source set of schematics so it can be printed on any 3D printer. The robot arm uses three stepper motors and two servo motors, and is based on the Arduino MEGA 2560 for control. The electrical schematics are also open-source, so getting this one up and running is just an issue of printing, wiring, and implementing some software. To that end there are software examples available, and they can easily be modified to fit one’s robotic needs.

A project like this could be helpful for any number of other projects, or also just as a lesson in robotics for yourself or even in a classroom, since many schools now have their own 3D printers. With everything being open-source, this is a much simpler endeavor now than other projects we’ve seen that attempted to get robotic arms running again.

Continue reading “Open-Source Robotic Arm For All Purposes”

Deep-Sleep Problems Lead To Forensic Investigation Of Troublesome Chip

When you buy a chip, how can you be sure you’re getting what you paid for? After all, it’s just a black fleck of plastic with some leads sticking out of it, and a few laser-etched markings on it that attest to what lies within. All of that’s straightforward to fake, of course, and it’s pretty easy to tell if you’ve got a defective chip once you try it out in a circuit.

But what about off-brand chips? Those chips might be functionally similar, but still off-spec in some critical way. That was the case for [Kevin Darrah] which led to his forensic analysis of potentially counterfeit MCU chips. [Kevin] noticed that one of his ATMega328 projects was consuming way too much power in deep sleep mode — about two orders of magnitude too much. The first video below shows his initial investigation and characterization of the problem, including removal of the questionable chip from the dev board it was on and putting it onto a breakout board that should draw less than a microamp in deep sleep. Showing that it drew 100 μA instead sealed the deal — something was up with the chip.

[Kevin] then sent the potentially bogus chip off to a lab for a full forensic analysis, because of course there are companies that do this for a living. The second video below shows the external inspection, which revealed nothing conclusive, followed by an X-ray analysis. That revealed enough weirdness to warrant destructive testing, which showed the sorry truth — the die in the suspect unit was vastly different from the Atmel chip’s die.

It’s hard to say that this chip is a counterfeit; after all, Atmel may have some sort of contract with another foundry to produce MCUs. But it’s clearly an issue to keep in mind when buying bargain-basement chips, especially ones that test functionally almost-sorta in-spec. Caveat emptor.

Counterfeit parts are depressingly common, and are a subject we’ve touched on many times before. If you’d like to know more, start with a guide.

Continue reading “Deep-Sleep Problems Lead To Forensic Investigation Of Troublesome Chip”

Digital Expression Via Harmonica

There is a good chance you clicked on this article with a mouse, trackball, trackpad, or tapped with your finger. Our hands are how most of us interact with the digital world, but that isn’t an option for everyone, and [Shu Takahashi] wants to give them a new outlet to express themselves. Some folks who cannot use their hands will be able to use the Magpie MIDI, which acts as a keyboard, mouse, MIDI device, and eventually, a game controller. This universal Human Interface Device (HID) differs from a mouth-operated joystick because it has air pressure sensors instead of buttons. The sensors can recognize the difference between exhalation and inhalation, so the thirteen ports can be neutral, positive, or negative, which is like having twenty-six discrete buttons.

The harmonica mounts on an analog X-Y joystick to move a mouse pointer or manipulate MIDI sound like a whammy bar. [Shu] knows that a standard harmonica has ten ports, but he picked thirteen because all twenty-six letters are accessible by a puff or sip in keyboard mode. The inputs outnumber the Arduino Leonardo’s analog inputs, so there is a multiplexor to read all of them. There was not enough time to get an Arduino with enough native ports, like a Teensy, with HID support baked in. Most of the structure is 3D printed, so parts will be replaceable and maybe even customizable.

Even with two working hands, we like to exercise different hardware, but the harmonica is a nifty tool to have attached to your computer.

Continue reading “Digital Expression Via Harmonica”