Hoverbike Turns Hoverboard Into Ebike

Hoverboards were a popular trend with the youths and in-crowd a few years ago, and now that the fad has largely died out there are plenty of them sitting unused in closets and basements around the world. That only means opportunities to put the parts from these unique transportation devices into other builds. A more practical method of transportation is a bicycle, and this build scavenges most of the parts from a hoverboard to turn a regular bicycle into a zippy ebike.

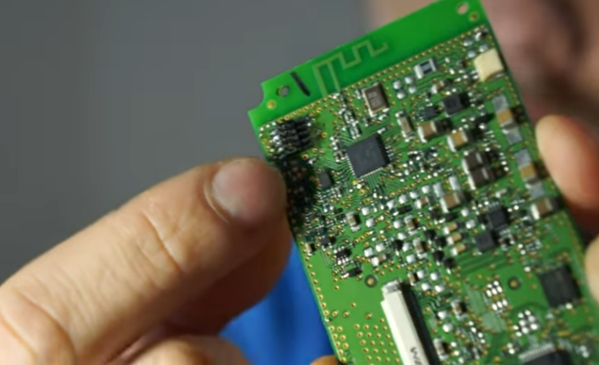
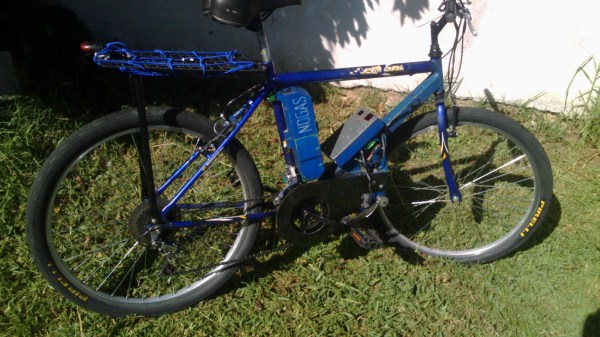
This bike build starts with a mountain bike frame and the parts from the hoverboard are added to it piece by piece. The two motors are mounted to the frame and drive the front chain ring of the bike, allowing it to still take advantage of the bike’s geared drivetrain. Battery packs from two hoverboards were combined into a single battery which give the bike a modest 6-10 km of range depending on use. But the real gem of this build is taking the gyroscopic controller board from the hoverboards and converting it, with the help of an Arduino Due, to an ebike controller.

Eventually a battery pack will be added to give the bike a more comfortable range, but for now we appreciate the ingenuity that it took to adapt the controller from the hoverboard into an ebike controller complete with throttle and pedal assist. For other household objects turned into ebikes, be sure to check out one of our favorites based on a washing machine motor: the Spin Cycle.

Processing Audio With The RP2040

The Raspberry Pi, although first intended as an inexpensive single-board computer for use in education, is now ubiquitous in electronics communities. Its low price as well as Linux platform and accessible GPIO make it useful in many places outside the classroom. But, if you want to abandon the ease-of-use in favor of an even lower price, the Raspberry Pi foundation makes that possible as well with the RP2040 chip, commonly found on the Pico. [Jason] shows us one way to make use of this powerful chip by putting one in an audio digital signal processing board.

While development boards are available for this chip, [Jason] has opted instead for a custom PCB which he designed himself and includes an integrated headphone amplifier and 3.5 mm audio jacks. To do the actual DSP work, the RP2040 chip uses three 12-bit ADC channels and 16 controllable PWM channels. The platform is also equipped with the TLV320AIC3254 codec from Texas Instruments. With all of this put together, he has a functioning open-source platform he calls the DS-Pi.

[Jason] has built this as a platform for guitar effects and as a customizable guitar amp modeler, but with a platform that is Arduino-compatible and fairly easy to program it could be put to use for anything involving other types of music or audio processing, like this specialized MIDI-compatible guitar effects platform which is built around the same processor.

Astrophotography On The Game Boy Camera

The Game Boy Camera was the first digital camera that many of us ever interacted with. At the time it was fairly groundbreaking to take pictures without film, even though the resolution was extremely low by modern standards, and it could only shoot two-bit color. It’s been long enough since its release that it’s starting to become a popular classic with all kinds of hacks and modifications, like this one which adds modern SLR camera lenses which lets it take pictures of the Moon.

The limitations of the camera make for a fairly challenging build. Settings like exposure are automatic on the Game Boy Camera and can’t be changed, and the system only allows the user to change contrast and brightness. But the small sensor size means that astrophotography can be done with a lens that is also much smaller than a photographer would need with a modern DSLR. Once a mount was 3D printed to allow the lenses to be changed and a tripod mount was built, it was time to take some pictures of the moon.

Thanks to the interchangeability of the lenses with this build, the camera can also capture macro images as well. The build went into great detail on how to set all of this up, even going as far as giving tips for how to better 3D print interlocking threads, so it’s well worth a view. And, for other Game Boy Camera builds, take a look at this one which allows the platform to send its pictures over WiFi.

Continue reading “Astrophotography On The Game Boy Camera”

Stress-Testing An Arduino’s EEPROM

Every time one of us flashes an Arduino’s internal memory, a nagging thought in the backs of our minds reminds us that, although everything in life is impermanent, nonvolatile re-writable memory is even more temporary. With a fixed number of writes until any EEPROM module fails, are we wasting writes every time we upload code with a mistake? The short answer is that most of us shouldn’t really be concerned with this unless we do what [AnotherMaker] has done and continually write data until the memory in an Arduino finally fails.

The software for this is fairly simple. He simply writes the first 256 ints with all zeros, reads them to make sure they are all there, and then repeats the process with ones. After iterating this for literally millions of times continuously over the course of about a month he was finally able to get his first read failure. Further writes past this point only accelerated the demise of the memory module. With this method he was able to get nearly three million writes before the device failed, which is far beyond the tens or hundreds of thousands typically estimated for a device of this type.

To prove this wasn’t an outlier, [AnotherMaker] repeated the test, and did a few others while writing to a much smaller amount of memory. With this he was able to push the number of cycles to over five million. Assuming the Arduino Nano clone isn’t using an amazingly high-quality EEPROM we can safely assume that most of us have nothing to worry about and our Arduinos will be functional for decades to come. Unless a bad Windows driver accidentally bricks your device.

Continue reading “Stress-Testing An Arduino’s EEPROM”

Custom Macro Keyboard With Sweet Backlighting

From the smallest 60% keyboards for those with no desk space to keyboards with number pads for those doing data entry all day, there’s a keyboard size and shape for just about everyone. The only problem, even with the largest keyboards, is that they’re still fairly limited in what they can do. If you find yourself wishing for even more functionality, you might want to build something like this custom macro keyboard with built-in LED backlighting.

Rather than go with a standard mechanical keyboard switch like a Cherry MX, this build is based around TS26-2 pushbuttons with built-in LED lighting. [atkaper] only really needed one button for managing the mute button on MS Teams, but still built a total of eight switches into this keyboard which can all be individually programmed with different functions. The controller is an Arduino Leonardo and the enclosure was 3D printed.

Paired with the classic IBM Model M keyboard, this new macro keyboard adds plenty of functionality while also having control over LED backlighting. Macro keyboards are incredibly useful, especially with their ability to easily change function with control over the software that runs on them. The key to most builds is the 32U4 chip found in some Atmel microcontrollers which allows it to easily pass keyboard (and mouse) functionality to any computer its plugged in to.

Flashing TI Chips With An ESP

Texas Instruments is best known to the general public for building obsolete calculators and selling them at extraordinary prices to students, but they also build some interesting (and reasonably-priced) microcontrollers as well. While not as ubiquitous as Atmel and the Arduino platform, they can still be found in plenty of consumer electronics and reprogrammed, and [Aaron] aka [atc1441] demonstrates how to modify them with an ESP32 as an intermediary.

Specifically, the TI chips in this build revolve around the 8051-coreĀ  microcontrollers, which [Aaron] has found in small e-paper price tags and other RF hardware. He’s using an ESP32 to reprogram the TI chips, and leveraging a web server on the ESP in order to be able to re-flash them over WiFi. Some of the e-paper displays have built-in header pins which makes connecting them to the ESP fairly easy, and once that’s out of the way [Aaron] also provides an entire software library for interacting with these microcontrollers through the browser interface.

Right now the project supports the CC2430, CC2510 and CC1110 variants, but [Aaron] plans to add support for more in the future. It’s a fairly comprehensive build, and much better than buying the proprietary TI programmer, so if you have some of these e-paper displays laying around the barrier to entry has been dramatically lowered. If you don’t have this specific type of display laying around, we’ve seen similar teardowns and repurposing of other e-paper devices in the past as well.

Continue reading “Flashing TI Chips With An ESP”

Using Statistics Instead Of Sensors

Statistics often gets a bad rap in mathematics circles for being less than concrete at best, and being downright misleading at worst. While these sentiments might ring true for things like political polling, it hides the fact that statistical methods can be put to good use in engineering systems with fantastic results. [Mark Smith], for example, has been working on an espresso machine which can make the perfect shot of coffee, and turned to one of the tools in the statistics toolbox in order to solve a problem rather than adding another sensor to his complex coffee-brewing machine.

To make espresso, steam is generated which is then forced through finely ground coffee. [Mark] found that his espresso machine was often pouring too much or too little coffee, and in order to improve his machine’s accuracy in this area he turned to the linear regression parameter R2, also known as the coefficient of determination. By using a machine learning algorithm tuned to this value, which assesses predictable variation in a data set, a computer can more easily tell when the coffee begins pouring out of the portafilter and into the espresso cup based on the pressure and water flow in the machine itself rather than using some other input such as the weight of the cup.

We have seen in the past how seriously [Mark] takes his coffee-making, and this is another step in a series of improvements he has made to his equipment. In this iteration, he has additionally produced a simulation in JupyterLab to better assist him in modeling the system and making even more accurate predictions. It’s quite a bit more effort than adding sensors, but since his espresso machine already included quite a bit of computing power it’s not too big a leap for him to make.